Producten

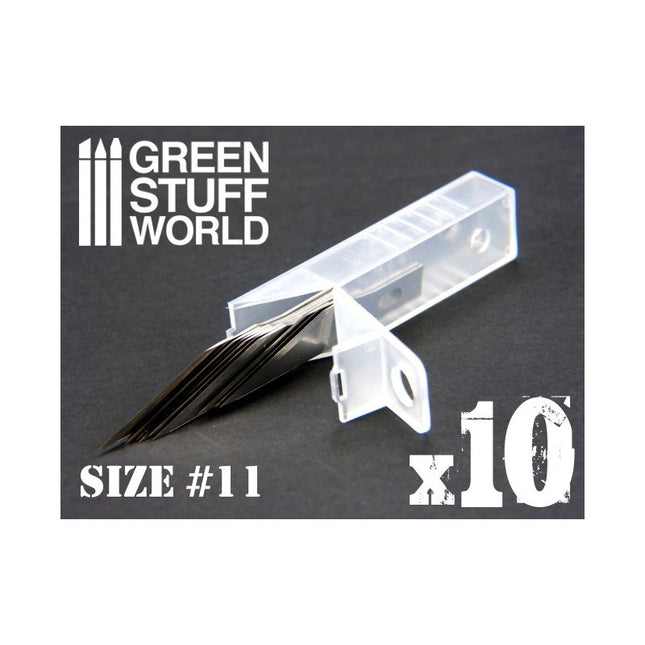
GreenStuffWorld 10 hobby mesjes
navulling hobby 10 mesjes (hoort bij hobby mes) Navulling van 10 stuks puntige bladen (2.5cm lengte) maat #11, in een hard plastic opbergetui 10x Hobby Knife Blade Refill This pack includes 10 razor pointed scalpel blades (2.5cm lenght), size #11, in a plastic safety container. #hobby #knife #greenstuffworld
€2,90
-
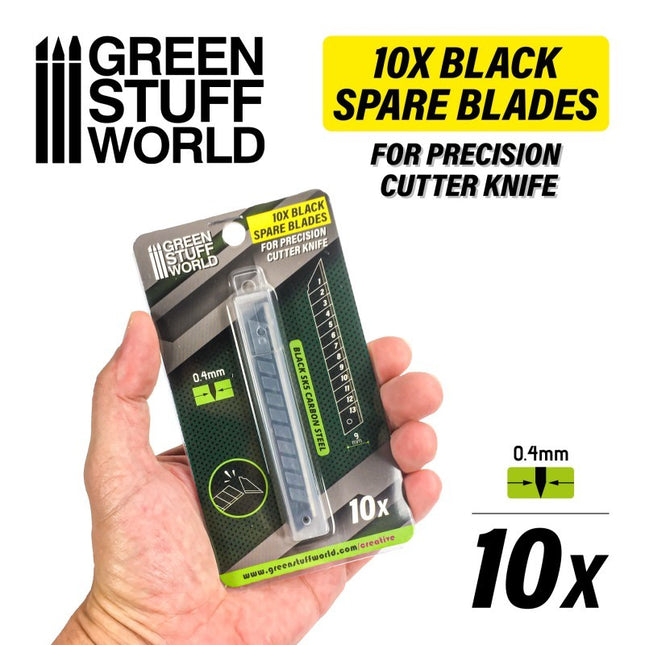
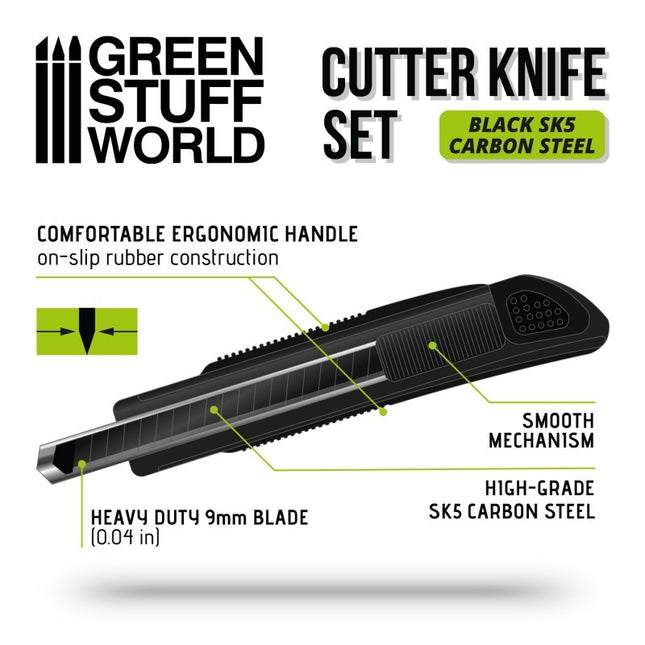
GreenStuffWorld 10x Black spare blades 9mm
10x Black spare blades 9mm BLACK high-grade SK5 carbon steel blades for deep and precise cutting and maximum control. CONTAINS: 10x blade refills HEAVY-DUTY 9mm BLADE (0.04 in) #hobby #mes #heavy #duty #greenstuffworld #knife #refill #spare #blades
€4,75
-
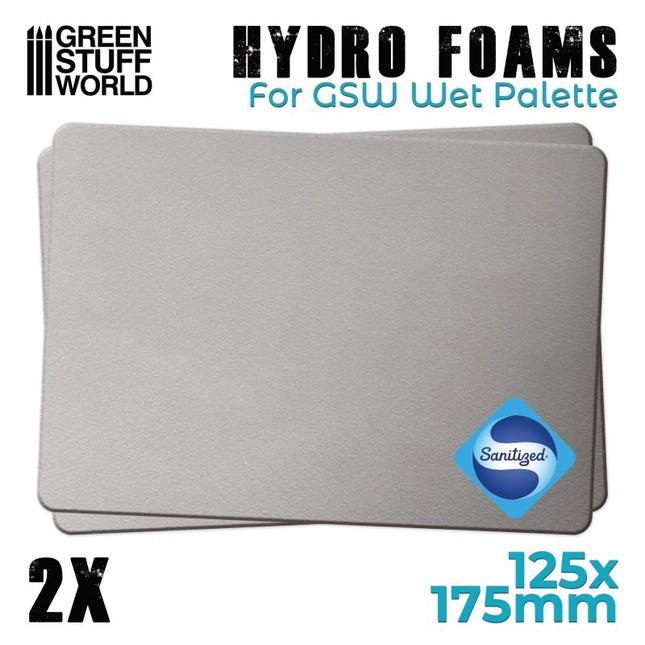
GreenStuffWorld 2 foam sponzen voor wet palette
Foam spons is een dikke hydrofil foam om vocht langer vast te houden en zorgt ervoor dat het papier vochtig blijft. Deze foam sponzen zijn behandeld tegen schimmelvorming. Maat 125x175mm.Laat deze sponzen bij het eerste gebruik goed vocht opnemen! Deze sponzen passen zowel in de GreenStuffWorld wet palette als de Red Grass gamer. Zonder hydro papier kun je deze foam pads NIET gebruiken! Hydro Foams High performance hydrofoam pads for GSW's Wet Palette. High thickness hydrophilic foam for increased fluid retention, whilst preventing wrinkles when drying out. Treated by Sanitized® to prevent mould and impurities, ensuring their longevity and capability to be reused. Size:125x175mm #foam #pads #wetpalette #greenstuffworld
€2,50
-
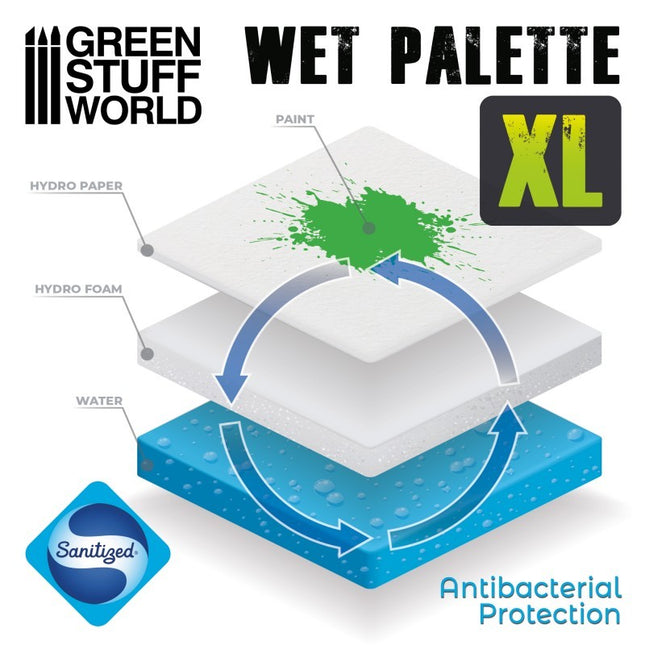
GreenStuffWorld 2 foam sponzen XL voor wet palette XL
Foam spons XL is een dikke hydrofil foam om vocht langer vast te houden en zorgt ervoor dat het papier vochtig blijft. Deze foam sponzen zijn behandeld tegen schimmelvorming. Maat 175x265mm.Laat deze sponzen bij het eerste gebruik goed vocht opnemen! Deze sponzen passen in de GreenStuffWorld wet palette XL Zonder hydro papier XL kun je deze foam pads NIET gebruiken! Hydro Foams XL High performance hydrofoam pads for GSW's Wet Palette XL. High thickness hydrophilic foam for increased fluid retention, whilst preventing wrinkles when drying out. Treated by Sanitized® to prevent mould and impurities, ensuring their longevity and capability to be reused. Size:175x265mm #foam #pads #wetpalette #greenstuffworld #xl
€4,75
-
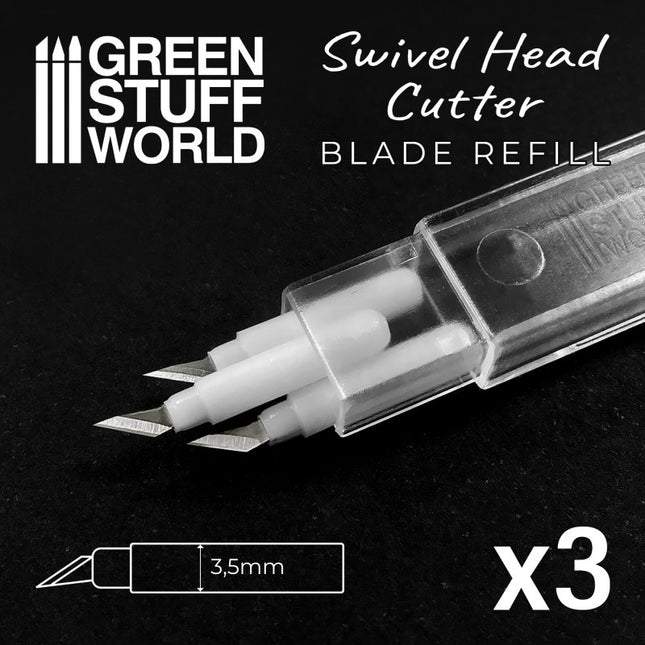
GreenStuffWorld 3 navul roterend kop hobby mesjes
navulling hobby 3 mesjes (hoort bij swifel head hobby mes) Navulling van 3 stuks puntige bladen (3.5cm lengte) , in een hard plastic opbergetui 3x Hobby Knife Blade Refill This pack includes 3x razor pointed scalpel blades (3.5mm), in a plastic safety container. The set comes with a protective case for storing the blades. #hobby #swifel #head #refill #knife #greenstuffworld
€3,75
-
Warhammer 40.000 40K Magic Mug
Met koude dranken is de achtergrond donker, met een warme inhoud verandert de achtergrond (rondom) in een warhammer scenery. Super gaaf en normaal alleen verkrijgbaar in de UK. Het is een grote mok (15cm hoog en 10cm diameter). NIET geschikt voor de magnetron of afwasmachine (wordt te warm en dan gaat de thermo kwaliteit van de weergave hard achteruit). Breekbaar (keramiek). Kleuren donkerblauwe tinten met overgang in zeer donkerblauw. Space marine en Chaos marine als figuren. #magic #mug #space #marine #chaos #heat #changing
€15,00
-

GreenStuffWorld Acrylic Brick molds - H Shaped
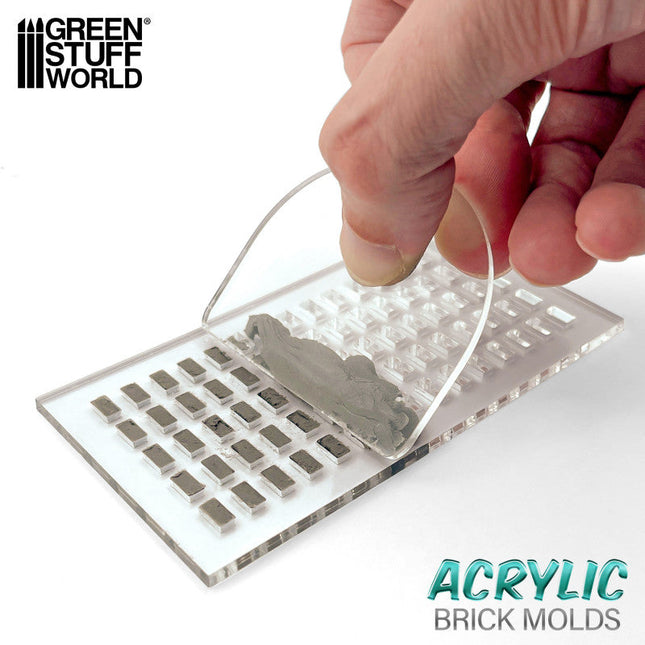
Elevate your dioramas to an unparalleled level of realism with our acrylic molds for modeling regular bricks. These accessories will allow you to create an infinite number of them with precision and consistency, adding authenticity and depth to your creations. They are specifically designed to create miniature regular bricks for use in scale modeling projects. Each model features a variety of patterns and textures that replicate real ones and that modelers will use to shape the air-drying clay. Our acrylic modeling molds are perfectly complemented by air-drying pastes such as modeling clay, foam clay, and similar products. These options guarantee a faithful and detailed reproduction for your diorama. Instructions for use: Using acrylic brick molds is a straightforward process, but it requires some care to ensure you get the best results. Here's a step-by-step guide on how to use these molds: Prepare the mold: Ensure that your acrylic brick mold is clean and dry. Make sure it's free of any debris or dust. Cover one side of the mold to hold the pieces. You can do this process with baking paper, wet oven paper, mylar plastic, or even airbrush masking tape. Place the mold on a flat surface: Find a flat and stable surface where you can work comfortably. Place the mold with the paper side down to prevent sticking. Add air-drying clay: Take a ball of air-drying clay and place it on the mold. Use your fingers to gently press and work the clay into the cavities of the mold. Make sure you fill each brick cavity completely. You may need to adjust the amount of clay to achieve your desired brick size and thickness. Level the surface: Use the included plastic spatula or the edge of another mold to drag/scrape across the surface of the mold, skimming off any excess clay. This will ensure that the surface is even and smooth. Let it dry: Allow the clay to dry completely. The air-drying paste has a small degree of shrinkage as it dries, which will help the pieces release from the mold. Remove the paper: Once the clay is completely dry, carefully peel off the paper tape from the back of the mold. This will help release the hobby bricks. Remove the pieces: Use a blunt stick (like the reverse end of a brush) to gently push out the individual bricks from the mold. Be careful not to apply too much pressure, as you don't want to damage the delicate acrylic mold. Smooth the edges: To give your bricks a more realistic look and get rid of any sharp edges, gently rub small amounts of them together between the palms of your hands. This will soften the edges and make the bricks look more like real bricks. Use the bricks: You can now use the air-dried clay bricks for your crafting or construction project. We recommend gluing the pieces with PVA glue or an acrylic sealer such as decoupe product (like ModPodge) to secure the pieces. Remember to handle the acrylic mold with care, as it's not as flexible as rubber or silicon molds and can break if bent. With our methacrylate molds, your dioramas will come to life with authentic and captivating details - unleash your creativity and build sets that tell stories of their own! Take your projects to the next level of excellence with this essential accessory for lovers of high-quality dioramas. Quantity: 2x pack Scale: 1:35 (1:48-1:32) The thickness of the pieces: 3 mm Brick size: 2.85 x 5.7 mm Mould size: 6 x 11 cm
€9,25
-

GreenStuffWorld Acrylic Brick molds - Hexagonal Pavement
Elevate your dioramas to an unparalleled level of realism with our acrylic molds for modeling regular bricks. These accessories will allow you to create an infinite number of them with precision and consistency, adding authenticity and depth to your creations. They are specifically designed to create miniature regular bricks for use in scale modeling projects. Each model features a variety of patterns and textures that replicate real ones and that modelers will use to shape the air-drying clay. Our acrylic modeling molds are perfectly complemented by air-drying pastes such as modeling clay, foam clay, and similar products. These options guarantee a faithful and detailed reproduction for your diorama. Instructions for use: Using acrylic brick molds is a straightforward process, but it requires some care to ensure you get the best results. Here's a step-by-step guide on how to use these molds: Prepare the mold: Ensure that your acrylic brick mold is clean and dry. Make sure it's free of any debris or dust. Cover one side of the mold to hold the pieces. You can do this process with baking paper, wet oven paper, mylar plastic, or even airbrush masking tape. Place the mold on a flat surface: Find a flat and stable surface where you can work comfortably. Place the mold with the paper side down to prevent sticking. Add air-drying clay: Take a ball of air-drying clay and place it on the mold. Use your fingers to gently press and work the clay into the cavities of the mold. Make sure you fill each brick cavity completely. You may need to adjust the amount of clay to achieve your desired brick size and thickness. Level the surface: Use the included plastic spatula or the edge of another mold to drag/scrape across the surface of the mold, skimming off any excess clay. This will ensure that the surface is even and smooth. Let it dry: Allow the clay to dry completely. The air-drying paste has a small degree of shrinkage as it dries, which will help the pieces release from the mold. Remove the paper: Once the clay is completely dry, carefully peel off the paper tape from the back of the mold. This will help release the hobby bricks. Remove the pieces: Use a blunt stick (like the reverse end of a brush) to gently push out the individual bricks from the mold. Be careful not to apply too much pressure, as you don't want to damage the delicate acrylic mold. Smooth the edges: To give your bricks a more realistic look and get rid of any sharp edges, gently rub small amounts of them together between the palms of your hands. This will soften the edges and make the bricks look more like real bricks. Use the bricks: You can now use the air-dried clay bricks for your crafting or construction project. We recommend gluing the pieces with PVA glue or an acrylic sealer such as decoupe product (like ModPodge) to secure the pieces. Remember to handle the acrylic mold with care, as it's not as flexible as rubber or silicon molds and can break if bent. With our methacrylate molds, your dioramas will come to life with authentic and captivating details - unleash your creativity and build sets that tell stories of their own! Take your projects to the next level of excellence with this essential accessory for lovers of high-quality dioramas. Quantity: 2x pack Scale: 1:35 (1:48-1:32) The thickness of the pieces: 3 mm Brick size: 2.85 x 5.7 mm Mould size: 6 x 11 cm
€9,25
-
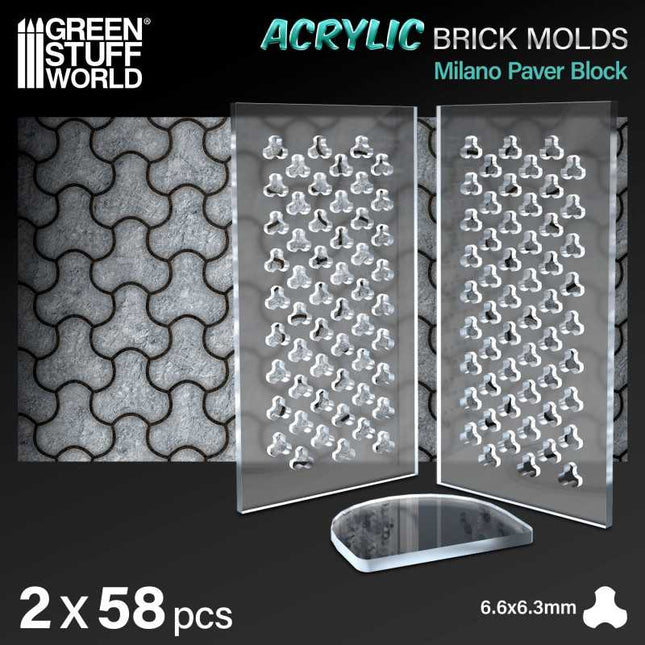
GreenStuffWorld Acrylic Brick molds - Milano Paver Block
Elevate your dioramas to an unparalleled level of realism with our acrylic molds for modeling regular bricks. These accessories will allow you to create an infinite number of them with precision and consistency, adding authenticity and depth to your creations. They are specifically designed to create miniature regular bricks for use in scale modeling projects. Each model features a variety of patterns and textures that replicate real ones and that modelers will use to shape the air-drying clay. Our acrylic modeling molds are perfectly complemented by air-drying pastes such as modeling clay, foam clay, and similar products. These options guarantee a faithful and detailed reproduction for your diorama. Instructions for use: Using acrylic brick molds is a straightforward process, but it requires some care to ensure you get the best results. Here's a step-by-step guide on how to use these molds: Prepare the mold: Ensure that your acrylic brick mold is clean and dry. Make sure it's free of any debris or dust. Cover one side of the mold to hold the pieces. You can do this process with baking paper, wet oven paper, mylar plastic, or even airbrush masking tape. Place the mold on a flat surface: Find a flat and stable surface where you can work comfortably. Place the mold with the paper side down to prevent sticking. Add air-drying clay: Take a ball of air-drying clay and place it on the mold. Use your fingers to gently press and work the clay into the cavities of the mold. Make sure you fill each brick cavity completely. You may need to adjust the amount of clay to achieve your desired brick size and thickness. Level the surface: Use the included plastic spatula or the edge of another mold to drag/scrape across the surface of the mold, skimming off any excess clay. This will ensure that the surface is even and smooth. Let it dry: Allow the clay to dry completely. The air-drying paste has a small degree of shrinkage as it dries, which will help the pieces release from the mold. Remove the paper: Once the clay is completely dry, carefully peel off the paper tape from the back of the mold. This will help release the hobby bricks. Remove the pieces: Use a blunt stick (like the reverse end of a brush) to gently push out the individual bricks from the mold. Be careful not to apply too much pressure, as you don't want to damage the delicate acrylic mold. Smooth the edges: To give your bricks a more realistic look and get rid of any sharp edges, gently rub small amounts of them together between the palms of your hands. This will soften the edges and make the bricks look more like real bricks. Use the bricks: You can now use the air-dried clay bricks for your crafting or construction project. We recommend gluing the pieces with PVA glue or an acrylic sealer such as decoupe product (like ModPodge) to secure the pieces. Remember to handle the acrylic mold with care, as it's not as flexible as rubber or silicon molds and can break if bent. With our methacrylate molds, your dioramas will come to life with authentic and captivating details - unleash your creativity and build sets that tell stories of their own! Take your projects to the next level of excellence with this essential accessory for lovers of high-quality dioramas. Quantity: 2x pack Scale: 1:35 (1:48-1:32) The thickness of the pieces: 3 mm Brick size: 2.85 x 5.7 mm Mould size: 6 x 11 cm
€9,25
-

GreenStuffWorld Acrylic Brick molds - Octagon Paving Brick
Elevate your dioramas to an unparalleled level of realism with our acrylic molds for modeling regular bricks. These accessories will allow you to create an infinite number of them with precision and consistency, adding authenticity and depth to your creations. They are specifically designed to create miniature regular bricks for use in scale modeling projects. Each model features a variety of patterns and textures that replicate real ones and that modelers will use to shape the air-drying clay. Our acrylic modeling molds are perfectly complemented by air-drying pastes such as modeling clay, foam clay, and similar products. These options guarantee a faithful and detailed reproduction for your diorama. Instructions for use: Using acrylic brick molds is a straightforward process, but it requires some care to ensure you get the best results. Here's a step-by-step guide on how to use these molds: Prepare the mold: Ensure that your acrylic brick mold is clean and dry. Make sure it's free of any debris or dust. Cover one side of the mold to hold the pieces. You can do this process with baking paper, wet oven paper, mylar plastic, or even airbrush masking tape. Place the mold on a flat surface: Find a flat and stable surface where you can work comfortably. Place the mold with the paper side down to prevent sticking. Add air-drying clay: Take a ball of air-drying clay and place it on the mold. Use your fingers to gently press and work the clay into the cavities of the mold. Make sure you fill each brick cavity completely. You may need to adjust the amount of clay to achieve your desired brick size and thickness. Level the surface: Use the included plastic spatula or the edge of another mold to drag/scrape across the surface of the mold, skimming off any excess clay. This will ensure that the surface is even and smooth. Let it dry: Allow the clay to dry completely. The air-drying paste has a small degree of shrinkage as it dries, which will help the pieces release from the mold. Remove the paper: Once the clay is completely dry, carefully peel off the paper tape from the back of the mold. This will help release the hobby bricks. Remove the pieces: Use a blunt stick (like the reverse end of a brush) to gently push out the individual bricks from the mold. Be careful not to apply too much pressure, as you don't want to damage the delicate acrylic mold. Smooth the edges: To give your bricks a more realistic look and get rid of any sharp edges, gently rub small amounts of them together between the palms of your hands. This will soften the edges and make the bricks look more like real bricks. Use the bricks: You can now use the air-dried clay bricks for your crafting or construction project. We recommend gluing the pieces with PVA glue or an acrylic sealer such as decoupe product (like ModPodge) to secure the pieces. Remember to handle the acrylic mold with care, as it's not as flexible as rubber or silicon molds and can break if bent. With our methacrylate molds, your dioramas will come to life with authentic and captivating details - unleash your creativity and build sets that tell stories of their own! Take your projects to the next level of excellence with this essential accessory for lovers of high-quality dioramas. Quantity: 2x pack Scale: 1:35 (1:48-1:32) The thickness of the pieces: 3 mm Brick size: 2.85 x 5.7 mm Mould size: 6 x 11 cm
€9,25
-

GreenStuffWorld Acrylic Brick molds - Old Town bricks
Elevate your dioramas to an unparalleled level of realism with our acrylic molds for modeling regular bricks. These accessories will allow you to create an infinite number of them with precision and consistency, adding authenticity and depth to your creations. They are specifically designed to create miniature regular bricks for use in scale modeling projects. Each model features a variety of patterns and textures that replicate real ones and that modelers will use to shape the air-drying clay. Our acrylic modeling molds are perfectly complemented by air-drying pastes such as modeling clay, foam clay, and similar products. These options guarantee a faithful and detailed reproduction for your diorama. Instructions for use: Using acrylic brick molds is a straightforward process, but it requires some care to ensure you get the best results. Here's a step-by-step guide on how to use these molds: Prepare the mold: Ensure that your acrylic brick mold is clean and dry. Make sure it's free of any debris or dust. Cover one side of the mold to hold the pieces. You can do this process with baking paper, wet oven paper, mylar plastic, or even airbrush masking tape. Place the mold on a flat surface: Find a flat and stable surface where you can work comfortably. Place the mold with the paper side down to prevent sticking. Add air-drying clay: Take a ball of air-drying clay and place it on the mold. Use your fingers to gently press and work the clay into the cavities of the mold. Make sure you fill each brick cavity completely. You may need to adjust the amount of clay to achieve your desired brick size and thickness. Level the surface: Use the included plastic spatula or the edge of another mold to drag/scrape across the surface of the mold, skimming off any excess clay. This will ensure that the surface is even and smooth. Let it dry: Allow the clay to dry completely. The air-drying paste has a small degree of shrinkage as it dries, which will help the pieces release from the mold. Remove the paper: Once the clay is completely dry, carefully peel off the paper tape from the back of the mold. This will help release the hobby bricks. Remove the pieces: Use a blunt stick (like the reverse end of a brush) to gently push out the individual bricks from the mold. Be careful not to apply too much pressure, as you don't want to damage the delicate acrylic mold. Smooth the edges: To give your bricks a more realistic look and get rid of any sharp edges, gently rub small amounts of them together between the palms of your hands. This will soften the edges and make the bricks look more like real bricks. Use the bricks: You can now use the air-dried clay bricks for your crafting or construction project. We recommend gluing the pieces with PVA glue or an acrylic sealer such as decoupe product (like ModPodge) to secure the pieces. Remember to handle the acrylic mold with care, as it's not as flexible as rubber or silicon molds and can break if bent. With our methacrylate molds, your dioramas will come to life with authentic and captivating details - unleash your creativity and build sets that tell stories of their own! Take your projects to the next level of excellence with this essential accessory for lovers of high-quality dioramas. Quantity: 2x pack Scale: 1:35 (1:48-1:32) The thickness of the pieces: 3 mm Brick size: 2.85 x 5.7 mm Mould size: 6 x 11 cm
€9,25
-

GreenStuffWorld Acrylic Brick molds - Regular bricks
Elevate your dioramas to an unparalleled level of realism with our acrylic molds for modeling regular bricks. These accessories will allow you to create an infinite number of them with precision and consistency, adding authenticity and depth to your creations. They are specifically designed to create miniature regular bricks for use in scale modeling projects. Each model features a variety of patterns and textures that replicate real ones and that modelers will use to shape the air-drying clay. Our acrylic modeling molds are perfectly complemented by air-drying pastes such as modeling clay, foam clay, and similar products. These options guarantee a faithful and detailed reproduction for your diorama. Instructions for use: Using acrylic brick molds is a straightforward process, but it requires some care to ensure you get the best results. Here's a step-by-step guide on how to use these molds: Prepare the mold: Ensure that your acrylic brick mold is clean and dry. Make sure it's free of any debris or dust. Cover one side of the mold to hold the pieces. You can do this process with baking paper, wet oven paper, mylar plastic, or even airbrush masking tape. Place the mold on a flat surface: Find a flat and stable surface where you can work comfortably. Place the mold with the paper side down to prevent sticking. Add air-drying clay: Take a ball of air-drying clay and place it on the mold. Use your fingers to gently press and work the clay into the cavities of the mold. Make sure you fill each brick cavity completely. You may need to adjust the amount of clay to achieve your desired brick size and thickness. Level the surface: Use the included plastic spatula or the edge of another mold to drag/scrape across the surface of the mold, skimming off any excess clay. This will ensure that the surface is even and smooth. Let it dry: Allow the clay to dry completely. The air-drying paste has a small degree of shrinkage as it dries, which will help the pieces release from the mold. Remove the paper: Once the clay is completely dry, carefully peel off the paper tape from the back of the mold. This will help release the hobby bricks. Remove the pieces: Use a blunt stick (like the reverse end of a brush) to gently push out the individual bricks from the mold. Be careful not to apply too much pressure, as you don't want to damage the delicate acrylic mold. Smooth the edges: To give your bricks a more realistic look and get rid of any sharp edges, gently rub small amounts of them together between the palms of your hands. This will soften the edges and make the bricks look more like real bricks. Use the bricks: You can now use the air-dried clay bricks for your crafting or construction project. We recommend gluing the pieces with PVA glue or an acrylic sealer such as decoupe product (like ModPodge) to secure the pieces. Remember to handle the acrylic mold with care, as it's not as flexible as rubber or silicon molds and can break if bent. With our methacrylate molds, your dioramas will come to life with authentic and captivating details - unleash your creativity and build sets that tell stories of their own! Take your projects to the next level of excellence with this essential accessory for lovers of high-quality dioramas. Quantity: 2x pack Scale: 1:35 (1:48-1:32) The thickness of the pieces: 3 mm Brick size: 2.85 x 5.7 mm Mould size: 6 x 11 cm
€9,25
-
GreenStuffWorld Acrylic Brick molds - Round Dumble paver
Elevate your dioramas to an unparalleled level of realism with our acrylic molds for modeling regular bricks. These accessories will allow you to create an infinite number of them with precision and consistency, adding authenticity and depth to your creations. They are specifically designed to create miniature regular bricks for use in scale modeling projects. Each model features a variety of patterns and textures that replicate real ones and that modelers will use to shape the air-drying clay. Our acrylic modeling molds are perfectly complemented by air-drying pastes such as modeling clay, foam clay, and similar products. These options guarantee a faithful and detailed reproduction for your diorama. Instructions for use: Using acrylic brick molds is a straightforward process, but it requires some care to ensure you get the best results. Here's a step-by-step guide on how to use these molds: Prepare the mold: Ensure that your acrylic brick mold is clean and dry. Make sure it's free of any debris or dust. Cover one side of the mold to hold the pieces. You can do this process with baking paper, wet oven paper, mylar plastic, or even airbrush masking tape. Place the mold on a flat surface: Find a flat and stable surface where you can work comfortably. Place the mold with the paper side down to prevent sticking. Add air-drying clay: Take a ball of air-drying clay and place it on the mold. Use your fingers to gently press and work the clay into the cavities of the mold. Make sure you fill each brick cavity completely. You may need to adjust the amount of clay to achieve your desired brick size and thickness. Level the surface: Use the included plastic spatula or the edge of another mold to drag/scrape across the surface of the mold, skimming off any excess clay. This will ensure that the surface is even and smooth. Let it dry: Allow the clay to dry completely. The air-drying paste has a small degree of shrinkage as it dries, which will help the pieces release from the mold. Remove the paper: Once the clay is completely dry, carefully peel off the paper tape from the back of the mold. This will help release the hobby bricks. Remove the pieces: Use a blunt stick (like the reverse end of a brush) to gently push out the individual bricks from the mold. Be careful not to apply too much pressure, as you don't want to damage the delicate acrylic mold. Smooth the edges: To give your bricks a more realistic look and get rid of any sharp edges, gently rub small amounts of them together between the palms of your hands. This will soften the edges and make the bricks look more like real bricks. Use the bricks: You can now use the air-dried clay bricks for your crafting or construction project. We recommend gluing the pieces with PVA glue or an acrylic sealer such as decoupe product (like ModPodge) to secure the pieces. Remember to handle the acrylic mold with care, as it's not as flexible as rubber or silicon molds and can break if bent. With our methacrylate molds, your dioramas will come to life with authentic and captivating details - unleash your creativity and build sets that tell stories of their own! Take your projects to the next level of excellence with this essential accessory for lovers of high-quality dioramas. Quantity: 2x pack Scale: 1:35 (1:48-1:32) The thickness of the pieces: 3 mm Brick size: 2.85 x 5.7 mm Mould size: 6 x 11 cm
€9,25
-

GreenStuffWorld Acrylic Brick molds - Trihex Pavement
Elevate your dioramas to an unparalleled level of realism with our acrylic molds for modeling regular bricks. These accessories will allow you to create an infinite number of them with precision and consistency, adding authenticity and depth to your creations. They are specifically designed to create miniature regular bricks for use in scale modeling projects. Each model features a variety of patterns and textures that replicate real ones and that modelers will use to shape the air-drying clay. Our acrylic modeling molds are perfectly complemented by air-drying pastes such as modeling clay, foam clay, and similar products. These options guarantee a faithful and detailed reproduction for your diorama. Instructions for use: Using acrylic brick molds is a straightforward process, but it requires some care to ensure you get the best results. Here's a step-by-step guide on how to use these molds: Prepare the mold: Ensure that your acrylic brick mold is clean and dry. Make sure it's free of any debris or dust. Cover one side of the mold to hold the pieces. You can do this process with baking paper, wet oven paper, mylar plastic, or even airbrush masking tape. Place the mold on a flat surface: Find a flat and stable surface where you can work comfortably. Place the mold with the paper side down to prevent sticking. Add air-drying clay: Take a ball of air-drying clay and place it on the mold. Use your fingers to gently press and work the clay into the cavities of the mold. Make sure you fill each brick cavity completely. You may need to adjust the amount of clay to achieve your desired brick size and thickness. Level the surface: Use the included plastic spatula or the edge of another mold to drag/scrape across the surface of the mold, skimming off any excess clay. This will ensure that the surface is even and smooth. Let it dry: Allow the clay to dry completely. The air-drying paste has a small degree of shrinkage as it dries, which will help the pieces release from the mold. Remove the paper: Once the clay is completely dry, carefully peel off the paper tape from the back of the mold. This will help release the hobby bricks. Remove the pieces: Use a blunt stick (like the reverse end of a brush) to gently push out the individual bricks from the mold. Be careful not to apply too much pressure, as you don't want to damage the delicate acrylic mold. Smooth the edges: To give your bricks a more realistic look and get rid of any sharp edges, gently rub small amounts of them together between the palms of your hands. This will soften the edges and make the bricks look more like real bricks. Use the bricks: You can now use the air-dried clay bricks for your crafting or construction project. We recommend gluing the pieces with PVA glue or an acrylic sealer such as decoupe product (like ModPodge) to secure the pieces. Remember to handle the acrylic mold with care, as it's not as flexible as rubber or silicon molds and can break if bent. With our methacrylate molds, your dioramas will come to life with authentic and captivating details - unleash your creativity and build sets that tell stories of their own! Take your projects to the next level of excellence with this essential accessory for lovers of high-quality dioramas. Quantity: 2x pack Scale: 1:35 (1:48-1:32) The thickness of the pieces: 3 mm Brick size: 2.85 x 5.7 mm Mould size: 6 x 11 cm
€9,25
-

GreenStuffWorld Acrylic Brick molds - Zig Zag Pavement (or Backbone)
Elevate your dioramas to an unparalleled level of realism with our acrylic molds for modeling regular bricks. These accessories will allow you to create an infinite number of them with precision and consistency, adding authenticity and depth to your creations. They are specifically designed to create miniature regular bricks for use in scale modeling projects. Each model features a variety of patterns and textures that replicate real ones and that modelers will use to shape the air-drying clay. Our acrylic modeling molds are perfectly complemented by air-drying pastes such as modeling clay, foam clay, and similar products. These options guarantee a faithful and detailed reproduction for your diorama. Instructions for use: Using acrylic brick molds is a straightforward process, but it requires some care to ensure you get the best results. Here's a step-by-step guide on how to use these molds: Prepare the mold: Ensure that your acrylic brick mold is clean and dry. Make sure it's free of any debris or dust. Cover one side of the mold to hold the pieces. You can do this process with baking paper, wet oven paper, mylar plastic, or even airbrush masking tape. Place the mold on a flat surface: Find a flat and stable surface where you can work comfortably. Place the mold with the paper side down to prevent sticking. Add air-drying clay: Take a ball of air-drying clay and place it on the mold. Use your fingers to gently press and work the clay into the cavities of the mold. Make sure you fill each brick cavity completely. You may need to adjust the amount of clay to achieve your desired brick size and thickness. Level the surface: Use the included plastic spatula or the edge of another mold to drag/scrape across the surface of the mold, skimming off any excess clay. This will ensure that the surface is even and smooth. Let it dry: Allow the clay to dry completely. The air-drying paste has a small degree of shrinkage as it dries, which will help the pieces release from the mold. Remove the paper: Once the clay is completely dry, carefully peel off the paper tape from the back of the mold. This will help release the hobby bricks. Remove the pieces: Use a blunt stick (like the reverse end of a brush) to gently push out the individual bricks from the mold. Be careful not to apply too much pressure, as you don't want to damage the delicate acrylic mold. Smooth the edges: To give your bricks a more realistic look and get rid of any sharp edges, gently rub small amounts of them together between the palms of your hands. This will soften the edges and make the bricks look more like real bricks. Use the bricks: You can now use the air-dried clay bricks for your crafting or construction project. We recommend gluing the pieces with PVA glue or an acrylic sealer such as decoupe product (like ModPodge) to secure the pieces. Remember to handle the acrylic mold with care, as it's not as flexible as rubber or silicon molds and can break if bent. With our methacrylate molds, your dioramas will come to life with authentic and captivating details - unleash your creativity and build sets that tell stories of their own! Take your projects to the next level of excellence with this essential accessory for lovers of high-quality dioramas. Quantity: 2x pack Scale: 1:35 (1:48-1:32) The thickness of the pieces: 3 mm Brick size: 2.85 x 5.7 mm Mould size: 6 x 11 cm
€9,25
-
Age of Sigmar Age of Sigmar Realmscape Ghurish Expanse
The Era of the Beast sees armies clash across all manner of terrain, from fetid bogs and ancient ruins to wind-blasted plains and snow-capped mountains. The nigh-endless expanses of the Mortal Realms play host to constant warfare, and no two battlefields are ever alike. As surely as there are men and monsters to fight, the forces of Order, Chaos, Death, and Destruction will find new corners of the world to soak in each others' blood.Begin your adventures upon the battlefields of Ghur with these double-sided, fold-out boards, featuring murky swamps on one side and dry wastelands on the other. When placed together, these boards make a battlefield measuring 44.8" x 30", perfect for 1,000-point games of Warhammer Age of Sigmar, and they are the ideal foundation for a wide range of Citadel scenery products. Due to the easily expandable rules available in the Warhammer Age of Sigmar Core Book, two or more sets of these boards can produce battlefields suitable for games of 2,000 points or more.The boards are made of thick, durable card with reinforced folds to ensure excellent condition even after frequent use. Each board measures 22.4" x 30" and can be folded into eighths for easy storage in the included sleeve. #age #sigmar #realmscape #ghurish #expanse
€28,00€25,20
-
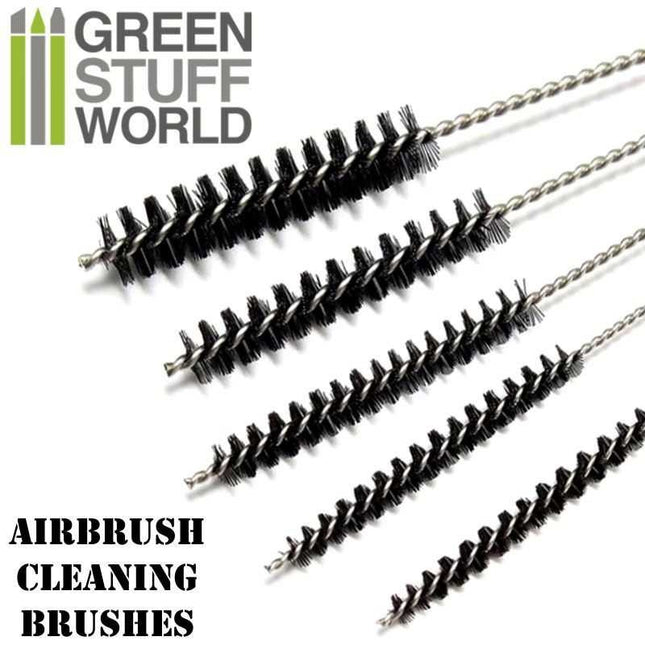
GreenStuffWorld Airbrush cleaning brushes set
Airbrush cleaning set with 5 different brushes. Voor het schoonmaken van de diverse onderdelen van de airbrush. Gebruik ook Airbrush Cleaner hiervoor.
€3,50
-
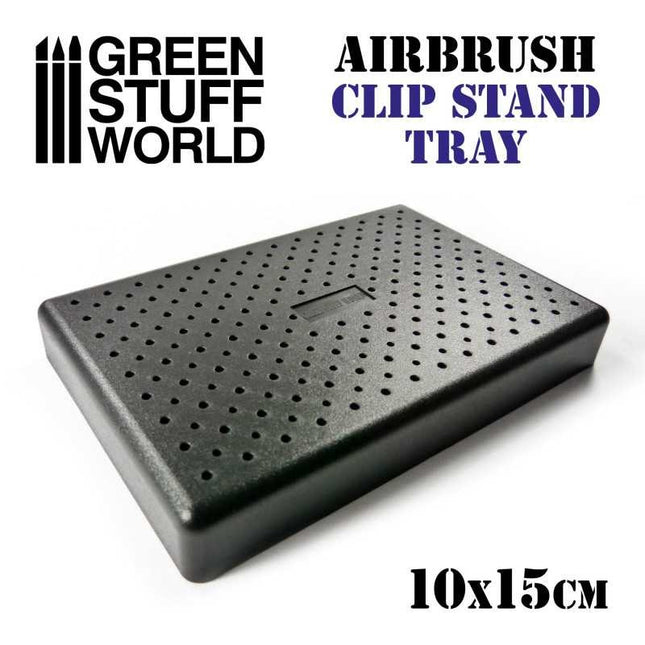
GreenStuffWorld Airbrush Clip stand tray
Airbrush Clip Board GSW plastic board with holes to hold miniatures and parts comfortably whilst airbrushing them.Contains two types of holes for different clip sizes, 1.5mm and 2mm. Length: 15cmWidth: 10cmHeight: 2cm * Alligator clips not included!! #alligator #clips #stand #tray #airbrush #small #parts #greenstuffworld
€5,50
-
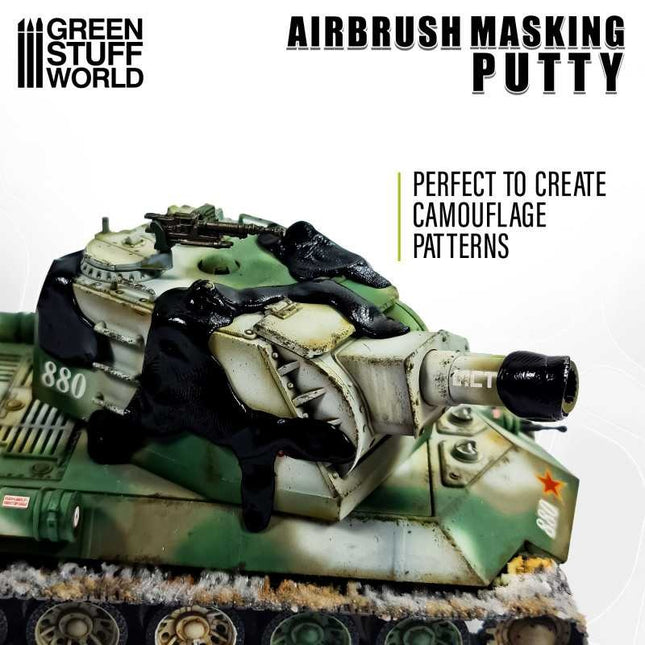
GreenStuffWorld Airbrush Masking Putty
What is Airbrush Masking Putty? Is a pliable material used in modeling and painting to mask off areas that you want to protect from paint or other applications. It works by shaping and applying it over the desired surface, creating a temporary barrier. Once painted, the product is removed, leaving behind clean, crisp edges. Airbrush Masking Putty easily conforms to all surfaces and other details on any model. It has been specially designed to leave no residue on surfaces, is very easy to remove, is free from grease, and cannot dry out. Perfect material to protect areas from paint and to easily create camouflage patterns. Its special formulation is designed for multiple uses and easy cleanup. It does not stain, it is free from grease, and cannot dry out.Content: 60g to be reused many many times.
€9,95
-
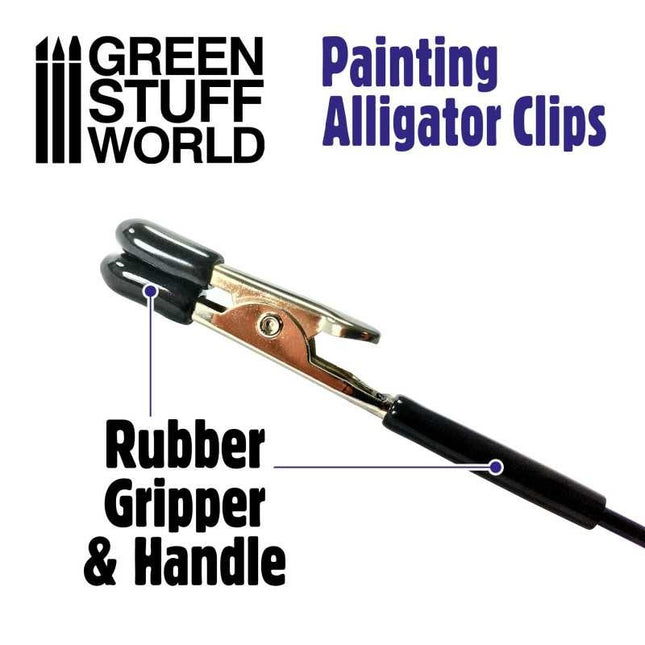
GreenStuffWorld Alligator Clips x20
Alligator Clips The alligator clips are great for securing small parts for spraying or airbrushing. These metal wire alligator clamps make it easy to keep your hands free and clean while painting your hobby model projects.Each clip comes with a silicone cover to avoid damaging or pinching the pieces. These clips are compatible with the Airbrush Clip Base available at our range. Contains x20 #alligator #clips #20 #airbrush #small #parts #greenstuffworld
€9,70
-
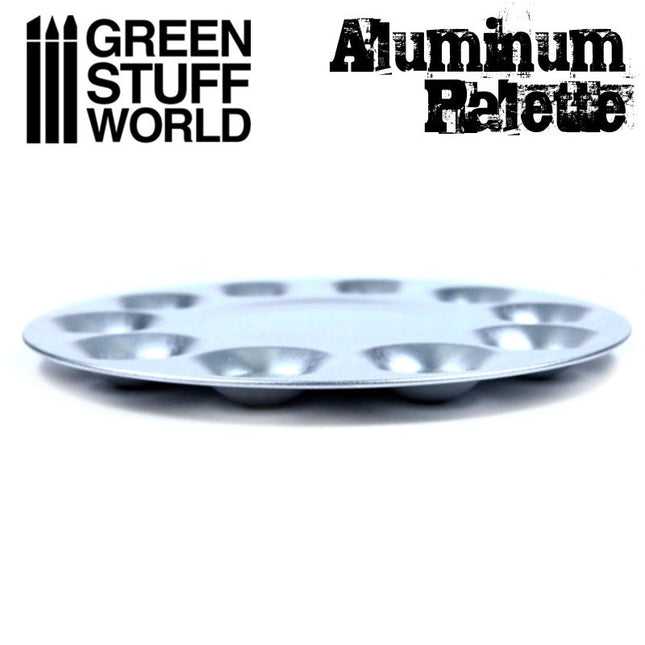
GreenStuffWorld Aluminium palet (10 reservoirs)
Metalen mengpalet voor schilder- en modelleerwerken. Gemaakt van stevig aluminium met 10 reservoirs. Lichtgewicht en gemakkelijk schoon te maken. Bestand tegen zowel synthetische als acrylverdunners, evenals aceton, terpetine en stopverf. Diameter: 17 cm Materiaal: aluminium Inhoud: 1 metalen palet met 10 reservoirs
€2,70
-
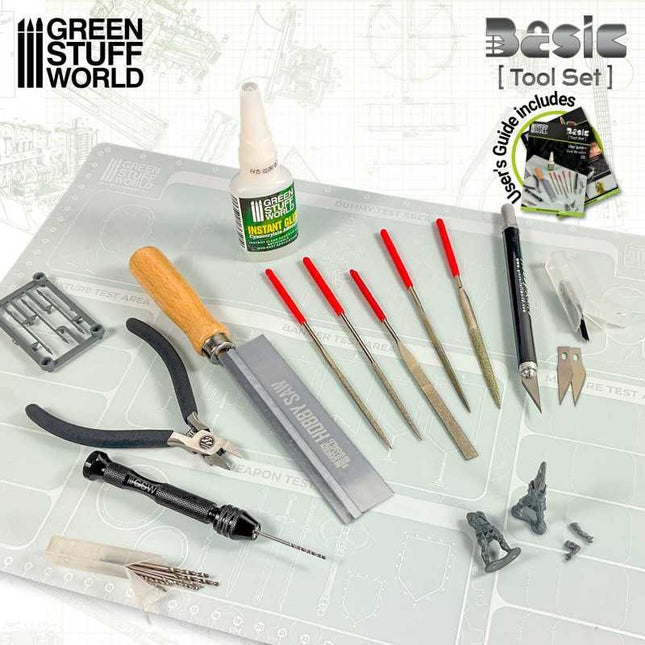
GreenStuffWorld Basic tool kit (30 delig)
Basic Tool kit A basic toolkit for modeling purposes typically includes a range of tools that are commonly used in modeling, DIY, prototyping, and crafting. This basic tool set has been designed to cover all the needs of a beginner and more advanced model maker in the miniature hobby. Ideal for beginners and hobbyists, modelers, and role-playing games such as Warhammer, 40K, AOS, 9thAge, Star Wars Legion, and Dungeons & Dragons. It should cover the basics for most modeling projects, depending on the specific type of modeling you're interested in e.g., scale models, architectural models, dioramas. This Basic Tool kit includes: Hobby Hand drill with 10 drills Hobby saw Modeling cutter + 10 refills CA instant glue 5x modeling files Flat Cutting Nipper #greenstuffworld #basic #tool #kit #set
€42,50
-
GreenStuffWorld Black Hobby Knife + 10x Black spare blades
Black Hobby Knife + 10x Black spare blades GSW ComfortGrip Cutter Knife with a non-slip rubber compact handle construction, smooth mechanism, and BLACK high-grade SK5 carbon steel blades for deep and precise cutting and maximum control. CONTAINS: 1 Cutter + (10+3) black blade refills HEAVY-DUTY 9mm BLADE (0.04 in) #hobby #mes #heavy #duty #greenstuffworld #knife
€8,65
-
Citadel Brush Layer Small STC Citadel
For intricate details and edge highlights, look no further than the S Layer brush. Made with precision to get you into even the tightest crevasses, this brush is absolutely essential for novice and experienced hobbyists alike. As a Citadel STC brush, the bristles have been made out of the finest 100% synthetic fibres Games Workshop have ever produced, helping to maintain the ideal brush shape and prevent curling at the tip. This brush has been carefully designed to paint the finest miniature details. It's an excellent companion to regular Citadel brushes, and designed to work perfectly with the Citadel Colour paint range. #citadel #layer #small #synthetic #stc
€4,50
-
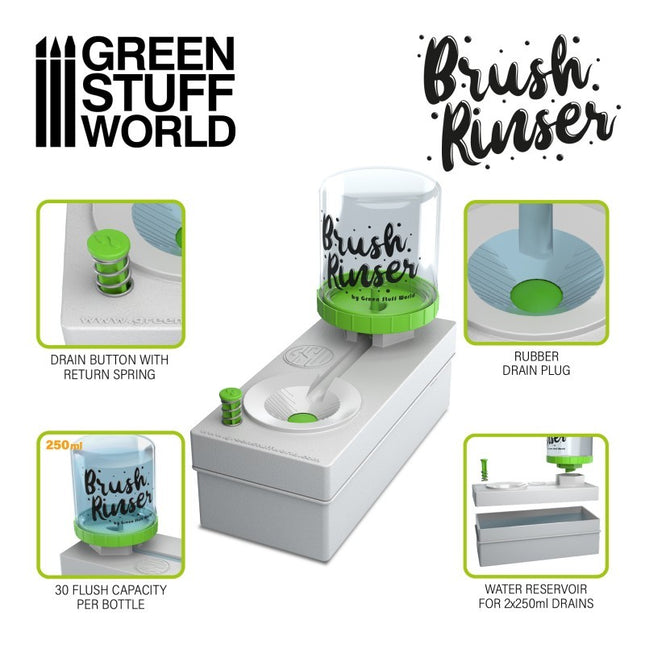
GreenStuffWorld Brush rinser - penseel spoeler
The Brush Rinser provides clean fresh water conveniently when brush-painting without the clutter and inconvenience of multiple rinse containers, accidental spills, or trips to the sink. Just rinse your brush in the fluted well. Then press the button and the dirty rinse water will drain into the base reservoir while automatically refilling the well with clean water. Takes up the space of 2 glasses of water on your desk, and allows you to clean brushes without damaging the bristles. You can use it with acrylic paints, metallic acrylic paints, watercolors, tempera, and gouache. Spoelen, spoelen en nog eens spoelen....
€15,50
-
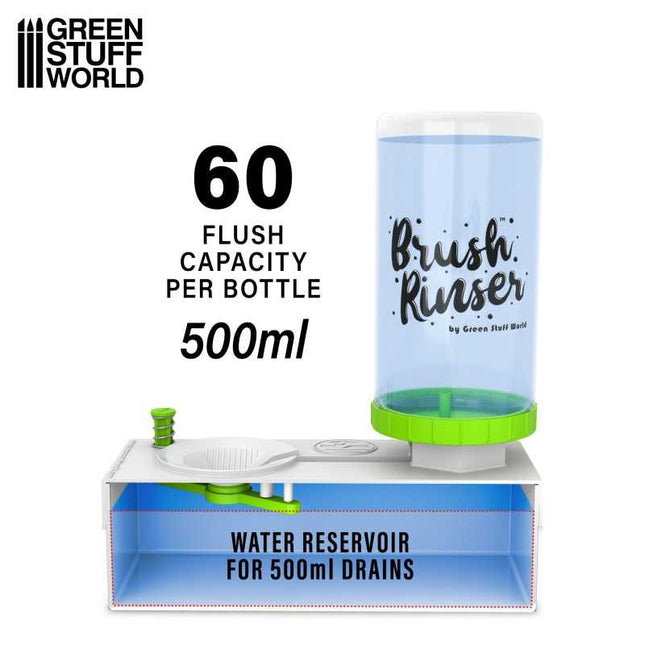
GreenStuffWorld Brush rinser bottle 500 ml - penseel spoelfles
The Brush Rinser provides clean fresh water conveniently when brush-painting without the clutter and inconvenience of multiple rinse containers, accidental spills, or trips to the sink. The standard Brush Rinser includes a 250ml bottle which allows 30 rinses per bottle. With this accessory you can have twice the capacity of clean water, and therefore twice as many rinses per bottle. This set includes a 500ml bottle and a GREEN adapter cap compatible with the original Green Stuff World Brush Rinser or the Pink Edition. You can use it with acrylic paints, metallic acrylic paints, watercolors, tempera, and gouache. Spoelen, spoelen en nog eens spoelen.... #brush #rinser #greenstuffworld #bottle #500ml #green #groen
€5,25
-
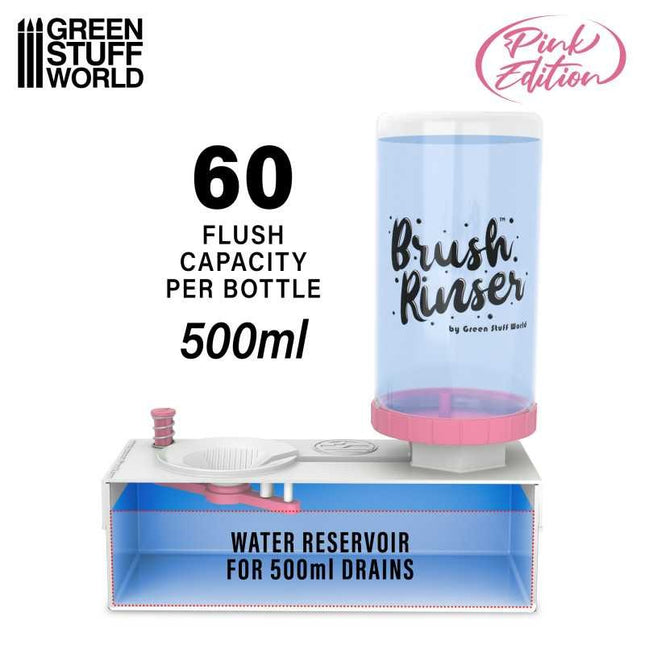
GreenStuffWorld Brush rinser bottle 500 ml - penseel spoelfles Roze
Pink Edition!!! The Brush Rinser provides clean fresh water conveniently when brush-painting without the clutter and inconvenience of multiple rinse containers, accidental spills, or trips to the sink. The standard Brush Rinser includes a 250ml bottle which allows 30 rinses per bottle. With this accessory you can have twice the capacity of clean water, and therefore twice as many rinses per bottle. This set includes a 500ml bottle and a PINK adapter cap compatible with the original Green Stuff World Brush Rinser or the Pink Edition. You can use it with acrylic paints, metallic acrylic paints, watercolors, tempera, and gouache. Spoelen, spoelen en nog eens spoelen.... #brush #rinser #greenstuffworld #bottle #500ml #pink #roze
€5,25
-

GreenStuffWorld Brush rinser Roze - penseel spoeler Roze
Pink Edition!!! The Brush Rinser provides clean fresh water conveniently when brush-painting without the clutter and inconvenience of multiple rinse containers, accidental spills, or trips to the sink. Just rinse your brush in the fluted well. Then press the button and the dirty rinse water will drain into the base reservoir while automatically refilling the well with clean water. Takes up the space of 2 glasses of water on your desk, and allows you to clean brushes without damaging the bristles. You can use it with acrylic paints, metallic acrylic paints, watercolors, tempera, and gouache. Spoelen, spoelen en nog eens spoelen....
€15,50
-

Citadel Citadel Colour Assembly Stand
The Citadel Colour Assembly Stand has been expertly designed to work with a range of modular hobby tools to enhance your painting and modelling experience. This wide, stable base features a snug holder to keep a Painting Handle or Painting Handle XL secure and safe while you work. You’ll also find two flexible yet sturdy assembly arms with rubberised jaws to hold components in place while the glue cures, making assembly easier than ever. Several shallow trays along the base allow you to collect the various bits and bobs that tend to pile up as you work. The arms are removable, allowing you to move them to any of the many circular sockets located around the base. The arms have been designed to fit in matching sockets on the Painting Handle XL for comfortably building the largest miniatures. The same sockets you find on this base are also sized to accommodate Sub-assembly Holders, so even the most sprawling projects stay organised and contained. This assembly base is compatible with the newer, ergonomic design of the Citadel Colour Painting Handle, and the older decagonal handle will not fit in the central holder. While you can find matching sockets on the updated Citadel Colour Spray Stick, continued use of canned sprays can degrade the rubber on the assembly arms, so we don’t recommend using them during your priming sessions. Miniatures displayed in images are for scale purposes only and are not included with this product. #painting #handle #stand #citadel
€19,95
-

Citadel Citadel Colour Sub-assembly Holder
The Citadel Colour Sub-assembly Holder contains 44 expertly-designed Part Holders. They’re made of the same plastic as Citadel models, which means you can drill small holes or use glue to attach the pegs, before simply clipping the bits off when you’re finished. You’ll also get two fluted bases for the Part Holders, which fit neatly into the Citadel Colour Painting Handle for comfortable painting sessions. Go on and paint those eyeballs! The Citadel Colour Sub-assembly Holder kit has been expertly designed to work with a range of modular hobby tools to enhance your painting and modelling experience. It’s the lynchpin of a sub-assembly painting process, as the Part Holders fit neatly into the circular sockets found on the Citadel Colour Spray Stick, Painting Handle XL, and Assembly Stand. This allows you to keep a consistent colour and finish when painting components separately from the rest of the model, and it also gives you the tools you need to manage and organise sprawling, complicated projects. It’s the solution you never knew you needed. Miniatures displayed in images are for scale purposes only and are not included with this product. #painting #handle #colour #sub #assembly #holder #citadel
€9,50
-
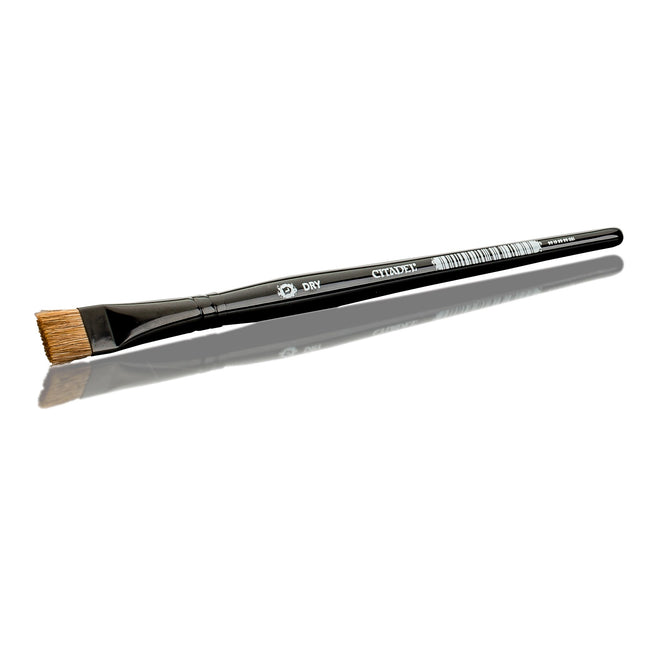
Citadel Citadel Extra Large Base Brush (1 St)
Entirely synthetic for extra durability, this extra large brush (XL Base) features the biggest size for the largest areas. The large, wide side and fine pointed edge mean you’ll basecoat your miniatures in no time. #citadel #base #extralarge #xl #brush
€7,80
-
Citadel Citadel Knife
Een hobbymes om de modellen uit de sprue te halen of om hiermee andere projecten uit te voeren. Let op, er zijn geen losse mesjes beschikbaar.
€22,80
-
Citadel Citadel Large Drybrush (1 St)
This large brush (L Dry) features a light ox hair and synthetic blend of bristles for stiffness and durability. The flat profile means a consistent coverage on raised areas - ideal for drybrushing!
€7,98
-
Citadel Citadel Large Shade Brush (1 St)
This brush (L Shade) holds a huge amount of paint, meaning a faster, more consistent coverage when shading your Citadel miniatures. The ox hair bristles have been chosen specifically for their ability to hold as much paint as possible - you’ll be amazed at how much more efficient your shading will become.
€8,80
-
Citadel Citadel Medium Drybrush (1 St)
This medium brush (M Dry) features a light ox hair and synthetic blend of bristles for stiffness and durability. The flat profile means a consistent coverage on raised areas - ideal for drybrushing!
€4,95
-
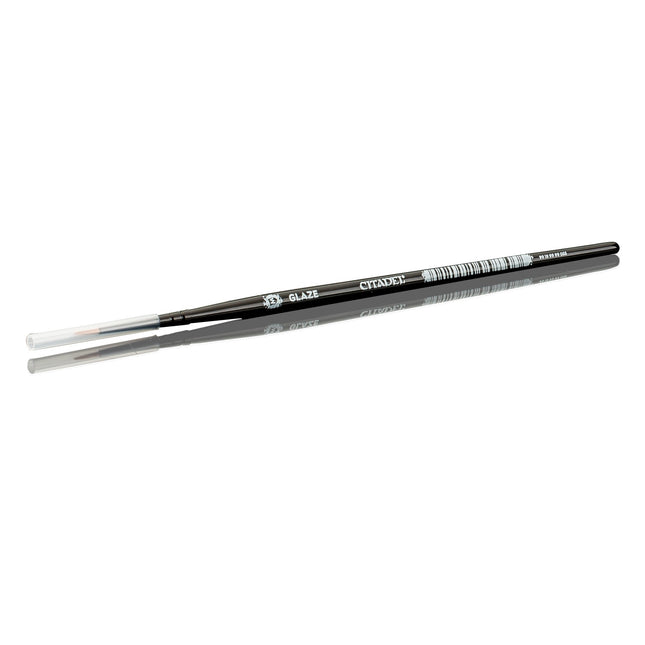
Citadel Citadel Medium Glaze Brush (1 St)
Featuring synthetic bristles for optimal shape retention and the finest point, this medium brush (M Glaze) will make short work of applying Citadel Glaze paints to your miniatures. Detail work is made quick and easy - you’ll be amazed by what you can do!
€5,45


