Mallen

GreenStuffWorld Siliconen mallen klinknagels, bouten en moeren (set van 2)
2 soorten Siliconen mallen Klinknagels, bouten en moeren Gemaakt van hoogwaardige voedingswaren siliconen. Makkelijk in gebruik en zo gesneden dat er vele tegelvormen in de mallen aanwezig is. Deze mallen zijn hittebestendig en duurzaam. De mallen zijn extra diep om zeer gedetailleerde mooie resultaten te geven voor zowel dimensionaal ontwerp als oppervlaktedruk. Elke mal heeft een groot oppervlak van 2,5x5 inch (6x12cm) en is flexibel voor optimale bruikbaarheid. De mallen werken geweldig met en elk soort materiaal inclusief hars.Met deze flexibele mallen kunt u eindeloze hoeveelheden maken die bruikbaar zijn voor verschillende schalenHittebestendig rubber tot 240ºCVoedingswaardeResin-GradeSchaal 1:35 (1:32-1:43) Maten 2,5mm, 2mm, 1,5mm, 1mm and 0,75mm We raden aan om klei boetseer schrapers te gebruiken om het overtollige kit / klei uit de vormen te verwijderen om beschadigingen te voorkomen Bevat 2 vormen met de volgende vormen:
€12,00
-
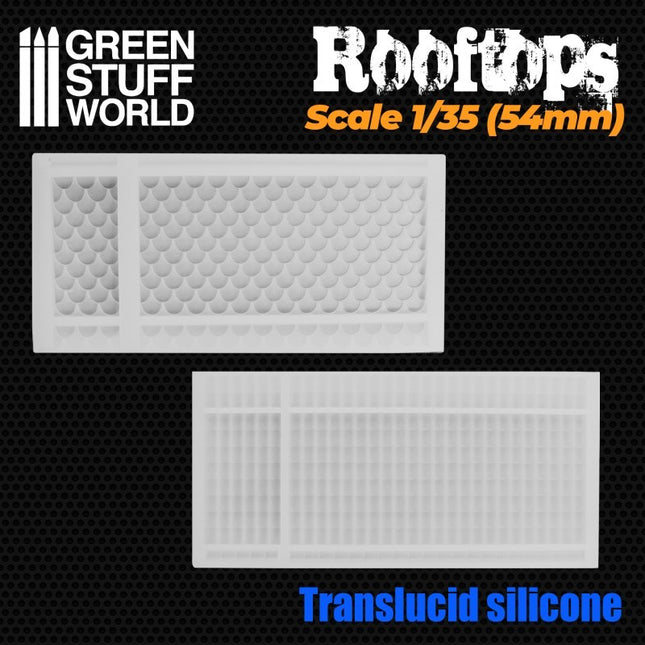
GreenStuffWorld Siliconen mallen Dakpan 2 soorten 1/35 (54mm)
Siliconen mallen voor 2 soorten dakpan (1:35)(54mm) Transparante siliconen mallen. Model A (recht) heeft panmaat 5x6mm en Model B (gebogen) heeft panmaat 6.5x8mm. Made of high quality foodgrade silicone, easy to use and intricately cut for great impressions, these molds are heat resistant (up to 240ºC) and durable. The molds are carefully carved for highly detailed and thorough results for both dimensional design and surface imprinting. Each mold has a large surface area measuring 6x12cm. The molds work great with any sort of resin, we highly recommend using acrylic resin (LINK). Wait until the resin has dried completely before removing the pieces. Other materials such as milliput, milliput mixed with plasteline, magic sculpt and others also work but are harder to use. We recommend the use of scrapers (LINK) to remove excess putty/clay from the molds without damaging them. Hittebestendig rubber tot 240ºCGeschikt voor voedingSchaal 1:35 Malmaat 6cm bij 12cm Gebruik de acrylic resin van GreenStuffworld of de UV resin. Beide produkten kunnen gekleurd worden met pigment (acrylic resin) of met dye/kleurstof (uv resin). Gebruik u UV resin leg de mallen dan in het zonlicht of gebruik een UV zaklamp. We raden aan om klei boetseer schrapers te gebruiken om het overtollige kit / klei uit de vormen te verwijderen om beschadigingen te voorkomen
€12,50
-
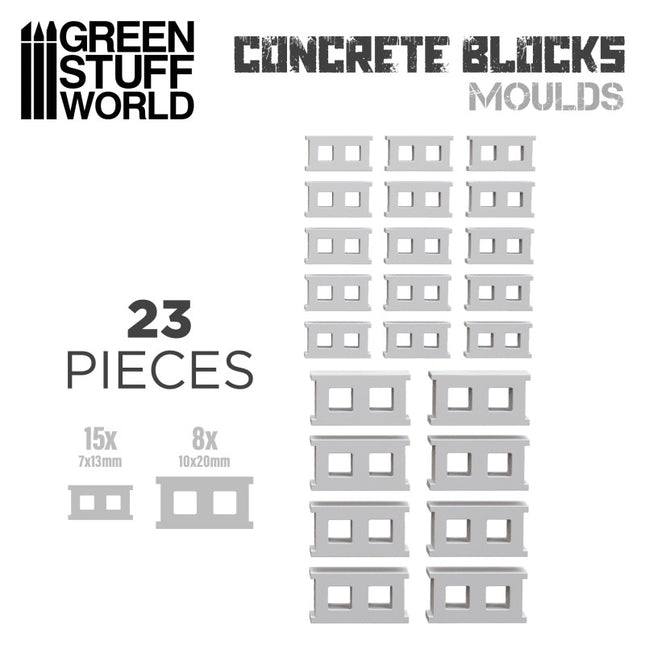
GreenStuffWorld Siliconen mal Betonblok
Silicone molds - Concrete Bricks Made of high quality foodgrade silicone, easy to use and intricately cut for great impressions, these molds are heat resistant and durable. The molds are extra deep to give highly detailed beautiful results for both dimensional design and surface imprinting. Each mold has a large surface area measuring 6x12cm, and is unmounted for optimal usability. The molds work great with any sort of resin. These flexible molds will allow you to create endless amounts of concrete brick valid for 1:35 (1:32-1:43). Heat resistant rubber up to 240ºC Food-grade and Resin-Grade We recommend using liquid Resins (UV resins too as the molds are transparant). Other putties such as milliput, milliput mixed with plasteline, magic sculpt or similars may also work, but because of the depth of the bricks in the pattern, they will need a bit of help when filling them in. We recommend using SCRAPERS (LINK) to remove the excess of putty/clay from the molds without cutting them. Contains 1 molds with 2 brick types as follows:
€12,50
-
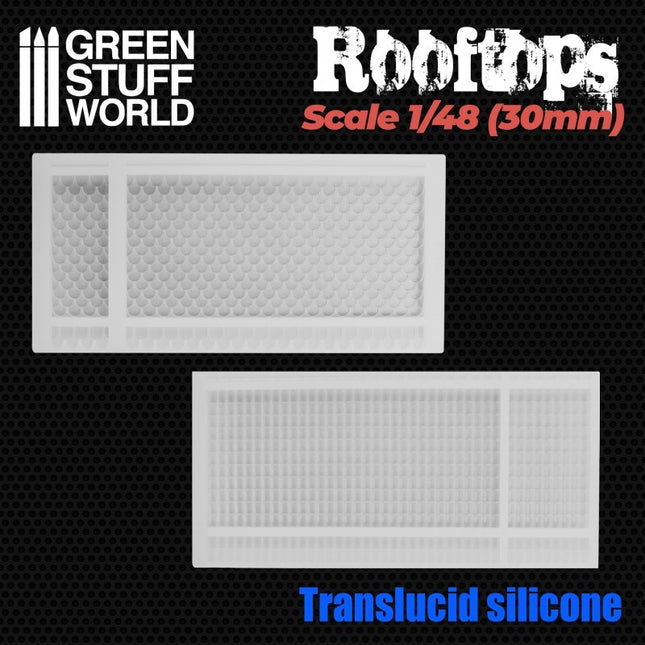
GreenStuffWorld Siliconen mallen Dakpan 2 soorten 1/48 (30mm)
Siliconen mallen voor 2 soorten dakpan (1:48)(30mm) Transparante siliconen mallen. Model A (recht) heeft panmaat 3x4mm en Model B (gebogen) heeft panmaat 4.3x6mm. Made of high quality foodgrade silicone, easy to use and intricately cut for great impressions, these molds are heat resistant (up to 240ºC) and durable. The molds are carefully carved for highly detailed and thorough results for both dimensional design and surface imprinting. Each mold has a large surface area measuring 6x12cm. The molds work great with any sort of resin, we highly recommend using acrylic resin (LINK). Wait until the resin has dried completely before removing the pieces. Other materials such as milliput, milliput mixed with plasteline, magic sculpt and others also work but are harder to use. We recommend the use of scrapers (LINK) to remove excess putty/clay from the molds without damaging them. Hittebestendig rubber tot 240ºCGeschikt voor voedingSchaal 1:48 Malmaat 6cm bij 12cm Gebruik de acrylic resin van GreenStuffworld of de UV resin. Beide produkten kunnen gekleurd worden met pigment (acrylic resin) of met dye/kleurstof (uv resin). Gebruik u UV resin leg de mallen dan in het zonlicht of gebruik een UV zaklamp. We raden aan om klei boetseer schrapers te gebruiken om het overtollige kit / klei uit de vormen te verwijderen om beschadigingen te voorkomen
€12,50
-
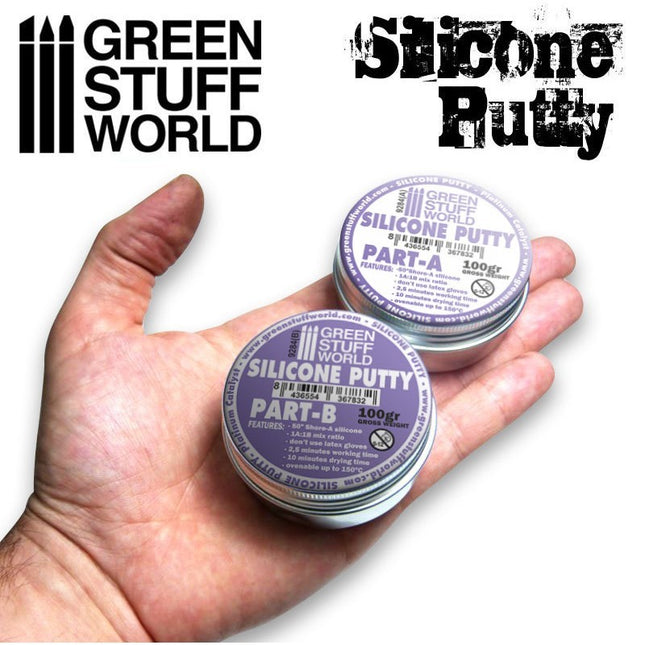
GreenStuffWorld Violet Silicone Putty 200gr
- 50º Shore-A hardness- Color: Violet- 1A:1B mix ratio, mixed by hand- 2.5 minutes pot life- 10 minutes cure time- Ovenable up to 150ºC- Non edible Silicone Putty 200gr. Green Stuff World Silicone Putty is platinum silicone that can be easily mixed and applied by hand. Mix it in equal amounts (1A:1B) by volume. Green Stuff World Silicone Putty has a pot life of 2.5 minutes with a cure time of 10 minutes. Shrinkage is very low (0.03%) and when cured is exceptionally strong and durable (tear strength 6 N/mm). It will resist temperatures up to 150ºC. Other applications include making fast mold impressions from almost any surface, orthotics, jewelry making and more. The cure of the silicone putty may be inhibited by certain contaminants in or on the pattern to be molded resulting in tackiness at the pattern or a total lack of cure throughout the mold. Wear vinyl gloves only, since Latex gloves will inhibit the cure of the rubber. Also, tin-cure silicone, sulfur clays, certain wood surfaces, newly cast polyester resin, epoxy or urethane rubber may cause inhibition. If compatibility between the silicone rubber and the surface is a concern, a small-scale test is recommended. Apply a small amount onto a non-critical area of the pattern. Inhibition has occurred if the rubber is gummy or uncured after the cure time has passed. (i) This set contains 200gr. of Green Stuff World Silicone Putty (100gr PartA + 100gr PartB) #greenstuffworld #putty #mold #making #silicone
€13,50
-
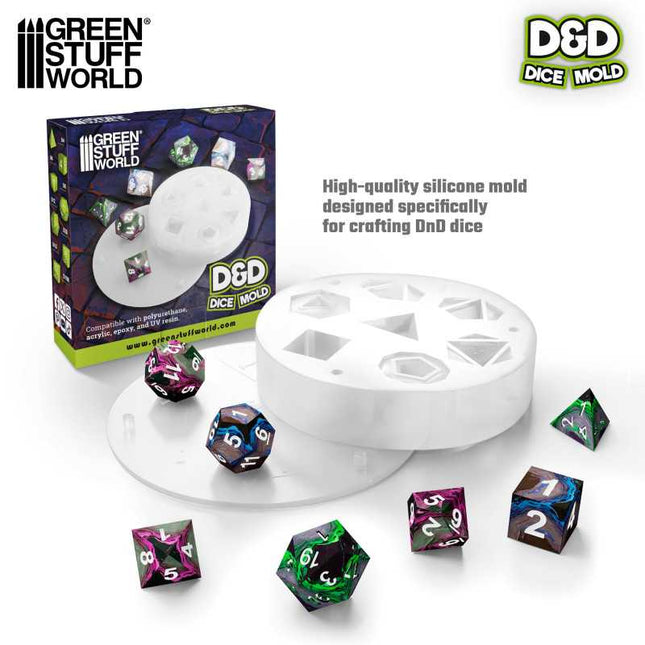
GreenStuffWorld Custom dnd dice mold
DnD dice mold 102x102 This DnD dice mold set introduces a high-quality silicone mold designed specifically for crafting D&D dice. Crafted with precision, this Dnd dice mold is compatible with a variety of resin types, including polyurethane, acrylic, epoxy, and UV resin, as well as wax, soap, polymer clays, and more. It serves as an indispensable tool for tabletop gaming enthusiasts and DIY hobbyists seeking to create their custom dice sets. You can create a complete collection of RPG dice tailored to your preferences and colors. Heat resistant to 200ºC. Content: 1 mold to create pieces with the following shapes: 4-Sided6-Sided8-Sided10-Sided12-Sided20-Sided100-Sided WARNINGS: Small bubbles may appear in the mold depending on the material. Apply heat to remove them. Alternatively, you may also use a toothpick or other pointed tool to assist in bubble extraction. When filling the mold, allow the resins to overflow to ensure well-formed dice. The excess can then be sanded and polished. It is advisable to place the mold lid slowly and laterally. Never all at once. Clean the mold after each use to avoid color contamination between castings. #greenstuffworld #silicone #dice #mold #dnd
€5,50
-

GreenStuffWorld Acrylic Brick molds - Octagon Paving Brick
Elevate your dioramas to an unparalleled level of realism with our acrylic molds for modeling regular bricks. These accessories will allow you to create an infinite number of them with precision and consistency, adding authenticity and depth to your creations. They are specifically designed to create miniature regular bricks for use in scale modeling projects. Each model features a variety of patterns and textures that replicate real ones and that modelers will use to shape the air-drying clay. Our acrylic modeling molds are perfectly complemented by air-drying pastes such as modeling clay, foam clay, and similar products. These options guarantee a faithful and detailed reproduction for your diorama. Instructions for use: Using acrylic brick molds is a straightforward process, but it requires some care to ensure you get the best results. Here's a step-by-step guide on how to use these molds: Prepare the mold: Ensure that your acrylic brick mold is clean and dry. Make sure it's free of any debris or dust. Cover one side of the mold to hold the pieces. You can do this process with baking paper, wet oven paper, mylar plastic, or even airbrush masking tape. Place the mold on a flat surface: Find a flat and stable surface where you can work comfortably. Place the mold with the paper side down to prevent sticking. Add air-drying clay: Take a ball of air-drying clay and place it on the mold. Use your fingers to gently press and work the clay into the cavities of the mold. Make sure you fill each brick cavity completely. You may need to adjust the amount of clay to achieve your desired brick size and thickness. Level the surface: Use the included plastic spatula or the edge of another mold to drag/scrape across the surface of the mold, skimming off any excess clay. This will ensure that the surface is even and smooth. Let it dry: Allow the clay to dry completely. The air-drying paste has a small degree of shrinkage as it dries, which will help the pieces release from the mold. Remove the paper: Once the clay is completely dry, carefully peel off the paper tape from the back of the mold. This will help release the hobby bricks. Remove the pieces: Use a blunt stick (like the reverse end of a brush) to gently push out the individual bricks from the mold. Be careful not to apply too much pressure, as you don't want to damage the delicate acrylic mold. Smooth the edges: To give your bricks a more realistic look and get rid of any sharp edges, gently rub small amounts of them together between the palms of your hands. This will soften the edges and make the bricks look more like real bricks. Use the bricks: You can now use the air-dried clay bricks for your crafting or construction project. We recommend gluing the pieces with PVA glue or an acrylic sealer such as decoupe product (like ModPodge) to secure the pieces. Remember to handle the acrylic mold with care, as it's not as flexible as rubber or silicon molds and can break if bent. With our methacrylate molds, your dioramas will come to life with authentic and captivating details - unleash your creativity and build sets that tell stories of their own! Take your projects to the next level of excellence with this essential accessory for lovers of high-quality dioramas. Quantity: 2x pack Scale: 1:35 (1:48-1:32) The thickness of the pieces: 3 mm Brick size: 2.85 x 5.7 mm Mould size: 6 x 11 cm
€9,25
-

GreenStuffWorld Acrylic Brick molds - Hexagonal Pavement
Elevate your dioramas to an unparalleled level of realism with our acrylic molds for modeling regular bricks. These accessories will allow you to create an infinite number of them with precision and consistency, adding authenticity and depth to your creations. They are specifically designed to create miniature regular bricks for use in scale modeling projects. Each model features a variety of patterns and textures that replicate real ones and that modelers will use to shape the air-drying clay. Our acrylic modeling molds are perfectly complemented by air-drying pastes such as modeling clay, foam clay, and similar products. These options guarantee a faithful and detailed reproduction for your diorama. Instructions for use: Using acrylic brick molds is a straightforward process, but it requires some care to ensure you get the best results. Here's a step-by-step guide on how to use these molds: Prepare the mold: Ensure that your acrylic brick mold is clean and dry. Make sure it's free of any debris or dust. Cover one side of the mold to hold the pieces. You can do this process with baking paper, wet oven paper, mylar plastic, or even airbrush masking tape. Place the mold on a flat surface: Find a flat and stable surface where you can work comfortably. Place the mold with the paper side down to prevent sticking. Add air-drying clay: Take a ball of air-drying clay and place it on the mold. Use your fingers to gently press and work the clay into the cavities of the mold. Make sure you fill each brick cavity completely. You may need to adjust the amount of clay to achieve your desired brick size and thickness. Level the surface: Use the included plastic spatula or the edge of another mold to drag/scrape across the surface of the mold, skimming off any excess clay. This will ensure that the surface is even and smooth. Let it dry: Allow the clay to dry completely. The air-drying paste has a small degree of shrinkage as it dries, which will help the pieces release from the mold. Remove the paper: Once the clay is completely dry, carefully peel off the paper tape from the back of the mold. This will help release the hobby bricks. Remove the pieces: Use a blunt stick (like the reverse end of a brush) to gently push out the individual bricks from the mold. Be careful not to apply too much pressure, as you don't want to damage the delicate acrylic mold. Smooth the edges: To give your bricks a more realistic look and get rid of any sharp edges, gently rub small amounts of them together between the palms of your hands. This will soften the edges and make the bricks look more like real bricks. Use the bricks: You can now use the air-dried clay bricks for your crafting or construction project. We recommend gluing the pieces with PVA glue or an acrylic sealer such as decoupe product (like ModPodge) to secure the pieces. Remember to handle the acrylic mold with care, as it's not as flexible as rubber or silicon molds and can break if bent. With our methacrylate molds, your dioramas will come to life with authentic and captivating details - unleash your creativity and build sets that tell stories of their own! Take your projects to the next level of excellence with this essential accessory for lovers of high-quality dioramas. Quantity: 2x pack Scale: 1:35 (1:48-1:32) The thickness of the pieces: 3 mm Brick size: 2.85 x 5.7 mm Mould size: 6 x 11 cm
€9,25
-
GreenStuffWorld Acrylic Brick molds - Round Dumble paver
Elevate your dioramas to an unparalleled level of realism with our acrylic molds for modeling regular bricks. These accessories will allow you to create an infinite number of them with precision and consistency, adding authenticity and depth to your creations. They are specifically designed to create miniature regular bricks for use in scale modeling projects. Each model features a variety of patterns and textures that replicate real ones and that modelers will use to shape the air-drying clay. Our acrylic modeling molds are perfectly complemented by air-drying pastes such as modeling clay, foam clay, and similar products. These options guarantee a faithful and detailed reproduction for your diorama. Instructions for use: Using acrylic brick molds is a straightforward process, but it requires some care to ensure you get the best results. Here's a step-by-step guide on how to use these molds: Prepare the mold: Ensure that your acrylic brick mold is clean and dry. Make sure it's free of any debris or dust. Cover one side of the mold to hold the pieces. You can do this process with baking paper, wet oven paper, mylar plastic, or even airbrush masking tape. Place the mold on a flat surface: Find a flat and stable surface where you can work comfortably. Place the mold with the paper side down to prevent sticking. Add air-drying clay: Take a ball of air-drying clay and place it on the mold. Use your fingers to gently press and work the clay into the cavities of the mold. Make sure you fill each brick cavity completely. You may need to adjust the amount of clay to achieve your desired brick size and thickness. Level the surface: Use the included plastic spatula or the edge of another mold to drag/scrape across the surface of the mold, skimming off any excess clay. This will ensure that the surface is even and smooth. Let it dry: Allow the clay to dry completely. The air-drying paste has a small degree of shrinkage as it dries, which will help the pieces release from the mold. Remove the paper: Once the clay is completely dry, carefully peel off the paper tape from the back of the mold. This will help release the hobby bricks. Remove the pieces: Use a blunt stick (like the reverse end of a brush) to gently push out the individual bricks from the mold. Be careful not to apply too much pressure, as you don't want to damage the delicate acrylic mold. Smooth the edges: To give your bricks a more realistic look and get rid of any sharp edges, gently rub small amounts of them together between the palms of your hands. This will soften the edges and make the bricks look more like real bricks. Use the bricks: You can now use the air-dried clay bricks for your crafting or construction project. We recommend gluing the pieces with PVA glue or an acrylic sealer such as decoupe product (like ModPodge) to secure the pieces. Remember to handle the acrylic mold with care, as it's not as flexible as rubber or silicon molds and can break if bent. With our methacrylate molds, your dioramas will come to life with authentic and captivating details - unleash your creativity and build sets that tell stories of their own! Take your projects to the next level of excellence with this essential accessory for lovers of high-quality dioramas. Quantity: 2x pack Scale: 1:35 (1:48-1:32) The thickness of the pieces: 3 mm Brick size: 2.85 x 5.7 mm Mould size: 6 x 11 cm
€9,25
-
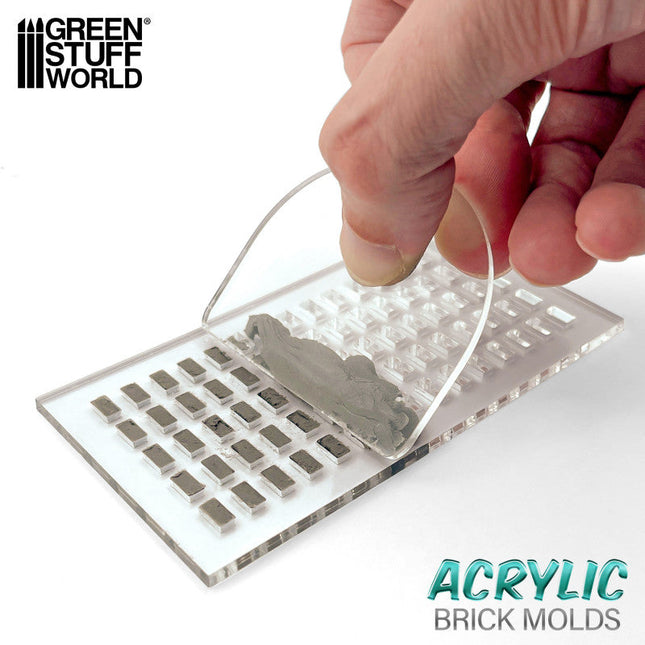
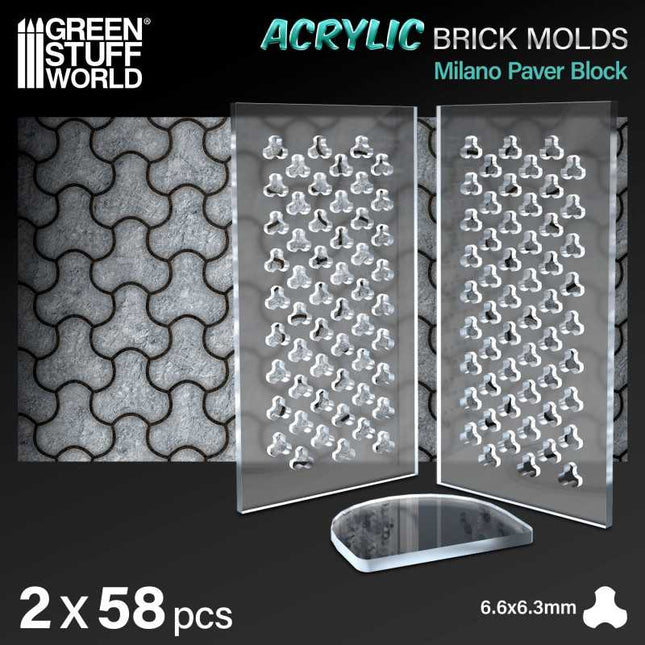
GreenStuffWorld Acrylic Brick molds - Milano Paver Block
Elevate your dioramas to an unparalleled level of realism with our acrylic molds for modeling regular bricks. These accessories will allow you to create an infinite number of them with precision and consistency, adding authenticity and depth to your creations. They are specifically designed to create miniature regular bricks for use in scale modeling projects. Each model features a variety of patterns and textures that replicate real ones and that modelers will use to shape the air-drying clay. Our acrylic modeling molds are perfectly complemented by air-drying pastes such as modeling clay, foam clay, and similar products. These options guarantee a faithful and detailed reproduction for your diorama. Instructions for use: Using acrylic brick molds is a straightforward process, but it requires some care to ensure you get the best results. Here's a step-by-step guide on how to use these molds: Prepare the mold: Ensure that your acrylic brick mold is clean and dry. Make sure it's free of any debris or dust. Cover one side of the mold to hold the pieces. You can do this process with baking paper, wet oven paper, mylar plastic, or even airbrush masking tape. Place the mold on a flat surface: Find a flat and stable surface where you can work comfortably. Place the mold with the paper side down to prevent sticking. Add air-drying clay: Take a ball of air-drying clay and place it on the mold. Use your fingers to gently press and work the clay into the cavities of the mold. Make sure you fill each brick cavity completely. You may need to adjust the amount of clay to achieve your desired brick size and thickness. Level the surface: Use the included plastic spatula or the edge of another mold to drag/scrape across the surface of the mold, skimming off any excess clay. This will ensure that the surface is even and smooth. Let it dry: Allow the clay to dry completely. The air-drying paste has a small degree of shrinkage as it dries, which will help the pieces release from the mold. Remove the paper: Once the clay is completely dry, carefully peel off the paper tape from the back of the mold. This will help release the hobby bricks. Remove the pieces: Use a blunt stick (like the reverse end of a brush) to gently push out the individual bricks from the mold. Be careful not to apply too much pressure, as you don't want to damage the delicate acrylic mold. Smooth the edges: To give your bricks a more realistic look and get rid of any sharp edges, gently rub small amounts of them together between the palms of your hands. This will soften the edges and make the bricks look more like real bricks. Use the bricks: You can now use the air-dried clay bricks for your crafting or construction project. We recommend gluing the pieces with PVA glue or an acrylic sealer such as decoupe product (like ModPodge) to secure the pieces. Remember to handle the acrylic mold with care, as it's not as flexible as rubber or silicon molds and can break if bent. With our methacrylate molds, your dioramas will come to life with authentic and captivating details - unleash your creativity and build sets that tell stories of their own! Take your projects to the next level of excellence with this essential accessory for lovers of high-quality dioramas. Quantity: 2x pack Scale: 1:35 (1:48-1:32) The thickness of the pieces: 3 mm Brick size: 2.85 x 5.7 mm Mould size: 6 x 11 cm
€9,25
-

GreenStuffWorld Acrylic Brick molds - Zig Zag Pavement (or Backbone)
Elevate your dioramas to an unparalleled level of realism with our acrylic molds for modeling regular bricks. These accessories will allow you to create an infinite number of them with precision and consistency, adding authenticity and depth to your creations. They are specifically designed to create miniature regular bricks for use in scale modeling projects. Each model features a variety of patterns and textures that replicate real ones and that modelers will use to shape the air-drying clay. Our acrylic modeling molds are perfectly complemented by air-drying pastes such as modeling clay, foam clay, and similar products. These options guarantee a faithful and detailed reproduction for your diorama. Instructions for use: Using acrylic brick molds is a straightforward process, but it requires some care to ensure you get the best results. Here's a step-by-step guide on how to use these molds: Prepare the mold: Ensure that your acrylic brick mold is clean and dry. Make sure it's free of any debris or dust. Cover one side of the mold to hold the pieces. You can do this process with baking paper, wet oven paper, mylar plastic, or even airbrush masking tape. Place the mold on a flat surface: Find a flat and stable surface where you can work comfortably. Place the mold with the paper side down to prevent sticking. Add air-drying clay: Take a ball of air-drying clay and place it on the mold. Use your fingers to gently press and work the clay into the cavities of the mold. Make sure you fill each brick cavity completely. You may need to adjust the amount of clay to achieve your desired brick size and thickness. Level the surface: Use the included plastic spatula or the edge of another mold to drag/scrape across the surface of the mold, skimming off any excess clay. This will ensure that the surface is even and smooth. Let it dry: Allow the clay to dry completely. The air-drying paste has a small degree of shrinkage as it dries, which will help the pieces release from the mold. Remove the paper: Once the clay is completely dry, carefully peel off the paper tape from the back of the mold. This will help release the hobby bricks. Remove the pieces: Use a blunt stick (like the reverse end of a brush) to gently push out the individual bricks from the mold. Be careful not to apply too much pressure, as you don't want to damage the delicate acrylic mold. Smooth the edges: To give your bricks a more realistic look and get rid of any sharp edges, gently rub small amounts of them together between the palms of your hands. This will soften the edges and make the bricks look more like real bricks. Use the bricks: You can now use the air-dried clay bricks for your crafting or construction project. We recommend gluing the pieces with PVA glue or an acrylic sealer such as decoupe product (like ModPodge) to secure the pieces. Remember to handle the acrylic mold with care, as it's not as flexible as rubber or silicon molds and can break if bent. With our methacrylate molds, your dioramas will come to life with authentic and captivating details - unleash your creativity and build sets that tell stories of their own! Take your projects to the next level of excellence with this essential accessory for lovers of high-quality dioramas. Quantity: 2x pack Scale: 1:35 (1:48-1:32) The thickness of the pieces: 3 mm Brick size: 2.85 x 5.7 mm Mould size: 6 x 11 cm
€9,25
-

GreenStuffWorld Acrylic Brick molds - H Shaped
Elevate your dioramas to an unparalleled level of realism with our acrylic molds for modeling regular bricks. These accessories will allow you to create an infinite number of them with precision and consistency, adding authenticity and depth to your creations. They are specifically designed to create miniature regular bricks for use in scale modeling projects. Each model features a variety of patterns and textures that replicate real ones and that modelers will use to shape the air-drying clay. Our acrylic modeling molds are perfectly complemented by air-drying pastes such as modeling clay, foam clay, and similar products. These options guarantee a faithful and detailed reproduction for your diorama. Instructions for use: Using acrylic brick molds is a straightforward process, but it requires some care to ensure you get the best results. Here's a step-by-step guide on how to use these molds: Prepare the mold: Ensure that your acrylic brick mold is clean and dry. Make sure it's free of any debris or dust. Cover one side of the mold to hold the pieces. You can do this process with baking paper, wet oven paper, mylar plastic, or even airbrush masking tape. Place the mold on a flat surface: Find a flat and stable surface where you can work comfortably. Place the mold with the paper side down to prevent sticking. Add air-drying clay: Take a ball of air-drying clay and place it on the mold. Use your fingers to gently press and work the clay into the cavities of the mold. Make sure you fill each brick cavity completely. You may need to adjust the amount of clay to achieve your desired brick size and thickness. Level the surface: Use the included plastic spatula or the edge of another mold to drag/scrape across the surface of the mold, skimming off any excess clay. This will ensure that the surface is even and smooth. Let it dry: Allow the clay to dry completely. The air-drying paste has a small degree of shrinkage as it dries, which will help the pieces release from the mold. Remove the paper: Once the clay is completely dry, carefully peel off the paper tape from the back of the mold. This will help release the hobby bricks. Remove the pieces: Use a blunt stick (like the reverse end of a brush) to gently push out the individual bricks from the mold. Be careful not to apply too much pressure, as you don't want to damage the delicate acrylic mold. Smooth the edges: To give your bricks a more realistic look and get rid of any sharp edges, gently rub small amounts of them together between the palms of your hands. This will soften the edges and make the bricks look more like real bricks. Use the bricks: You can now use the air-dried clay bricks for your crafting or construction project. We recommend gluing the pieces with PVA glue or an acrylic sealer such as decoupe product (like ModPodge) to secure the pieces. Remember to handle the acrylic mold with care, as it's not as flexible as rubber or silicon molds and can break if bent. With our methacrylate molds, your dioramas will come to life with authentic and captivating details - unleash your creativity and build sets that tell stories of their own! Take your projects to the next level of excellence with this essential accessory for lovers of high-quality dioramas. Quantity: 2x pack Scale: 1:35 (1:48-1:32) The thickness of the pieces: 3 mm Brick size: 2.85 x 5.7 mm Mould size: 6 x 11 cm
€9,25
-

GreenStuffWorld Acrylic Brick molds - Trihex Pavement
Elevate your dioramas to an unparalleled level of realism with our acrylic molds for modeling regular bricks. These accessories will allow you to create an infinite number of them with precision and consistency, adding authenticity and depth to your creations. They are specifically designed to create miniature regular bricks for use in scale modeling projects. Each model features a variety of patterns and textures that replicate real ones and that modelers will use to shape the air-drying clay. Our acrylic modeling molds are perfectly complemented by air-drying pastes such as modeling clay, foam clay, and similar products. These options guarantee a faithful and detailed reproduction for your diorama. Instructions for use: Using acrylic brick molds is a straightforward process, but it requires some care to ensure you get the best results. Here's a step-by-step guide on how to use these molds: Prepare the mold: Ensure that your acrylic brick mold is clean and dry. Make sure it's free of any debris or dust. Cover one side of the mold to hold the pieces. You can do this process with baking paper, wet oven paper, mylar plastic, or even airbrush masking tape. Place the mold on a flat surface: Find a flat and stable surface where you can work comfortably. Place the mold with the paper side down to prevent sticking. Add air-drying clay: Take a ball of air-drying clay and place it on the mold. Use your fingers to gently press and work the clay into the cavities of the mold. Make sure you fill each brick cavity completely. You may need to adjust the amount of clay to achieve your desired brick size and thickness. Level the surface: Use the included plastic spatula or the edge of another mold to drag/scrape across the surface of the mold, skimming off any excess clay. This will ensure that the surface is even and smooth. Let it dry: Allow the clay to dry completely. The air-drying paste has a small degree of shrinkage as it dries, which will help the pieces release from the mold. Remove the paper: Once the clay is completely dry, carefully peel off the paper tape from the back of the mold. This will help release the hobby bricks. Remove the pieces: Use a blunt stick (like the reverse end of a brush) to gently push out the individual bricks from the mold. Be careful not to apply too much pressure, as you don't want to damage the delicate acrylic mold. Smooth the edges: To give your bricks a more realistic look and get rid of any sharp edges, gently rub small amounts of them together between the palms of your hands. This will soften the edges and make the bricks look more like real bricks. Use the bricks: You can now use the air-dried clay bricks for your crafting or construction project. We recommend gluing the pieces with PVA glue or an acrylic sealer such as decoupe product (like ModPodge) to secure the pieces. Remember to handle the acrylic mold with care, as it's not as flexible as rubber or silicon molds and can break if bent. With our methacrylate molds, your dioramas will come to life with authentic and captivating details - unleash your creativity and build sets that tell stories of their own! Take your projects to the next level of excellence with this essential accessory for lovers of high-quality dioramas. Quantity: 2x pack Scale: 1:35 (1:48-1:32) The thickness of the pieces: 3 mm Brick size: 2.85 x 5.7 mm Mould size: 6 x 11 cm
€9,25
-

GreenStuffWorld Acrylic Brick molds - Old Town bricks
Elevate your dioramas to an unparalleled level of realism with our acrylic molds for modeling regular bricks. These accessories will allow you to create an infinite number of them with precision and consistency, adding authenticity and depth to your creations. They are specifically designed to create miniature regular bricks for use in scale modeling projects. Each model features a variety of patterns and textures that replicate real ones and that modelers will use to shape the air-drying clay. Our acrylic modeling molds are perfectly complemented by air-drying pastes such as modeling clay, foam clay, and similar products. These options guarantee a faithful and detailed reproduction for your diorama. Instructions for use: Using acrylic brick molds is a straightforward process, but it requires some care to ensure you get the best results. Here's a step-by-step guide on how to use these molds: Prepare the mold: Ensure that your acrylic brick mold is clean and dry. Make sure it's free of any debris or dust. Cover one side of the mold to hold the pieces. You can do this process with baking paper, wet oven paper, mylar plastic, or even airbrush masking tape. Place the mold on a flat surface: Find a flat and stable surface where you can work comfortably. Place the mold with the paper side down to prevent sticking. Add air-drying clay: Take a ball of air-drying clay and place it on the mold. Use your fingers to gently press and work the clay into the cavities of the mold. Make sure you fill each brick cavity completely. You may need to adjust the amount of clay to achieve your desired brick size and thickness. Level the surface: Use the included plastic spatula or the edge of another mold to drag/scrape across the surface of the mold, skimming off any excess clay. This will ensure that the surface is even and smooth. Let it dry: Allow the clay to dry completely. The air-drying paste has a small degree of shrinkage as it dries, which will help the pieces release from the mold. Remove the paper: Once the clay is completely dry, carefully peel off the paper tape from the back of the mold. This will help release the hobby bricks. Remove the pieces: Use a blunt stick (like the reverse end of a brush) to gently push out the individual bricks from the mold. Be careful not to apply too much pressure, as you don't want to damage the delicate acrylic mold. Smooth the edges: To give your bricks a more realistic look and get rid of any sharp edges, gently rub small amounts of them together between the palms of your hands. This will soften the edges and make the bricks look more like real bricks. Use the bricks: You can now use the air-dried clay bricks for your crafting or construction project. We recommend gluing the pieces with PVA glue or an acrylic sealer such as decoupe product (like ModPodge) to secure the pieces. Remember to handle the acrylic mold with care, as it's not as flexible as rubber or silicon molds and can break if bent. With our methacrylate molds, your dioramas will come to life with authentic and captivating details - unleash your creativity and build sets that tell stories of their own! Take your projects to the next level of excellence with this essential accessory for lovers of high-quality dioramas. Quantity: 2x pack Scale: 1:35 (1:48-1:32) The thickness of the pieces: 3 mm Brick size: 2.85 x 5.7 mm Mould size: 6 x 11 cm
€9,25
-

GreenStuffWorld Acrylic Brick molds - Regular bricks
Elevate your dioramas to an unparalleled level of realism with our acrylic molds for modeling regular bricks. These accessories will allow you to create an infinite number of them with precision and consistency, adding authenticity and depth to your creations. They are specifically designed to create miniature regular bricks for use in scale modeling projects. Each model features a variety of patterns and textures that replicate real ones and that modelers will use to shape the air-drying clay. Our acrylic modeling molds are perfectly complemented by air-drying pastes such as modeling clay, foam clay, and similar products. These options guarantee a faithful and detailed reproduction for your diorama. Instructions for use: Using acrylic brick molds is a straightforward process, but it requires some care to ensure you get the best results. Here's a step-by-step guide on how to use these molds: Prepare the mold: Ensure that your acrylic brick mold is clean and dry. Make sure it's free of any debris or dust. Cover one side of the mold to hold the pieces. You can do this process with baking paper, wet oven paper, mylar plastic, or even airbrush masking tape. Place the mold on a flat surface: Find a flat and stable surface where you can work comfortably. Place the mold with the paper side down to prevent sticking. Add air-drying clay: Take a ball of air-drying clay and place it on the mold. Use your fingers to gently press and work the clay into the cavities of the mold. Make sure you fill each brick cavity completely. You may need to adjust the amount of clay to achieve your desired brick size and thickness. Level the surface: Use the included plastic spatula or the edge of another mold to drag/scrape across the surface of the mold, skimming off any excess clay. This will ensure that the surface is even and smooth. Let it dry: Allow the clay to dry completely. The air-drying paste has a small degree of shrinkage as it dries, which will help the pieces release from the mold. Remove the paper: Once the clay is completely dry, carefully peel off the paper tape from the back of the mold. This will help release the hobby bricks. Remove the pieces: Use a blunt stick (like the reverse end of a brush) to gently push out the individual bricks from the mold. Be careful not to apply too much pressure, as you don't want to damage the delicate acrylic mold. Smooth the edges: To give your bricks a more realistic look and get rid of any sharp edges, gently rub small amounts of them together between the palms of your hands. This will soften the edges and make the bricks look more like real bricks. Use the bricks: You can now use the air-dried clay bricks for your crafting or construction project. We recommend gluing the pieces with PVA glue or an acrylic sealer such as decoupe product (like ModPodge) to secure the pieces. Remember to handle the acrylic mold with care, as it's not as flexible as rubber or silicon molds and can break if bent. With our methacrylate molds, your dioramas will come to life with authentic and captivating details - unleash your creativity and build sets that tell stories of their own! Take your projects to the next level of excellence with this essential accessory for lovers of high-quality dioramas. Quantity: 2x pack Scale: 1:35 (1:48-1:32) The thickness of the pieces: 3 mm Brick size: 2.85 x 5.7 mm Mould size: 6 x 11 cm
€9,25


