


Tools all products


GreenStuffWorld Acrylic Brick molds - Round Dumble paver
Elevate your dioramas to an unparalleled level of realism with our acrylic molds for modeling regular bricks. These accessories will allow you to create an infinite number of them with precision and consistency, adding authenticity and depth to your creations. They are specifically designed to create miniature regular bricks for use in scale modeling projects. Each model features a variety of patterns and textures that replicate real ones and that modelers will use to shape the air-drying clay. Our acrylic modeling molds are perfectly complemented by air-drying pastes such as modeling clay, foam clay, and similar products. These options guarantee a faithful and detailed reproduction for your diorama. Instructions for use: Using acrylic brick molds is a straightforward process, but it requires some care to ensure you get the best results. Here's a step-by-step guide on how to use these molds: Prepare the mold: Ensure that your acrylic brick mold is clean and dry. Make sure it's free of any debris or dust. Cover one side of the mold to hold the pieces. You can do this process with baking paper, wet oven paper, mylar plastic, or even airbrush masking tape. Place the mold on a flat surface: Find a flat and stable surface where you can work comfortably. Place the mold with the paper side down to prevent sticking. Add air-drying clay: Take a ball of air-drying clay and place it on the mold. Use your fingers to gently press and work the clay into the cavities of the mold. Make sure you fill each brick cavity completely. You may need to adjust the amount of clay to achieve your desired brick size and thickness. Level the surface: Use the included plastic spatula or the edge of another mold to drag/scrape across the surface of the mold, skimming off any excess clay. This will ensure that the surface is even and smooth. Let it dry: Allow the clay to dry completely. The air-drying paste has a small degree of shrinkage as it dries, which will help the pieces release from the mold. Remove the paper: Once the clay is completely dry, carefully peel off the paper tape from the back of the mold. This will help release the hobby bricks. Remove the pieces: Use a blunt stick (like the reverse end of a brush) to gently push out the individual bricks from the mold. Be careful not to apply too much pressure, as you don't want to damage the delicate acrylic mold. Smooth the edges: To give your bricks a more realistic look and get rid of any sharp edges, gently rub small amounts of them together between the palms of your hands. This will soften the edges and make the bricks look more like real bricks. Use the bricks: You can now use the air-dried clay bricks for your crafting or construction project. We recommend gluing the pieces with PVA glue or an acrylic sealer such as decoupe product (like ModPodge) to secure the pieces. Remember to handle the acrylic mold with care, as it's not as flexible as rubber or silicon molds and can break if bent. With our methacrylate molds, your dioramas will come to life with authentic and captivating details - unleash your creativity and build sets that tell stories of their own! Take your projects to the next level of excellence with this essential accessory for lovers of high-quality dioramas. Quantity: 2x pack Scale: 1:35 (1:48-1:32) The thickness of the pieces: 3 mm Brick size: 2.85 x 5.7 mm Mould size: 6 x 11 cm
€9,25
-

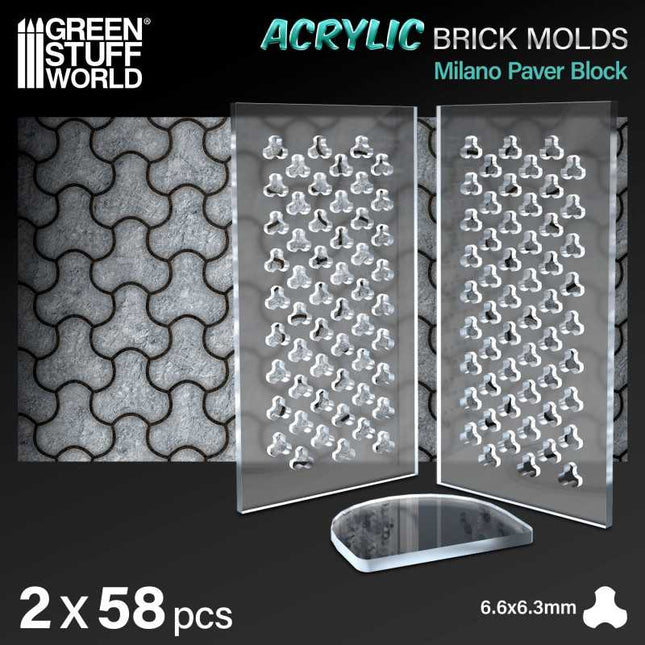
GreenStuffWorld Acrylic Brick molds - Milano Paver Block
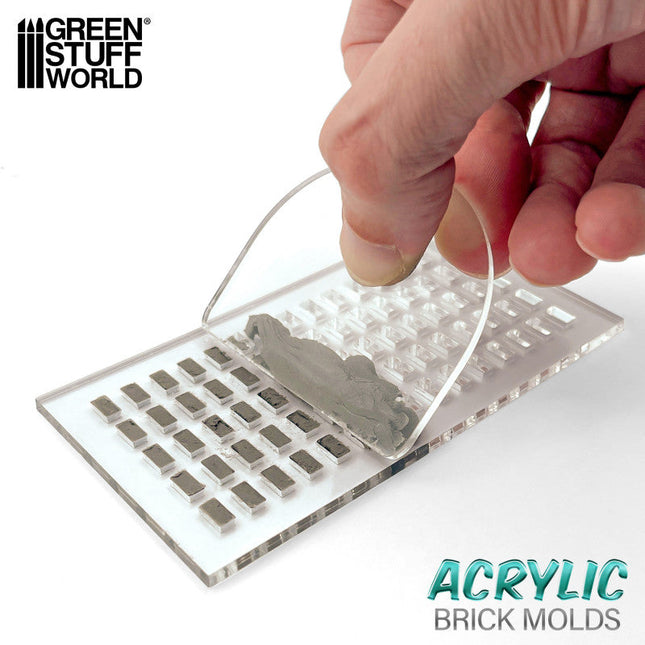
Elevate your dioramas to an unparalleled level of realism with our acrylic molds for modeling regular bricks. These accessories will allow you to create an infinite number of them with precision and consistency, adding authenticity and depth to your creations. They are specifically designed to create miniature regular bricks for use in scale modeling projects. Each model features a variety of patterns and textures that replicate real ones and that modelers will use to shape the air-drying clay. Our acrylic modeling molds are perfectly complemented by air-drying pastes such as modeling clay, foam clay, and similar products. These options guarantee a faithful and detailed reproduction for your diorama. Instructions for use: Using acrylic brick molds is a straightforward process, but it requires some care to ensure you get the best results. Here's a step-by-step guide on how to use these molds: Prepare the mold: Ensure that your acrylic brick mold is clean and dry. Make sure it's free of any debris or dust. Cover one side of the mold to hold the pieces. You can do this process with baking paper, wet oven paper, mylar plastic, or even airbrush masking tape. Place the mold on a flat surface: Find a flat and stable surface where you can work comfortably. Place the mold with the paper side down to prevent sticking. Add air-drying clay: Take a ball of air-drying clay and place it on the mold. Use your fingers to gently press and work the clay into the cavities of the mold. Make sure you fill each brick cavity completely. You may need to adjust the amount of clay to achieve your desired brick size and thickness. Level the surface: Use the included plastic spatula or the edge of another mold to drag/scrape across the surface of the mold, skimming off any excess clay. This will ensure that the surface is even and smooth. Let it dry: Allow the clay to dry completely. The air-drying paste has a small degree of shrinkage as it dries, which will help the pieces release from the mold. Remove the paper: Once the clay is completely dry, carefully peel off the paper tape from the back of the mold. This will help release the hobby bricks. Remove the pieces: Use a blunt stick (like the reverse end of a brush) to gently push out the individual bricks from the mold. Be careful not to apply too much pressure, as you don't want to damage the delicate acrylic mold. Smooth the edges: To give your bricks a more realistic look and get rid of any sharp edges, gently rub small amounts of them together between the palms of your hands. This will soften the edges and make the bricks look more like real bricks. Use the bricks: You can now use the air-dried clay bricks for your crafting or construction project. We recommend gluing the pieces with PVA glue or an acrylic sealer such as decoupe product (like ModPodge) to secure the pieces. Remember to handle the acrylic mold with care, as it's not as flexible as rubber or silicon molds and can break if bent. With our methacrylate molds, your dioramas will come to life with authentic and captivating details - unleash your creativity and build sets that tell stories of their own! Take your projects to the next level of excellence with this essential accessory for lovers of high-quality dioramas. Quantity: 2x pack Scale: 1:35 (1:48-1:32) The thickness of the pieces: 3 mm Brick size: 2.85 x 5.7 mm Mould size: 6 x 11 cm
€9,25
-

GreenStuffWorld Acrylic Brick molds - Zig Zag Pavement (or Backbone)
Elevate your dioramas to an unparalleled level of realism with our acrylic molds for modeling regular bricks. These accessories will allow you to create an infinite number of them with precision and consistency, adding authenticity and depth to your creations. They are specifically designed to create miniature regular bricks for use in scale modeling projects. Each model features a variety of patterns and textures that replicate real ones and that modelers will use to shape the air-drying clay. Our acrylic modeling molds are perfectly complemented by air-drying pastes such as modeling clay, foam clay, and similar products. These options guarantee a faithful and detailed reproduction for your diorama. Instructions for use: Using acrylic brick molds is a straightforward process, but it requires some care to ensure you get the best results. Here's a step-by-step guide on how to use these molds: Prepare the mold: Ensure that your acrylic brick mold is clean and dry. Make sure it's free of any debris or dust. Cover one side of the mold to hold the pieces. You can do this process with baking paper, wet oven paper, mylar plastic, or even airbrush masking tape. Place the mold on a flat surface: Find a flat and stable surface where you can work comfortably. Place the mold with the paper side down to prevent sticking. Add air-drying clay: Take a ball of air-drying clay and place it on the mold. Use your fingers to gently press and work the clay into the cavities of the mold. Make sure you fill each brick cavity completely. You may need to adjust the amount of clay to achieve your desired brick size and thickness. Level the surface: Use the included plastic spatula or the edge of another mold to drag/scrape across the surface of the mold, skimming off any excess clay. This will ensure that the surface is even and smooth. Let it dry: Allow the clay to dry completely. The air-drying paste has a small degree of shrinkage as it dries, which will help the pieces release from the mold. Remove the paper: Once the clay is completely dry, carefully peel off the paper tape from the back of the mold. This will help release the hobby bricks. Remove the pieces: Use a blunt stick (like the reverse end of a brush) to gently push out the individual bricks from the mold. Be careful not to apply too much pressure, as you don't want to damage the delicate acrylic mold. Smooth the edges: To give your bricks a more realistic look and get rid of any sharp edges, gently rub small amounts of them together between the palms of your hands. This will soften the edges and make the bricks look more like real bricks. Use the bricks: You can now use the air-dried clay bricks for your crafting or construction project. We recommend gluing the pieces with PVA glue or an acrylic sealer such as decoupe product (like ModPodge) to secure the pieces. Remember to handle the acrylic mold with care, as it's not as flexible as rubber or silicon molds and can break if bent. With our methacrylate molds, your dioramas will come to life with authentic and captivating details - unleash your creativity and build sets that tell stories of their own! Take your projects to the next level of excellence with this essential accessory for lovers of high-quality dioramas. Quantity: 2x pack Scale: 1:35 (1:48-1:32) The thickness of the pieces: 3 mm Brick size: 2.85 x 5.7 mm Mould size: 6 x 11 cm
€9,25
-

GreenStuffWorld Acrylic Brick molds - H Shaped
Elevate your dioramas to an unparalleled level of realism with our acrylic molds for modeling regular bricks. These accessories will allow you to create an infinite number of them with precision and consistency, adding authenticity and depth to your creations. They are specifically designed to create miniature regular bricks for use in scale modeling projects. Each model features a variety of patterns and textures that replicate real ones and that modelers will use to shape the air-drying clay. Our acrylic modeling molds are perfectly complemented by air-drying pastes such as modeling clay, foam clay, and similar products. These options guarantee a faithful and detailed reproduction for your diorama. Instructions for use: Using acrylic brick molds is a straightforward process, but it requires some care to ensure you get the best results. Here's a step-by-step guide on how to use these molds: Prepare the mold: Ensure that your acrylic brick mold is clean and dry. Make sure it's free of any debris or dust. Cover one side of the mold to hold the pieces. You can do this process with baking paper, wet oven paper, mylar plastic, or even airbrush masking tape. Place the mold on a flat surface: Find a flat and stable surface where you can work comfortably. Place the mold with the paper side down to prevent sticking. Add air-drying clay: Take a ball of air-drying clay and place it on the mold. Use your fingers to gently press and work the clay into the cavities of the mold. Make sure you fill each brick cavity completely. You may need to adjust the amount of clay to achieve your desired brick size and thickness. Level the surface: Use the included plastic spatula or the edge of another mold to drag/scrape across the surface of the mold, skimming off any excess clay. This will ensure that the surface is even and smooth. Let it dry: Allow the clay to dry completely. The air-drying paste has a small degree of shrinkage as it dries, which will help the pieces release from the mold. Remove the paper: Once the clay is completely dry, carefully peel off the paper tape from the back of the mold. This will help release the hobby bricks. Remove the pieces: Use a blunt stick (like the reverse end of a brush) to gently push out the individual bricks from the mold. Be careful not to apply too much pressure, as you don't want to damage the delicate acrylic mold. Smooth the edges: To give your bricks a more realistic look and get rid of any sharp edges, gently rub small amounts of them together between the palms of your hands. This will soften the edges and make the bricks look more like real bricks. Use the bricks: You can now use the air-dried clay bricks for your crafting or construction project. We recommend gluing the pieces with PVA glue or an acrylic sealer such as decoupe product (like ModPodge) to secure the pieces. Remember to handle the acrylic mold with care, as it's not as flexible as rubber or silicon molds and can break if bent. With our methacrylate molds, your dioramas will come to life with authentic and captivating details - unleash your creativity and build sets that tell stories of their own! Take your projects to the next level of excellence with this essential accessory for lovers of high-quality dioramas. Quantity: 2x pack Scale: 1:35 (1:48-1:32) The thickness of the pieces: 3 mm Brick size: 2.85 x 5.7 mm Mould size: 6 x 11 cm
€9,25
-

GreenStuffWorld Acrylic Brick molds - Trihex Pavement
Elevate your dioramas to an unparalleled level of realism with our acrylic molds for modeling regular bricks. These accessories will allow you to create an infinite number of them with precision and consistency, adding authenticity and depth to your creations. They are specifically designed to create miniature regular bricks for use in scale modeling projects. Each model features a variety of patterns and textures that replicate real ones and that modelers will use to shape the air-drying clay. Our acrylic modeling molds are perfectly complemented by air-drying pastes such as modeling clay, foam clay, and similar products. These options guarantee a faithful and detailed reproduction for your diorama. Instructions for use: Using acrylic brick molds is a straightforward process, but it requires some care to ensure you get the best results. Here's a step-by-step guide on how to use these molds: Prepare the mold: Ensure that your acrylic brick mold is clean and dry. Make sure it's free of any debris or dust. Cover one side of the mold to hold the pieces. You can do this process with baking paper, wet oven paper, mylar plastic, or even airbrush masking tape. Place the mold on a flat surface: Find a flat and stable surface where you can work comfortably. Place the mold with the paper side down to prevent sticking. Add air-drying clay: Take a ball of air-drying clay and place it on the mold. Use your fingers to gently press and work the clay into the cavities of the mold. Make sure you fill each brick cavity completely. You may need to adjust the amount of clay to achieve your desired brick size and thickness. Level the surface: Use the included plastic spatula or the edge of another mold to drag/scrape across the surface of the mold, skimming off any excess clay. This will ensure that the surface is even and smooth. Let it dry: Allow the clay to dry completely. The air-drying paste has a small degree of shrinkage as it dries, which will help the pieces release from the mold. Remove the paper: Once the clay is completely dry, carefully peel off the paper tape from the back of the mold. This will help release the hobby bricks. Remove the pieces: Use a blunt stick (like the reverse end of a brush) to gently push out the individual bricks from the mold. Be careful not to apply too much pressure, as you don't want to damage the delicate acrylic mold. Smooth the edges: To give your bricks a more realistic look and get rid of any sharp edges, gently rub small amounts of them together between the palms of your hands. This will soften the edges and make the bricks look more like real bricks. Use the bricks: You can now use the air-dried clay bricks for your crafting or construction project. We recommend gluing the pieces with PVA glue or an acrylic sealer such as decoupe product (like ModPodge) to secure the pieces. Remember to handle the acrylic mold with care, as it's not as flexible as rubber or silicon molds and can break if bent. With our methacrylate molds, your dioramas will come to life with authentic and captivating details - unleash your creativity and build sets that tell stories of their own! Take your projects to the next level of excellence with this essential accessory for lovers of high-quality dioramas. Quantity: 2x pack Scale: 1:35 (1:48-1:32) The thickness of the pieces: 3 mm Brick size: 2.85 x 5.7 mm Mould size: 6 x 11 cm
€9,25
-

GreenStuffWorld Acrylic Brick molds - Old Town bricks
Elevate your dioramas to an unparalleled level of realism with our acrylic molds for modeling regular bricks. These accessories will allow you to create an infinite number of them with precision and consistency, adding authenticity and depth to your creations. They are specifically designed to create miniature regular bricks for use in scale modeling projects. Each model features a variety of patterns and textures that replicate real ones and that modelers will use to shape the air-drying clay. Our acrylic modeling molds are perfectly complemented by air-drying pastes such as modeling clay, foam clay, and similar products. These options guarantee a faithful and detailed reproduction for your diorama. Instructions for use: Using acrylic brick molds is a straightforward process, but it requires some care to ensure you get the best results. Here's a step-by-step guide on how to use these molds: Prepare the mold: Ensure that your acrylic brick mold is clean and dry. Make sure it's free of any debris or dust. Cover one side of the mold to hold the pieces. You can do this process with baking paper, wet oven paper, mylar plastic, or even airbrush masking tape. Place the mold on a flat surface: Find a flat and stable surface where you can work comfortably. Place the mold with the paper side down to prevent sticking. Add air-drying clay: Take a ball of air-drying clay and place it on the mold. Use your fingers to gently press and work the clay into the cavities of the mold. Make sure you fill each brick cavity completely. You may need to adjust the amount of clay to achieve your desired brick size and thickness. Level the surface: Use the included plastic spatula or the edge of another mold to drag/scrape across the surface of the mold, skimming off any excess clay. This will ensure that the surface is even and smooth. Let it dry: Allow the clay to dry completely. The air-drying paste has a small degree of shrinkage as it dries, which will help the pieces release from the mold. Remove the paper: Once the clay is completely dry, carefully peel off the paper tape from the back of the mold. This will help release the hobby bricks. Remove the pieces: Use a blunt stick (like the reverse end of a brush) to gently push out the individual bricks from the mold. Be careful not to apply too much pressure, as you don't want to damage the delicate acrylic mold. Smooth the edges: To give your bricks a more realistic look and get rid of any sharp edges, gently rub small amounts of them together between the palms of your hands. This will soften the edges and make the bricks look more like real bricks. Use the bricks: You can now use the air-dried clay bricks for your crafting or construction project. We recommend gluing the pieces with PVA glue or an acrylic sealer such as decoupe product (like ModPodge) to secure the pieces. Remember to handle the acrylic mold with care, as it's not as flexible as rubber or silicon molds and can break if bent. With our methacrylate molds, your dioramas will come to life with authentic and captivating details - unleash your creativity and build sets that tell stories of their own! Take your projects to the next level of excellence with this essential accessory for lovers of high-quality dioramas. Quantity: 2x pack Scale: 1:35 (1:48-1:32) The thickness of the pieces: 3 mm Brick size: 2.85 x 5.7 mm Mould size: 6 x 11 cm
€9,25
-

GreenStuffWorld Acrylic Brick molds - Regular bricks
Elevate your dioramas to an unparalleled level of realism with our acrylic molds for modeling regular bricks. These accessories will allow you to create an infinite number of them with precision and consistency, adding authenticity and depth to your creations. They are specifically designed to create miniature regular bricks for use in scale modeling projects. Each model features a variety of patterns and textures that replicate real ones and that modelers will use to shape the air-drying clay. Our acrylic modeling molds are perfectly complemented by air-drying pastes such as modeling clay, foam clay, and similar products. These options guarantee a faithful and detailed reproduction for your diorama. Instructions for use: Using acrylic brick molds is a straightforward process, but it requires some care to ensure you get the best results. Here's a step-by-step guide on how to use these molds: Prepare the mold: Ensure that your acrylic brick mold is clean and dry. Make sure it's free of any debris or dust. Cover one side of the mold to hold the pieces. You can do this process with baking paper, wet oven paper, mylar plastic, or even airbrush masking tape. Place the mold on a flat surface: Find a flat and stable surface where you can work comfortably. Place the mold with the paper side down to prevent sticking. Add air-drying clay: Take a ball of air-drying clay and place it on the mold. Use your fingers to gently press and work the clay into the cavities of the mold. Make sure you fill each brick cavity completely. You may need to adjust the amount of clay to achieve your desired brick size and thickness. Level the surface: Use the included plastic spatula or the edge of another mold to drag/scrape across the surface of the mold, skimming off any excess clay. This will ensure that the surface is even and smooth. Let it dry: Allow the clay to dry completely. The air-drying paste has a small degree of shrinkage as it dries, which will help the pieces release from the mold. Remove the paper: Once the clay is completely dry, carefully peel off the paper tape from the back of the mold. This will help release the hobby bricks. Remove the pieces: Use a blunt stick (like the reverse end of a brush) to gently push out the individual bricks from the mold. Be careful not to apply too much pressure, as you don't want to damage the delicate acrylic mold. Smooth the edges: To give your bricks a more realistic look and get rid of any sharp edges, gently rub small amounts of them together between the palms of your hands. This will soften the edges and make the bricks look more like real bricks. Use the bricks: You can now use the air-dried clay bricks for your crafting or construction project. We recommend gluing the pieces with PVA glue or an acrylic sealer such as decoupe product (like ModPodge) to secure the pieces. Remember to handle the acrylic mold with care, as it's not as flexible as rubber or silicon molds and can break if bent. With our methacrylate molds, your dioramas will come to life with authentic and captivating details - unleash your creativity and build sets that tell stories of their own! Take your projects to the next level of excellence with this essential accessory for lovers of high-quality dioramas. Quantity: 2x pack Scale: 1:35 (1:48-1:32) The thickness of the pieces: 3 mm Brick size: 2.85 x 5.7 mm Mould size: 6 x 11 cm
€9,25
-

GreenStuffWorld 50mm doorzichtige acrylic clear bases (5st)
Clear Acrylic 50mm Bases - TRANSPARENT See where you miniature stands on the board by this acrylic transparant base. Compatible with any wargame or board game. Each pack contains 5 x 40mm round clear acrylic bases. #clear #acrylic #bases #transparant #40mm#greenstuffworld
€3,45
-

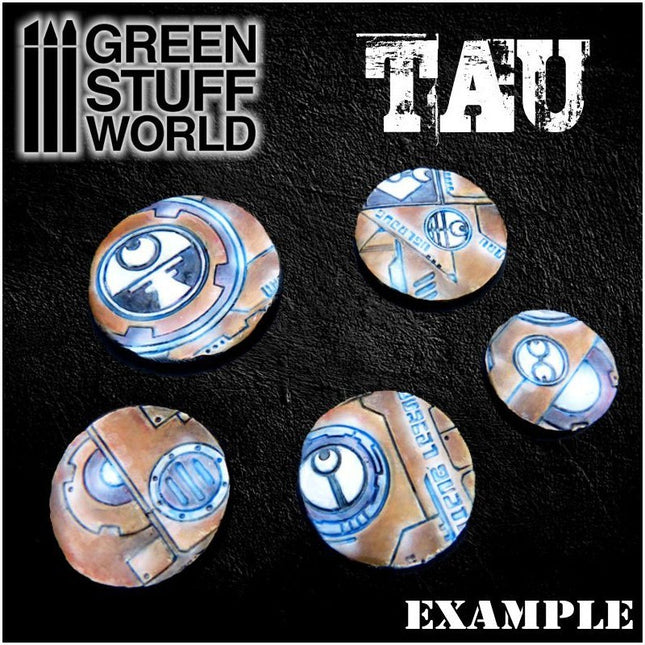
GreenStuffWorld Rolling pin T'au (Tau) - figuur roller T'au (Warhammer)
Figuur roller T'au of Tau Empire Roller voorzien van een basisfiguur waarmee een continu herhaald patroon op klei en plamuren kan worden gedrukt. Gemaakt van helder PMMA-plastic met verbazingwekkende antikleefeigenschappen. Niet giftig. Ze zijn er in verschillende texturen die u kunt kopen op basis van uw specifieke behoeften.Lengte: 14'50 cm (5'5 inches)Diameter: 2'5cm (1 inch)GEBRUIK INSTRUCTIES:1e - Meng de epoxyhars / klei / polymer klei tot een egaal plakkaat2e - Zorg voor een optimaal resultaat voor een glad en egaal oppervlak zodat het patroon goed zal overkomen. Gebruik desnoods een deegroller, fles of ander glad rond voorwerp. 3e - Afhankelijk van het type plamuur / klei is het raadzaam om de figuurroller nat te maken om vastzitten te voorkomen.4e - Verplaats de figuurroller langzaam en oefen gelijkmatige druk uit op alle punten voor een gelijkmatige afdruk op de klei, epoxy kneedhars of ander materiaal5e - Haal overtollig klei weg met een scherp mes. Het wordt aanbevolen om dit te doen als het eenmaal is opgedroogd om vervormingen in de stopverf / klei te voorkomen.Materialen:Er zijn veel verschillende kleien of epoxyhars op de markt en ze kunnen allemaal worden voorzien van een afdruk met de roller. Gebruik verschillende druk bij de verschillende materialen.Gewoonlijk zijn polymeerklei (Fimo of Sculpey-type) vrij eenvoudig om met deze Rolling Pins te bewerken, omdat ze een gemakkelijke correctie van fouten toelaten voordat ze worden gebakken. Wil je de structuur overbrengen op een basis, gebruik dan een MDF basis. Dit omdat je de polymeerklei direct op een MDF-basis kunt zetten en alles in de oven, inclusief de basis, kunt plaatsen. De droogtijd van deze klei is ongeveer 15 minuten bij 150ºC. MDF hout laat wel een lichte geur achter zoals bij geroosterd brood, maar maak je geen zorgen dat het niet zal branden! In het geval van epoxy basis zoals GreenStuff zijn er verschillende technieken die vergelijkbare resultaten opleveren. Het goede is: je hoeft ze niet te bakken, alleen te laten drogen en daarna kun je ze direct verwerken. Met Green Stuff, dat bijzonder kleverig is, is het het beste om de roller of de klei enigszins te bevochtigen voor je de figuur roller erover heen walst. U kunt ook de kleverigheid verminderen door talkpoeder toe te passen of door een oliebasis als Vaseline te gebruiken.Andere epoxy klei zoals de Milliput putty, bijvoorbeeld, zijn ook geschikt, maar we zouden niet aanraden om ze veel nat te maken. Als het mengsel te plakkerig is, is het beter om door te gaan met kneden totdat de plakkerigheid verdwenen is. Voor dit soort epoxyplamuren is het erg belangrijk om de deegrollen na gebruik goed te reinigen.Schoonmaak instructies:Gebruik na het werken met de deegroller een penseel met harde haren en voldoende water om eventuele resten op de deegroller te verwijderen, indien nodig. Om de veiligheid te garanderen, moeten kinderen nauwlettend worden gecontroleerd door een verantwoordelijke volwassene.
€13,00
-

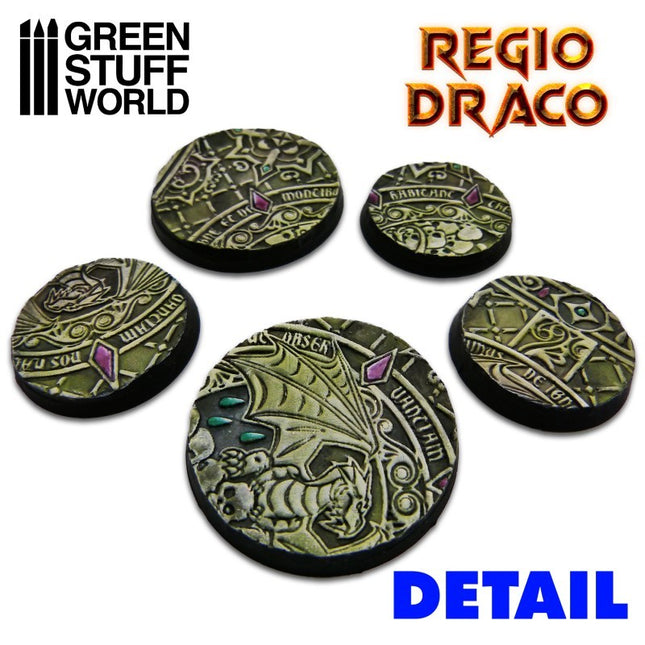
GreenStuffWorld Rolling pin Regio Draco - figuur roller Draken
Rolling pin Regio Draco - Figuur roller Draken Roller voorzien van een basisfiguur waarmee een continu herhaald patroon op klei en plamuren kan worden gedrukt. Gemaakt van helder PMMA-plastic met verbazingwekkende antikleefeigenschappen. Niet giftig. Ze zijn er in verschillende texturen die u kunt kopen op basis van uw specifieke behoeften.Lengte: 14'50 cm (5'5 inches)Diameter: 2'5cm (1 inch)Aanbevolen schaal: 1/35-1/43-1/48-1/76 of Warhammer scale GEBRUIK INSTRUCTIES1e - Meng de epoxyhars / klei / polymer klei tot een egaal plakkaat2e - Zorg voor een optimaal resultaat voor een glad en egaal oppervlak zodat het patroon goed zal overkomen. Gebruik desnoods een deegroller, fles of ander glad rond voorwerp. 3e - Afhankelijk van het type plamuur / klei is het raadzaam om de figuurroller nat te maken om vastzitten te voorkomen.4e - Verplaats de figuurroller langzaam en oefen gelijkmatige druk uit op alle punten voor een gelijkmatige afdruk op de klei, epoxy kneedhars of ander materiaal5e - Haal overtollig klei weg met een scherp mes. Het wordt aanbevolen om dit te doen als het eenmaal is opgedroogd om vervormingen in de stopverf / klei te voorkomen.Materialen:Er zijn veel verschillende kleien of epoxyhars op de markt en ze kunnen allemaal worden voorzien van een afdruk met de roller. Gebruik verschillende druk bij de verschillende materialen.Gewoonlijk zijn polymeerklei (Fimo of Sculpey-type) vrij eenvoudig om met deze Rolling Pins te bewerken, omdat ze een gemakkelijke correctie van fouten toelaten voordat ze worden gebakken. Wil je de structuur overbrengen op een basis, gebruik dan een MDF basis. Dit omdat je de polymeerklei direct op een MDF-basis kunt zetten en alles in de oven, inclusief de basis, kunt plaatsen. De droogtijd van deze klei is ongeveer 15 minuten bij 150ºC. MDF hout laat wel een lichte geur achter zoals bij geroosterd brood, maar maak je geen zorgen dat het zal branden! Wil je alleen een prachtig pad, veranda, straat of iets anders maken dan kun je dit natuurlijk op een platte plaat drogen in de oven.In het geval van epoxy basis zoals GreenStuff zijn er verschillende technieken die vergelijkbare resultaten opleveren. Het goede is: je hoeft ze niet te bakken, alleen te laten drogen en daarna kun je ze direct verwerken. Met Green Stuff, dat bijzonder kleverig is, is het het beste om de roller of de klei enigszins te bevochtigen voor je de figuur roller erover heen walst. U kunt ook de kleverigheid verminderen door talkpoeder toe te passen of door een oliebasis als Vaseline te gebruiken.Andere epoxy klei zoals de Milliput putty, bijvoorbeeld, zijn ook geschikt, maar we zouden niet aanraden om ze veel nat te maken. Als het mengsel te plakkerig is, is het beter om door te gaan met kneden totdat de plakkerigheid verdwenen is. Voor dit soort epoxyplamuren is het erg belangrijk om de rollen na gebruik goed te reinigen.Schoonmaak instructies:Gebruik na het werken met de roller een penseel met harde haren en voldoende water om eventuele resten op de roller te verwijderen, indien nodig. Om de veiligheid te garanderen, moeten kinderen nauwlettend worden gecontroleerd door een verantwoordelijke volwassene. #regio #draco #draken #dragon #idoneth #deepkin #greenstuffworld #rollingpin
€13,00
-

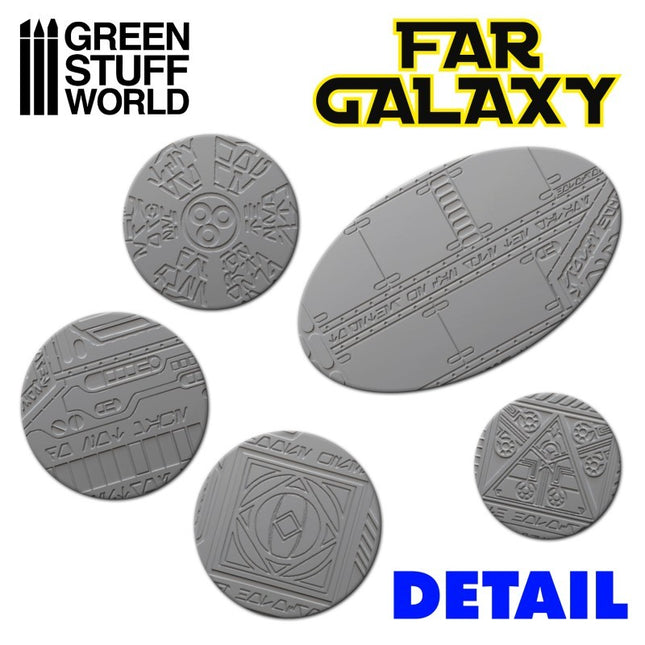
GreenStuffWorld Rolling pin Far Galaxy - figuur roller Far Galaxy
Figuur roller Far GalaxyRoller voorzien van een basisfiguur waarmee een continu herhaald patroon op klei en plamuren kan worden gedrukt. Gemaakt van helder PMMA-plastic met verbazingwekkende antikleefeigenschappen. Niet giftig. Ze zijn er in verschillende texturen die u kunt kopen op basis van uw specifieke behoeften.Lengte: 14,50 cm (5'5 inches)Diameter: 2,5cm (1 inch) Patroon varieert met verschillende steensoorten, motieven (fleur de lis) en een filigree / rasters GEBRUIK INSTRUCTIES:1e - Meng de epoxyhars / klei / polymer klei tot een egaal plakkaat2e - Zorg voor een optimaal resultaat voor een glad en egaal oppervlak zodat het patroon goed zal overkomen. Gebruik desnoods een deegroller, fles of ander glad rond voorwerp. 3e - Afhankelijk van het type plamuur / klei is het raadzaam om de figuurroller nat te maken om vastzitten te voorkomen.4e - Verplaats de figuurroller langzaam en oefen gelijkmatige druk uit op alle punten voor een gelijkmatige afdruk op de klei, epoxy kneedhars of ander materiaal5e - Haal overtollig klei weg met een scherp mes. Het wordt aanbevolen om dit te doen als het eenmaal is opgedroogd om vervormingen in de stopverf / klei te voorkomen.Materialen:Er zijn veel verschillende kleien of epoxyhars op de markt en ze kunnen allemaal worden voorzien van een afdruk met de roller. Gebruik verschillende druk bij de verschillende materialen.Gewoonlijk zijn polymeerklei (Fimo of Sculpey-type) vrij eenvoudig om met deze Rolling Pins te bewerken, omdat ze een gemakkelijke correctie van fouten toelaten voordat ze worden gebakken. Wil je de structuur overbrengen op een basis, gebruik dan een MDF basis. Dit omdat je de polymeerklei direct op een MDF-basis kunt zetten en alles in de oven, inclusief de basis, kunt plaatsen. De droogtijd van deze klei is ongeveer 15 minuten bij 150ºC. MDF hout laat wel een lichte geur achter zoals bij geroosterd brood, maar maak je geen zorgen dat het zal branden! In het geval van epoxy basis zoals GreenStuff zijn er verschillende technieken die vergelijkbare resultaten opleveren. Het goede is: je hoeft ze niet te bakken, alleen te laten drogen en daarna kun je ze direct verwerken. Met Green Stuff, dat bijzonder kleverig is, is het het beste om de roller of de klei enigszins te bevochtigen voor je de figuur roller erover heen walst. U kunt ook de kleverigheid verminderen door talkpoeder toe te passen of door een oliebasis als Vaseline te gebruiken.Andere epoxy klei zoals de Milliput putty, bijvoorbeeld, zijn ook geschikt, maar we zouden niet aanraden om ze veel nat te maken. Als het mengsel te plakkerig is, is het beter om door te gaan met kneden totdat de plakkerigheid verdwenen is. Voor dit soort epoxyplamuren is het erg belangrijk om de deegrollen na gebruik goed te reinigen.Schoonmaak instructies:Gebruik na het werken met de roller een penseel met harde haren (of een scratch brush) en voldoende water om eventuele resten op de roller te verwijderen, indien nodig. Om de veiligheid te garanderen, moeten kinderen nauwlettend worden gecontroleerd door een verantwoordelijke volwassene. #greenstuffworld #rolling #pin #far #galaxy
€13,00
-
GreenStuffWorld Set van 10 boortjes
Bit Set for drill Bit Set for drill of 1, 1,5, and 2 mm drill bits for drilling, positioning, and starting holes in a variety of materials in your hobby projects such as miniature conversions, miniature assembly, scale models, model railroading, arts, and craft, etc. Compatible with our Hobby Hand Drill offered by Green Stuff World on this website and also with all Mini Hand Drills in the market for small sizes. This Hobby Drill Set includes a total of 10 precision bits as follows: - 5x in 1 mm - 3x in 1,5mm. - 2x bits in 2mm #hobby #hand #drill #set #boortjes #bits #greenstuffworld
€3,85
-

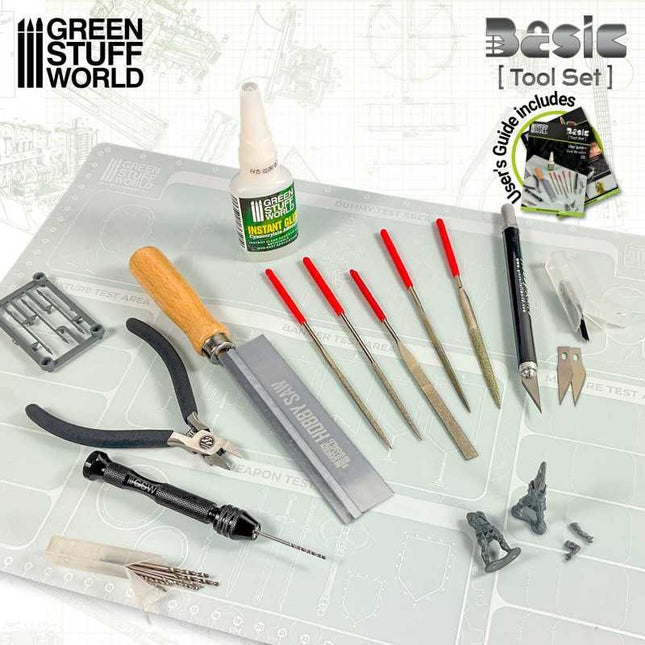
GreenStuffWorld Basic tool kit (30 delig)
Basic Tool kit A basic toolkit for modeling purposes typically includes a range of tools that are commonly used in modeling, DIY, prototyping, and crafting. This basic tool set has been designed to cover all the needs of a beginner and more advanced model maker in the miniature hobby. Ideal for beginners and hobbyists, modelers, and role-playing games such as Warhammer, 40K, AOS, 9thAge, Star Wars Legion, and Dungeons & Dragons. It should cover the basics for most modeling projects, depending on the specific type of modeling you're interested in e.g., scale models, architectural models, dioramas. This Basic Tool kit includes: Hobby Hand drill with 10 drills Hobby saw Modeling cutter + 10 refills CA instant glue 5x modeling files Flat Cutting Nipper #greenstuffworld #basic #tool #kit #set
€42,50
-

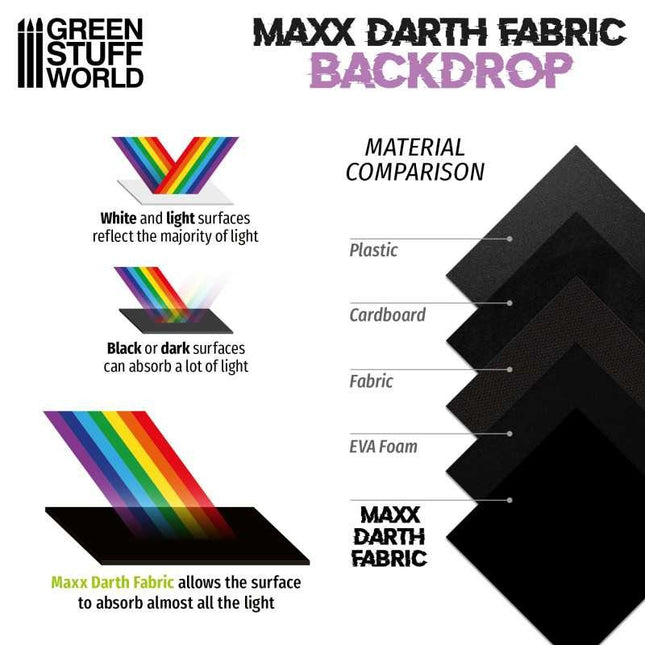
GreenStuffWorld Maxx Darth Black 20X30cm
Black fabric for backgrounds Ultra-black photography backdrops are a very popular choice in modeling and crafts, as they allow you to photograph your work with a high color contrast obtaining very professional finishes with almost no work. The super black Maxx Darth™ material of this photo background has been created from a combination of unique synthetic flocked fabrics with light-absorbing properties at a percentage of 99.9% in the visible light spectrum, making this backdrop the blackest fabric on earth. This ultra-black backdrop will allow you to use it as a Photography and Videography photo background of miniatures and other small objects, easily obtaining images with completely pure black backgrounds and no reflections. Your miniature photos will be directly contrasted without the need to use photoshop. This photo background has no anchor holes to be placed inside a lightbox. In order to use it, you simply have to lean it against a rigid surface creating a curve. Contains: 1x Maxx Darth backdrop 200x300mm Warnings: Do not leave any heavy object on top of your backdrop, as it could deform the flocked micro-fabric film, reducing its light absorption performance. Always keep it very clean with a Sticky Hair Removal Roller, since any speck of dust will be visible in your photo background due to contrasting colors. In case of wrinkles or folds in any of your photo backgrounds, the indirect application of steam and gentle brushing could restore the shape. These photography backdrops do not absorb infrared light. #greenstuffworld #maxx #darth #black #size #m #photo #background
€7,50
-

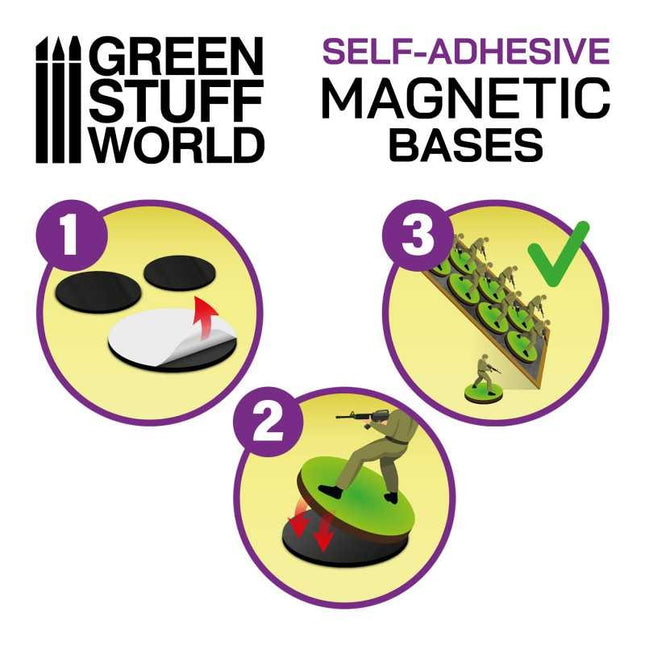
GreenStuffWorld Magneten zelfklevende rond 55mm (13st)
Magnetic Sheet - SELF ADHESIVE Self-adhesive flexible magnetic sheets provide a quick and simple way of magnetizing your wargames units without the necessity of drilling bases and gluing magnets. Square, rectangular, round, and oval most common shapes are available in a variety of sizes, but also as complete sheets to be cut to convenience with a pair of scissors or a craft knife. Use them alone, together with our rubber steel sheets, or together with our Neodymium Magnets depending on the attraction strength needed. Using magnetically-based figures allows you to field large units on the tabletop on their movement trays as one item. This removes the time spent moving figures one-by-one across the table. Even if the trays are knocked or tipped, you have a good chance of your figures staying attached and undamaged. Applying is very easy. Simply take the protective paper off the underside of the magnetic foil and stick it to the bottom of the bases. The thickness of the stickers is 0,9mm. Content: 13 rounds Gebruik een rubber sheet in een box om ze magnetisch vast te zetten. #magnetisch #rond #magnetic #round #55mm #zelfklevend #self #adhesive #greenstuffworld
€3,75