


Tools all products


Silicone glue - Clear Glue 45ml
Clear Glue 45ml | Silicone glue for EVA foams, PLA plastic from 3D printing, Crafts, and Modeling What is Silicone Glue? This silicone glue - clear glue, known for its flexibility and transparency, is crafted from silicone polymers and used for creating strong bonds between various materials. It is particularly effective on PVC, resins, transparent plastics, plasticard, wood, PLA plastic from 3D printing, and EVA foam. Unlike sealants designed for filling gaps, this type of product focuses on bonding materials with precision and a clear finish. Its slower drying time compared to cyanoacrylate adhesives makes it a preferred choice for intricate or detailed projects, ensuring both durability and ease of use. It also excels in maintaining a clean, professional appearance, especially on clear surfaces. It is also excellent for bonding all types of clear plastics where a cyanoacrylate would create a whitish stain, e.g. bonding clear plastic miniature bases, aircraft cockpits, and weapon effects helping to maintain a clean and professional look. How to Remove Silicone Glue? To remove this type of adhesive, a careful approach is essential. Start by scraping away excess material using a non-abrasive tool like a plastic scraper. If the bond is particularly strong, applying a solvent such as isopropyl alcohol or acetone can help soften it. Once softened, gently rub the area with a cloth to lift any remaining residue. For delicate surfaces, consider testing the solvent on an inconspicuous spot to avoid potential damage. If necessary, specialized removers designed for this purpose can offer additional assistance in breaking down tougher residues. What is Silicone Glue Used For? This versatile bonding agent is widely used in craft, repair, 3D printing, and professional applications. It works effectively on PVC, resins, and clear plastics, as well as PLA plastic from 3D printers ensuring that surfaces retain their clarity without visible imperfections. In crafts, it is often used to glue EVA foam, felt, or cardboard in projects that require a clean, seamless finish. In the world of modeling and Warhammer board game miniatures, it is an excellent choice for creating dynamic effects such as splashes or slime in modeling projects. Unlike other adhesives, it does not discolor, making it ideal for transparent or decorative materials where precision is most important. How to Dissolve Silicone Glue? Breaking down this material requires a combination of patience and the right tools. Acetone is one of the most effective solvents, loosening the bond when applied sparingly and allowed to penetrate for a few minutes. For a gentler approach, warming the adhesive with a hairdryer can make it more pliable and easier to remove. Dedicated removers designed specifically for silicone-based products can also provide excellent results. When working with solvents or heat, always ensure proper ventilation and take care to protect the surrounding surfaces and materials. How to Add Drool and Saliva Effects to Your Miniatures Using Clear Glue? Adding drool and saliva effects to miniatures can elevate their realism, especially for creatures like monsters or aliens. Using a transparent adhesive like Clear Glue ensures a perfect glossy finish for this purpose. Here’s a step-by-step guide to achieving these effects. Prepare Your Tools and Materials: Gather your materials: the adhesive, a toothpick or fine applicator, tweezers, and a small paintbrush. These tools will help you work precisely and ensure a realistic outcome. Visualize the Effect: Decide on the placement and style of the drool or saliva. For instance, you might create a thin strand between teeth or dripping saliva from a tongue. Imagining the final look helps with placement and proportions during application. Apply the Adhesive: Using the toothpick or fine applicator, place a small amount of adhesive where the drool or saliva should begin. Stretch it between two points, such as between fangs, to create strands. The product’s transparent and viscous nature makes it ideal for forming realistic shapes. Shape and refine: While the adhesive is still flexible, use tweezers or a small paintbrush to adjust the strands, curves, or drops to mimic the natural flow of saliva. This step is key to achieving a realistic look. Allow the material to harden completely: Depending on the thickness, this may take a few hours. Finishing touches: Enhance the effect by brushing on a gloss varnish for a wet look or change its color by adding a blood effect paint. These details add depth and realism to the finished piece. CONTENT: 1x 45ml
€3,90
-

Hot Glue Gun (150w - 220v)
What is a Glue Gun? The GSW Hot Glue Gun is an incredibly versatile and efficient hobby tool, specially designed to meet the needs of crafters, DIY enthusiasts, and professionals alike. This powerful device offers precision in bonding and fastening various materials such as fabric, plasticard, wood, ceramics, metal, foams, cork, and more, quickly and securely. Ideal for craft and repair projects, it ensures seamless operation with a lightweight, ergonomic design that minimizes user fatigue while maximizing productivity. It’s compatible with 11mm glue Sticks for glue gun and offers adjustable power settings ranging from 120W to 150W. With the ability to reach temperatures between 100°C to 220°C, this tool can be adapted to a wide range of materials, making it highly versatile. The GSW model also includes a fast-heating system, ensuring that it is ready for use in just minutes. Whether you're working on small crafts or complex repairs, it will help you get the job done efficiently and precisely. A glue gun is a tool that uses heat to melt a cylindrical adhesive stick, which then flows out in liquid form. The melted adhesive bonds different surfaces and materials quickly and securely as it cools and hardens. These tools are commonly used in a variety of applications, including arts and crafts, DIY repairs, packaging, and even professional construction projects. The adhesive can stick to a wide range of materials such as wood, plastic, metal, fabric, ceramics, and more. It is ideal for any project that requires fast and effective joining of materials. With an adjustable temperature setting, the GSW model can handle delicate as well as sturdy materials, making it one of the most versatile tools available for both beginners and experts. How to Use a Hot Melt Gun? Using a hot melt gun is straightforward, but there are a few important steps to ensure safety and the best results. Here’s a step-by-step guide: Preparation: Make sure the device is unplugged before you begin. Insert an 11mm adhesive stick into the slot located at the back of the device. Ensure that it is seated properly. Place the device on its stand so it remains stable while heating. Power and Heating: Plug the device into a power source and switch it on. If your model has an adjustable power setting, choose the appropriate one based on your project. Lower temperatures are better for delicate materials like paper or fabric, while higher temperatures work well for tougher materials such as wood and metal. Wait for a few minutes (usually around 3 to 5) for the device to heat up. Most models have a small indicator light to show when they are ready for use. Application: Once it’s heated, gently squeeze the trigger to release the melted adhesive onto the surface of your project. You can apply it directly to the material or in small dots depending on how much you need. Move the device slowly and steadily to ensure even distribution of the adhesive. For larger or heavier projects, apply more adhesive to ensure a secure bond. Bonding the Materials: Once the adhesive is applied, press the materials together firmly. The adhesive cools quickly, so you’ll have to act fast. Hold the materials in place for a few seconds to ensure a strong bond. If needed, you can use clamps or weights to hold the materials until the adhesive fully hardens. Resting the Device: After applying the adhesive, always rest the tool on its stand to avoid spills or accidental burns. If you are done using it, make sure to unplug it and allow it to cool down completely before storing it. What is the best hot glue gun? When it comes to choosing the best hot melt applicator, the Green Stuff World (GSW) Hot Glue Gun stands out as a top contender due to its innovative features designed for both safety and efficiency. This tool is highly regarded not only for its powerful bonding capabilities but also for the attention to detail in its design, which ensures ease of use, precision, and safety. Key Features that Make the GSW Hot Glue Gun the Best Choice: Brass Nozzle for Backflow Prevention One of the standout features of the GSW model is its brass nozzle, which is specifically designed to prevent backflow. This is a crucial innovation for anyone who has experienced the frustration of melted adhesive leaking or oozing out of a tool uncontrollably. The brass material is highly durable and heat-resistant, ensuring that the adhesive flows smoothly while preventing any messy backflow, even during extended use. This feature significantly enhances the precision and cleanliness of the tool, making it perfect for delicate crafting projects or precise repairs. Safety Stand Support Safety is a top priority when working with a tool that involves high temperatures, and the GSW applicator addresses this concern with its safety stand support. This sturdy stand allows you to rest the device securely between uses, minimizing the risk of accidental burns or damage to your workspace. The stand keeps the heated nozzle elevated, preventing it from coming into contact with surfaces, which could cause potential hazards. It’s an essential feature for maintaining a safe working environment, especially in busy workshops or home studios. Ergonomic Trigger for Comfort Another reason the GSW model is highly recommended is its ergonomic trigger. Unlike standard models that may cause hand fatigue during extended use, this applicator has a trigger designed to fit comfortably in your hand. This reduces strain, allowing you to work for longer periods without discomfort. The ergonomic design makes the GSW model a great option for professionals who use this tool for hours at a time, as well as for hobbyists who want a comfortable, user-friendly experience. Adjustable Temperature for Versatility The adjustable temperature control is a feature that sets the GSW applicator apart from many others on the market. With the ability to adjust the temperature from 100°C to 220°C, this model allows you to tailor the heat output depending on the material you’re working with. Lower temperatures are ideal for delicate projects involving materials like fabric, foam, or lightweight plastics, while higher temperatures provide the necessary heat for tougher materials like wood, metal, or ceramics. This versatility makes the GSW model suitable for a wide range of applications, from crafting and DIY repairs to more robust construction tasks. Consistent Performance and Fast Heating In addition to these specialized features, the GSW model offers consistent performance thanks to its high-power output of 120W to 150W. It heats up quickly, meaning you can get started on your projects in just a few minutes. The fast heating system ensures that you won’t waste time waiting for the tool to reach its optimal temperature, making it an efficient choice for both small and large projects. if you're looking for the best hot melt applicator on the market, the Green Stuff World Hot Glue Gun is a top-tier option. Its advanced features ensure not only high-quality results but also enhance the overall user experience, making your crafting, DIY, or repair projects smoother and more enjoyable. How to remove hot gun glue? Removing hardened adhesive may seem tricky, but it can be done with the right approach. Here’s how to safely remove it: From Non-Porous Surfaces: For materials like glass, metal, or ceramics, you can usually peel off the adhesive once it has fully hardened. If it doesn’t come off easily, try applying rubbing alcohol or acetone to soften it before peeling. Be careful not to scratch the surface as you remove the adhesive. From Fabric or Other Delicate Materials: If adhesive gets on the fabric, wait for it to harden, then place the fabric in the freezer for about 30 minutes. The cold will harden the adhesive further, making it easier to peel off. For more stubborn spots, you can try using an iron. Place a piece of wax paper over the adhesive and run the iron over it on a low setting. The heat will soften the adhesive, and it will stick to the wax paper, pulling it away from the fabric. Using Heat: In some cases, you can reheat the adhesive using the same device you used to apply it. Hold the device a few inches away from the hardened adhesive to soften it, then scrape it off carefully with a blunt object like a butter knife or spatula. Just make sure the material you're working with can withstand the heat. Specialized Removal Tools: There are also adhesive removal tools available, which can help scrape away the adhesive without damaging the underlying surface. How to treat a hot glue gun burn? Burns are a potential hazard when working with a high-temperature device like this, so it’s important to know how to treat them. Here’s what you should do if you accidentally burn yourself: Immediate Cooling: The first thing to do when you get burned is to cool the area immediately. Run cold water over the affected area for 10 to 15 minutes. Avoid using ice directly on the burn, as it can cause additional damage to the skin. If the adhesive is still on your skin, do not attempt to peel it off right away. Continue to flush the area with cold water until the adhesive solidifies, and then gently peel it off. Avoiding Further Damage: After the burn has cooled down, avoid touching or applying pressure to the area, as this can cause further damage. If the burn is severe or involves blistering, seek medical attention. Using Burn Cream: For minor burns, applying a burn cream or ointment can help soothe the area and promote healing. Aloe vera is also an excellent natural remedy for burns. It reduces pain and helps the skin recover more quickly. Protecting the Burn: After treating the burn, cover the area with a sterile bandage or dressing. This will help prevent infection and keep the burn clean. Change the dressing regularly, and keep an eye on the wound for any signs of infection such as increased redness, swelling, or pus. Seeking Medical Attention: If the burn is large, severe, or located on sensitive areas like the face, hands, or joints, it’s important to seek medical attention right away. Safety Considerations When using any tool that involves heat, safety is of the utmost importance. The GSW model includes several built-in safety features such as automatic temperature control to prevent overheating. However, it’s still essential to take precautions: Always Rest on the Stand: When not actively using the tool, always rest it on its stand to prevent accidental burns or spills. Unplug When Not in Use: After completing your project, be sure to unplug the device and allow it to cool down before storing it. Work in a Well-Ventilated Area: While most adhesive sticks are non-toxic, it’s still a good idea to work in a well-ventilated area to avoid inhaling any fumes. Keep Out of Reach of Children: Ensure that this tool is kept away from children and pets to prevent accidental burns or injuries.
€16,25
-

Rolling pin Mandela
Textured Rolling Pins capable of pressing a continuous repeated pattern on clay and putties. Made of clear PMMA plastic with amazing non-stick properties. Non-toxic. They come in several different textures that you can purchase based on your specific needs. Length: 14'50 cm (5’5 inches)Diameter: 2’5cm (1 inch) USE INSTRUCTIONS: 1st - Properly mix the putty/clay until ready according to the manufacturer's recommendations. 2nd - Extend the putty/clay on a surface to be textured. For optimal results, make sure you have got a smooth and even surface before impressing with the Rolling Pins. *** We recommend using a plain Rolling Pin for this. 3rd - Depending on the type of putty/clay, it is advisable to wet the Rolling Pin to prevent any sticking. 4th - Slowly move the Rolling Pin applying equal pressure at all points for an even texture. 5th - Trim any excess putty/clay with a sharp knife. It is recommended to do this once it has dried to avoid any deformations in the putty/clay. MATERIALS: There are plenty of different putties and clays on the market and all of them can be textured using the proper technique. Usually polymer clay (Fimo or Sculpey type) are quite simple to work with these Rolling Pins as they allow for an easy correction of mistakes before they are baked. If the aim is to make textured bases, we recommend using MDF bases, because you can texture the polymer clay directly onto an MDF base, and then put it all in the oven, including the base. The cooking time of these clays are around 15 minutes at 150ºC. MDF Wood may leave a slight scent similar to that of toasted bread, but don't worry it won’t burn! In the case of epoxy putties, there are a variety of techniques which achieve similar results. Good thing is. you do not need to bake them, so they may be applied directly onto plastic bases. For Green Stuff putty, which is particularly sticky, it is required to slightly wet either the putty or the Rolling Pin with some water before texturing. You may also reduce the stickiness by applying talcum powder, or using (Sculptor) Vaseline. Other epoxy putties like the Milliput putty, for example, are also suitable, but we wouldn't recommend to wet them much since it will hinder your work. Furthermore, if the mixture is too sticky, it is better to continue kneading until the stickiness is gone. *** For this type of epoxy putties, it is very important to clean the rolling pins properly after use. CARE INSTRUCTIONS: After working with the Rolling Pins, use a Scratch Brush and plenty of water to clean off any residue on the Rolling Pins if required. SAFETY: To ensure safety, children should be closely monitored by a responsible adult.
€13,00
-

Bending Flat Pliers - Platte buig tang
Photo etch bending pliers Every modeler's toolkit must include high-quality photo etch bending tools, especially for handling delicate photoetched parts. These bending pliers feature completely flat tips, specifically designed to avoid damaging or marking the photoetched parts for scale models when they want to bend a part. They can also be of great help when working with plasticard. They are designed to help you achieve the highest level of craftsmanship possible. By providing a secure grip, precise control, and the ability to make clean bends without damage, they allow you to work with confidence and precision. Whether you’re building a detailed model from scratch or enhancing a pre-made kit, they are an essential addition to your workbench. Invest in quality hobby tools and elevate your modeling projects to new heights with this indispensable tool. Total length: 124cmLength of the tips: 26cmWeight: 64g.
€3,50
-

Rectangular Magnetic Sheet (zelfklevend) - 50x75mm
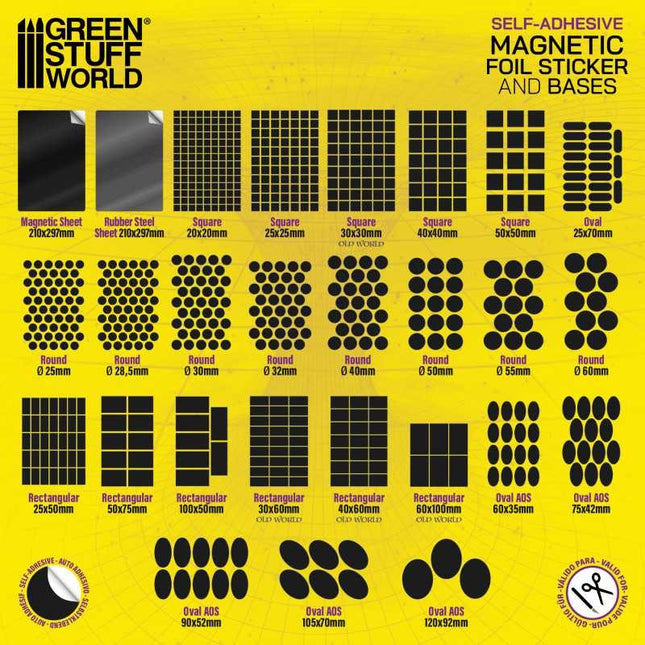
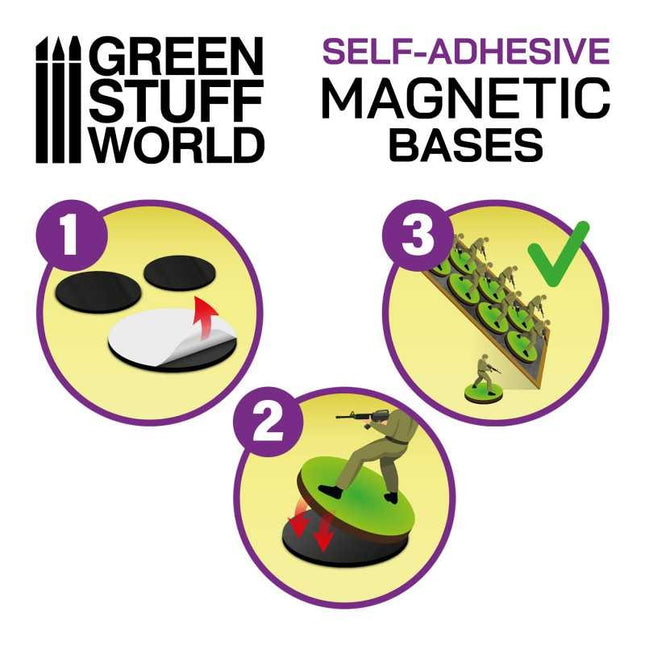
Magnetic Sheet - SELF ADHESIVE Self-adhesive flexible magnetic sheets provide a quick and simple way of magnetizing your wargames units without the necessity of drilling bases and gluing magnets. Square, rectangular, round, and oval most common shapes are available in a variety of sizes, but also as complete sheets to be cut to convenience with a pair of scissors or a craft knife. Use them alone, together with our rubber steel sheets, or together with our Neodymium Magnets depending on the attraction strength needed. Using magnetically-based figures allows you to field large units on the tabletop on their movement trays as one item. This removes the time spent moving figures one-by-one across the table. Even if the trays are knocked or tipped, you have a good chance of your figures staying attached and undamaged. Applying is very easy. Simply take the protective paper off the underside of the magnetic foil and stick it to the bottom of the bases. The thickness of the stickers is 0,9mm.
€3,75
-

Color Shaper Red size 2 Extra Firm
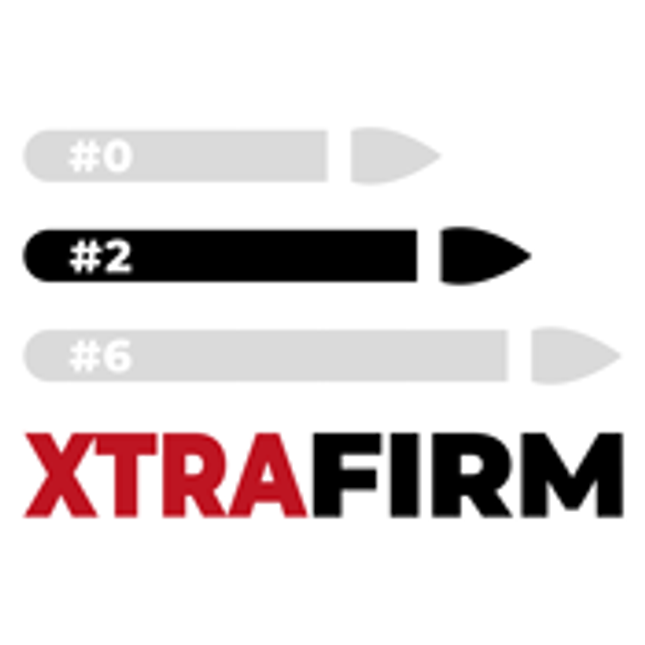
Colour Shapers Brushes SIZE 2 - EXTRA FIRM They are excellent tools to sculpt and add incredible effects when modeling and sculpting with different putties, clays, and fimo. They are somewhere between a brush, a palette knife, a modeling tool and your fingers. Easy-to-clean and long-lasting. Non-absorbent. This is the extra firm version of the black silicone brushes. They would be twice as hard as normal firm brushes. This set is including 5 different brushes with 5 different tips with 8 mm length by 5 mm width - SIZE #2 Hardness: EXTRA FIRM (very hard)
€12,00
-

Color Shaper Black size 6 Firm
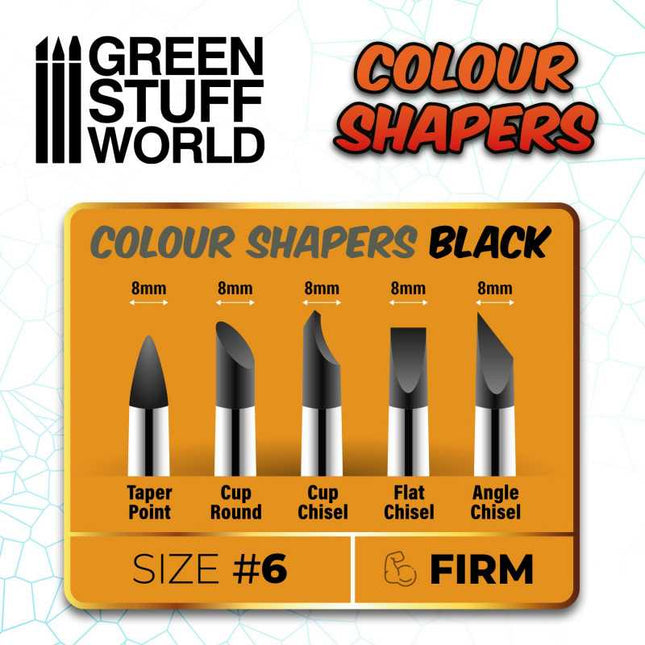
Silicone Brushes – Colour Shapers BLACK SIZE #6 are excellent tools to paint and sculpt and add incredible effects when painting, modeling and sculpting with different paints, putties, clays and fimo. They are somewhere between a brush, a palette knife, a modelling tool and your fingers. Because they do not absorb paint like a brush, you can simply wipe them clean. Easy-to-clean and long lasting. Non absorbent - Silicone tips in colour black (FIRM hardness) Valuable additional resource for anyone who enjoys painting in general or sculpting scales bigger than 54mm. They are a perfect complement to your artists brushes. The Colour Shaper allows you to move paint easily, apply pastel, carve images, sculpt clay and creatively decorate cakes with fondant.... the possibilities really are endless. This set is coming with 5 different brushes with 5 different tips with 12 mm length by 8 mm width - SIZE #6 Total length of the brushes 23 cm (around 9 inches)
€12,50
-

Rolling pin Hexagons - figuur roller Zeshoekig
Figuur roller Hexagons - Zeshoekig Roller voorzien van een basisfiguur waarmee een continu herhaald patroon op klei en plamuren kan worden gedrukt. Gemaakt van helder PMMA-plastic met verbazingwekkende antikleefeigenschappen. Niet giftig. Ze zijn er in verschillende texturen die u kunt kopen op basis van uw specifieke behoeften.Lengte: 14'50 cm (5'5 inches)Diameter: 2'5cm (1 inch) Patroonafmetingen: 10x10 mm Aanbevolen schaal: 1/35-1/43-1/48-1/76 GEBRUIK INSTRUCTIES of bekijk deze video1e - Meng de epoxyhars / klei / polymer klei tot een egaal plakkaat2e - Zorg voor een optimaal resultaat voor een glad en egaal oppervlak zodat het patroon goed zal overkomen. Gebruik desnoods een deegroller, fles of ander glad rond voorwerp. 3e - Afhankelijk van het type plamuur / klei is het raadzaam om de figuurroller nat te maken om vastzitten te voorkomen.4e - Verplaats de figuurroller langzaam en oefen gelijkmatige druk uit op alle punten voor een gelijkmatige afdruk op de klei, epoxy kneedhars of ander materiaal5e - Haal overtollig klei weg met een scherp mes. Het wordt aanbevolen om dit te doen als het eenmaal is opgedroogd om vervormingen in de stopverf / klei te voorkomen.Materialen:Er zijn veel verschillende kleien of epoxyhars op de markt en ze kunnen allemaal worden voorzien van een afdruk met de roller. Gebruik verschillende druk bij de verschillende materialen.Gewoonlijk zijn polymeerklei (Fimo of Sculpey-type) vrij eenvoudig om met deze Rolling Pins te bewerken, omdat ze een gemakkelijke correctie van fouten toelaten voordat ze worden gebakken. Wil je de structuur overbrengen op een basis, gebruik dan een MDF basis. Dit omdat je de polymeerklei direct op een MDF-basis kunt zetten en alles in de oven, inclusief de basis, kunt plaatsen. De droogtijd van deze klei is ongeveer 15 minuten bij 150ºC. MDF hout laat wel een lichte geur achter zoals bij geroosterd brood, maar maak je geen zorgen dat het zal branden! Wil je alleen een prachtig pad, veranda, straat of iets anders maken dan kun je dit natuurlijk op een platte plaat drogen in de oven.In het geval van epoxy basis zoals GreenStuff zijn er verschillende technieken die vergelijkbare resultaten opleveren. Het goede is: je hoeft ze niet te bakken, alleen te laten drogen en daarna kun je ze direct verwerken. Met Green Stuff, dat bijzonder kleverig is, is het het beste om de roller of de klei enigszins te bevochtigen voor je de figuur roller erover heen walst. U kunt ook de kleverigheid verminderen door talkpoeder toe te passen of door een oliebasis als Vaseline te gebruiken.Andere epoxy klei zoals de Milliput putty, bijvoorbeeld, zijn ook geschikt, maar we zouden niet aanraden om ze veel nat te maken. Als het mengsel te plakkerig is, is het beter om door te gaan met kneden totdat de plakkerigheid verdwenen is. Voor dit soort epoxyplamuren is het erg belangrijk om de rollen na gebruik goed te reinigen.Schoonmaak instructies:Gebruik na het werken met de deegroller een penseel met harde haren en voldoende water om eventuele resten op de deegroller te verwijderen, indien nodig. Om de veiligheid te garanderen, moeten kinderen nauwlettend worden gecontroleerd door een verantwoordelijke volwassene.
€13,00
-

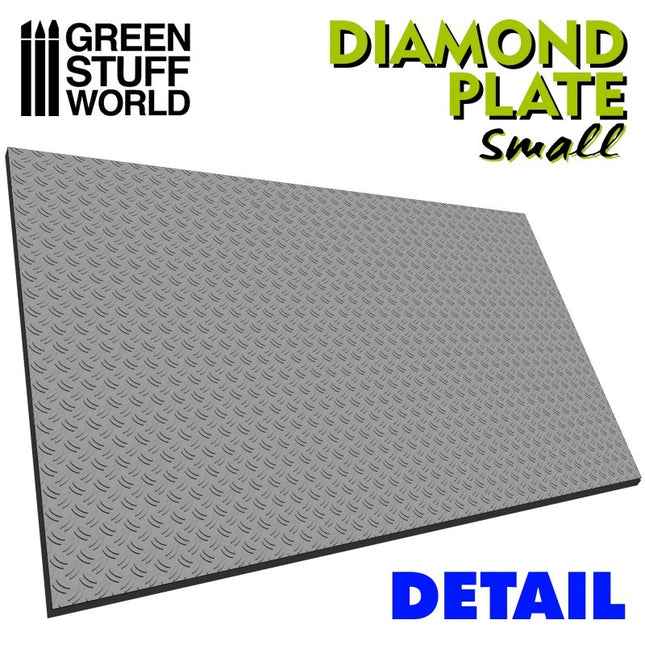
Rolling pin Diamond small - figuur roller Diamant small
Figuur roller Diamant plate small Roller voorzien van een basisfiguur waarmee een continu herhaald patroon op klei en plamuren kan worden gedrukt. Gemaakt van helder PMMA-plastic met verbazingwekkende antikleefeigenschappen. Niet giftig. Ze zijn er in verschillende texturen die u kunt kopen op basis van uw specifieke behoeften.Lengte: 14'50 cm (5'5 inches)Diameter: 2'5cm (1 inch) Diamant grootte: 2x1mm GEBRUIK INSTRUCTIES:1e - Meng de epoxyhars / klei / polymer klei tot een egaal plakkaat2e - Zorg voor een optimaal resultaat voor een glad en egaal oppervlak zodat het patroon goed zal overkomen. Gebruik desnoods een deegroller, fles of ander glad rond voorwerp. 3e - Afhankelijk van het type plamuur / klei is het raadzaam om de figuurroller nat te maken om vastzitten te voorkomen.4e - Verplaats de figuurroller langzaam en oefen gelijkmatige druk uit op alle punten voor een gelijkmatige afdruk op de klei, epoxy kneedhars of ander materiaal5e - Haal overtollig klei weg met een scherp mes. Het wordt aanbevolen om dit te doen als het eenmaal is opgedroogd om vervormingen in de stopverf / klei te voorkomen.Materialen:Er zijn veel verschillende kleien of epoxyhars op de markt en ze kunnen allemaal worden voorzien van een afdruk met de roller. Gebruik verschillende druk bij de verschillende materialen.Gewoonlijk zijn polymeerklei (Fimo of Sculpey-type) vrij eenvoudig om met deze Rolling Pins te bewerken, omdat ze een gemakkelijke correctie van fouten toelaten voordat ze worden gebakken. Wil je de structuur overbrengen op een basis, gebruik dan een MDF basis. Dit omdat je de polymeerklei direct op een MDF-basis kunt zetten en alles in de oven, inclusief de basis, kunt plaatsen. De droogtijd van deze klei is ongeveer 15 minuten bij 150ºC. MDF hout laat wel een lichte geur achter zoals bij geroosterd brood, maar maak je geen zorgen dat het zal branden! In het geval van epoxy basis zoals GreenStuff zijn er verschillende technieken die vergelijkbare resultaten opleveren. Het goede is: je hoeft ze niet te bakken, alleen te laten drogen en daarna kun je ze direct verwerken. Met Green Stuff, dat bijzonder kleverig is, is het het beste om de roller of de klei enigszins te bevochtigen voor je de figuur roller erover heen walst. U kunt ook de kleverigheid verminderen door talkpoeder toe te passen of door een oliebasis als Vaseline te gebruiken.Andere epoxy klei zoals de Milliput putty, bijvoorbeeld, zijn ook geschikt, maar we zouden niet aanraden om ze veel nat te maken. Als het mengsel te plakkerig is, is het beter om door te gaan met kneden totdat de plakkerigheid verdwenen is. Voor dit soort epoxyplamuren is het erg belangrijk om de rollen na gebruik goed te reinigen.Schoonmaak instructies:Gebruik na het werken met de deegroller een penseel met harde haren en voldoende water om eventuele resten op de roller te verwijderen, indien nodig. Om de veiligheid te garanderen, moeten kinderen nauwlettend worden gecontroleerd door een verantwoordelijke volwassene.
€13,00
-

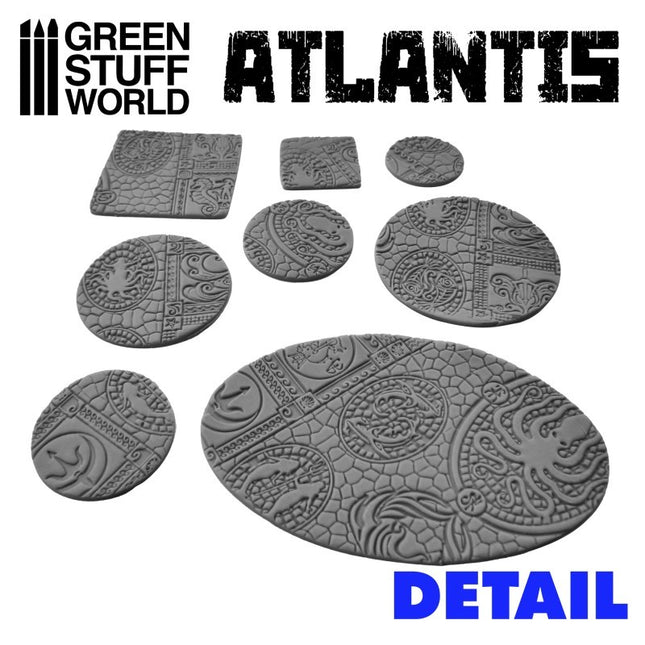
Rolling pin Atlantis - figuur roller Atlantis
Figuur roller AtlantisRoller voorzien van een basisfiguur waarmee een continu herhaald patroon op klei en plamuren kan worden gedrukt. Gemaakt van helder PMMA-plastic met verbazingwekkende antikleefeigenschappen. Niet giftig. Ze zijn er in verschillende texturen die u kunt kopen op basis van uw specifieke behoeften.Lengte: 14,50 cm (5'5 inches)Diameter: 2,5cm (1 inch) Patroon varieert met verschillende steensoorten, motieven (fleur de lis) en een filigree / rasters GEBRUIK INSTRUCTIES:1e - Meng de epoxyhars / klei / polymer klei tot een egaal plakkaat2e - Zorg voor een optimaal resultaat voor een glad en egaal oppervlak zodat het patroon goed zal overkomen. Gebruik desnoods een deegroller, fles of ander glad rond voorwerp. 3e - Afhankelijk van het type plamuur / klei is het raadzaam om de figuurroller nat te maken om vastzitten te voorkomen.4e - Verplaats de figuurroller langzaam en oefen gelijkmatige druk uit op alle punten voor een gelijkmatige afdruk op de klei, epoxy kneedhars of ander materiaal5e - Haal overtollig klei weg met een scherp mes. Het wordt aanbevolen om dit te doen als het eenmaal is opgedroogd om vervormingen in de stopverf / klei te voorkomen.Materialen:Er zijn veel verschillende kleien of epoxyhars op de markt en ze kunnen allemaal worden voorzien van een afdruk met de roller. Gebruik verschillende druk bij de verschillende materialen.Gewoonlijk zijn polymeerklei (Fimo of Sculpey-type) vrij eenvoudig om met deze Rolling Pins te bewerken, omdat ze een gemakkelijke correctie van fouten toelaten voordat ze worden gebakken. Wil je de structuur overbrengen op een basis, gebruik dan een MDF basis. Dit omdat je de polymeerklei direct op een MDF-basis kunt zetten en alles in de oven, inclusief de basis, kunt plaatsen. De droogtijd van deze klei is ongeveer 15 minuten bij 150ºC. MDF hout laat wel een lichte geur achter zoals bij geroosterd brood, maar maak je geen zorgen dat het zal branden! In het geval van epoxy basis zoals GreenStuff zijn er verschillende technieken die vergelijkbare resultaten opleveren. Het goede is: je hoeft ze niet te bakken, alleen te laten drogen en daarna kun je ze direct verwerken. Met Green Stuff, dat bijzonder kleverig is, is het het beste om de roller of de klei enigszins te bevochtigen voor je de figuur roller erover heen walst. U kunt ook de kleverigheid verminderen door talkpoeder toe te passen of door een oliebasis als Vaseline te gebruiken.Andere epoxy klei zoals de Milliput putty, bijvoorbeeld, zijn ook geschikt, maar we zouden niet aanraden om ze veel nat te maken. Als het mengsel te plakkerig is, is het beter om door te gaan met kneden totdat de plakkerigheid verdwenen is. Voor dit soort epoxyplamuren is het erg belangrijk om de deegrollen na gebruik goed te reinigen.Schoonmaak instructies:Gebruik na het werken met de roller een penseel met harde haren (of een scratch brush) en voldoende water om eventuele resten op de roller te verwijderen, indien nodig. Om de veiligheid te garanderen, moeten kinderen nauwlettend worden gecontroleerd door een verantwoordelijke volwassene.
€13,00
-

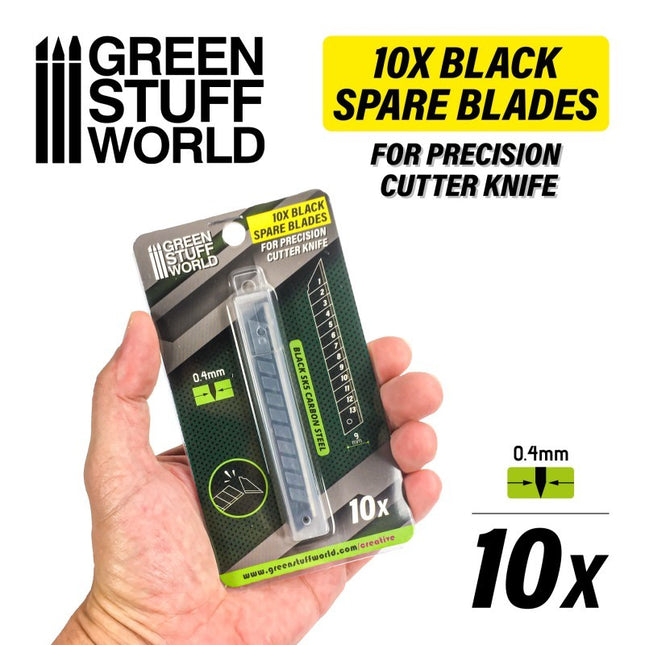
Black spare blades 9mm refill 10st
10x Black spare blades 9mm BLACK high-grade SK5 carbon steel blades for deep and precise cutting and maximum control. CONTAINS: 10x blade refills HEAVY-DUTY 9mm BLADE (0.04 in) #hobby #mes #heavy #duty #greenstuffworld #knife #refill #spare #blades
€4,75
-

Black Plastic Bases - Oval 60x35mm AoS
Plastic Bases - Oval Pill 60x35mm Top quality plastic bases for mounting wargames figures. Shape: Oval Thickness: 3mm Color: Black Bases: 6 per pack
€3,45
-

Rectangular Magnetic Sheet (zelfklevend) - 30x60mm
Self-adhesive flexible magnetic sheets provide a quick and simple way of magnetizing your wargames units without the necessity of drilling bases and gluing magnets. Square, rectangular, round, and oval most common shapes are available in a variety of sizes, but also as complete sheets to be cut to convenience with a pair of scissors or a craft knife. Use them alone, together with our rubber steel sheets, or together with our Neodymium Magnets depending on the attraction strength needed. Using magnetically-based figures allows you to field large units on the tabletop on their movement trays as one item. This removes the time spent moving figures one-by-one across the table. Even if the trays are knocked or tipped, you have a good chance of your figures staying attached and undamaged. Applying is very easy. Simply take the protective paper off the underside of the magnetic foil and stick it to the bottom of the bases. The thickness of the stickers is 0,9mm.
€3,75
-

Army Transport Bag - Extra Cabinet M
Extra Cabinet - Medium Extra Cabinet is designed to complement the transport and storage of miniatures. It can be used both as an additional cabinet for the GSW Army Transport Bag and as a free-standing stackable storage system. Manufactured of MDF wood is capable of accommodating more than 200 miniatures distributed among its rack levels. Storage modules with removable and configurable trays. These modules are designed to be stacked on top of one another, allowing for a customizable and space-efficient storage solution. Their property of being stackable between them will allow them to stack, for example, 1 medium module + 1 small module which equals 1 large module. It includes 4 removable metalized trays and its height is adjustable up to 11 levels to place the trays with your miniatures. If you want to gain a few extra centimeters of inner space, you could remove the first lower MDF tray, and glue the metalized rubber directly to the base of the case. To make this modification, simply cut with scissors the rubber so that it can fit. By doing so, the lower level will no longer be removable. Size: 7x11,8x11,8 in. (18x30x30cm). Total weights 2,3kg. Assembly instructions inside. Includes: - 1x Complete cabinet - 4x Trays + 4x adhesive metallized rubber sheets
€32,85€30,40
-

Army Transport Bag - Extra Cabinet L
Extra Cabinet - Large Extra Cabinet is designed to complement the transport and storage of miniatures. It can be used both as an additional cabinet for the GSW Army Transport Bag and as a free-standing stackable storage system. Manufactured of MDF wood is capable of accommodating more than 200 miniatures distributed among its rack levels. Storage modules with removable and configurable trays. These modules are designed to be stacked on top of one another, allowing for a customizable and space-efficient storage solution. Their property of being stackable between them will allow them to stack, for example, 1 medium module + 1 small module which equals 1 large module. It includes 4 removable metalized tray and its height is adjustable up to 21 levels to place the trays with your miniatures. If you want to gain a few extra centimeters of inner space, you could remove the first lower MDF tray, and glue the metalized rubber directly to the base of the case. To make this modification, simply cut with scissors the rubber so that it can fit. By doing so, the lower level will no longer be removable. Size: 45x30x18cm. Total weights 3.2 kg. Assembly instructions inside. Includes: - 1x Complete cabinet - 4x Trays + 4x adhesive metallized rubber sheets
€43,50€40,25
-

Hot Glue Gun sticks transparent 11mm
Hot Glue Sticks for glue gun are made from a thermoplastic material designed to be melted in hot glue guns. When heated, the glue stick turns into a liquid form, allowing it to be applied easily to various surfaces. As it cools, the glue solidifies, creating a strong bond between the materials being joined. They are the perfect solution for all your crafting, DIY, and repair needs and they are designed to fit most standard hot glue guns, ensuring a smooth and reliable flow for quick and durable adhesion on various materials such as fabric, plasticard, wood, ceramics, metal, foams, cork, and more. Available in both transparent and black, they offer versatile options depending on the nature of your project. Transparent color: they are ideal for general use, allowing for discreet bonding without leaving visible marks. Whether you're working on crafts, home decor, or repairs, the clear adhesive blends seamlessly into your materials, providing a strong hold while maintaining the appearance of your project. Black color: they are perfect for tasks where you want the adhesive to either blend into dark materials or stand out as part of your design. They’re a popular choice for cosplay, electronics, automotive repairs, and any creative project that involves darker color schemes. They provide a clean, and polished look for professional results, making it a favorite for artists, designers, and hobbyists alike. These glue sticks heat up quickly and bond strongly, providing a fast-setting adhesive that ensures your projects stay in place. Perfect for beginners and experts, these hot glue sticks are non-toxic and safe to use with proper handling. Each pack contains 30x hot glue sticks 11mm in diameter and 190 mm in length offering excellent value for money. Whether you're fixing, crafting, or creating, these are the ideal tool to help bring your ideas to life!
€10,50
-

Rolling pin Ancestral Recall
Textured Rolling Pins capable of pressing a continuous repeated pattern on clay and putties. Made of clear PMMA plastic with amazing non-stick properties. Non-toxic. They come in several different textures that you can purchase based on your specific needs. Length: 14'50 cm (5’5 inches)Diameter: 2’5cm (1 inch) USE INSTRUCTIONS: 1st - Properly mix the putty/clay until ready according to the manufacturer's recommendations. 2nd - Extend the putty/clay on a surface to be textured. For optimal results, make sure you have got a smooth and even surface before impressing with the Rolling Pins. *** We recommend using a plain Rolling Pin for this. 3rd - Depending on the type of putty/clay, it is advisable to wet the Rolling Pin to prevent any sticking. 4th - Slowly move the Rolling Pin applying equal pressure at all points for an even texture. 5th - Trim any excess putty/clay with a sharp knife. It is recommended to do this once it has dried to avoid any deformations in the putty/clay. MATERIALS: There are plenty of different putties and clays on the market and all of them can be textured using the proper technique. Usually polymer clay (Fimo or Sculpey type) are quite simple to work with these Rolling Pins as they allow for an easy correction of mistakes before they are baked. If the aim is to make textured bases, we recommend using MDF bases, because you can texture the polymer clay directly onto an MDF base, and then put it all in the oven, including the base. The cooking time of these clays are around 15 minutes at 150ºC. MDF Wood may leave a slight scent similar to that of toasted bread, but don't worry it won’t burn! In the case of epoxy putties, there are a variety of techniques which achieve similar results. Good thing is. you do not need to bake them, so they may be applied directly onto plastic bases. For Green Stuff putty, which is particularly sticky, it is required to slightly wet either the putty or the Rolling Pin with some water before texturing. You may also reduce the stickiness by applying talcum powder, or using (Sculptor) Vaseline. Other epoxy putties like the Milliput putty, for example, are also suitable, but we wouldn't recommend to wet them much since it will hinder your work. Furthermore, if the mixture is too sticky, it is better to continue kneading until the stickiness is gone. *** For this type of epoxy putties, it is very important to clean the rolling pins properly after use. CARE INSTRUCTIONS: After working with the Rolling Pins, use a Scratch Brush and plenty of water to clean off any residue on the Rolling Pins if required. SAFETY: To ensure safety, children should be closely monitored by a responsible adult.
€13,00
-

Corners for Modular Movement trays (pack x 1)
Corners for Modular Movement Trays Pack of extra corners specifically designed to enhance the functionality of GSW modular movement trays, ensuring that your units remain organized and stable during gameplay. Crafted from durable polystyrene plastic (PS), these corners offer a robust solution for constructing customized trays that can withstand the rigors of intense battles. This product is highly customizable thanks to the wide variety of sizes and their sturdy construction. They can be easily cut to the exact size needed using a hobby knife, allowing you to tailor your movement trays to fit various unit types, whether monstrous infantry, swift cavalry, or disciplined regular infantry. The assembly process is straightforward, with the corners designed to be glued using either Cyanoacrylate Glue, Cement Glue, or most glues for plastics, providing a strong and lasting bond. This makes it easy to quickly assemble or modify your movement trays as needed, enabling you to maintain the cohesion and organization of your units during play. Thickness compatibility: 3mm Content: 8x short corner (15mm) 4x long corner pieces (25mm) 18x short straight pieces (25mm) 14x long straight pieces (75mm) #corners # movement #tray #greenstuffworld
€4,25
-

Rectangular Magnetic Sheet (zelfklevend) - 40x60mm
Magnetic Sheet - SELF ADHESIVE Self-adhesive flexible magnetic sheets provide a quick and simple way of magnetizing your wargames units without the necessity of drilling bases and gluing magnets. Square, rectangular, round, and oval most common shapes are available in a variety of sizes, but also as complete sheets to be cut to convenience with a pair of scissors or a craft knife. Use them alone, together with our rubber steel sheets, or together with our Neodymium Magnets depending on the attraction strength needed. Using magnetically-based figures allows you to field large units on the tabletop on their movement trays as one item. This removes the time spent moving figures one-by-one across the table. Even if the trays are knocked or tipped, you have a good chance of your figures staying attached and undamaged. Applying is very easy. Simply take the protective paper off the underside of the magnetic foil and stick it to the bottom of the bases. The thickness of the stickers is 0,9mm.
€3,75
-

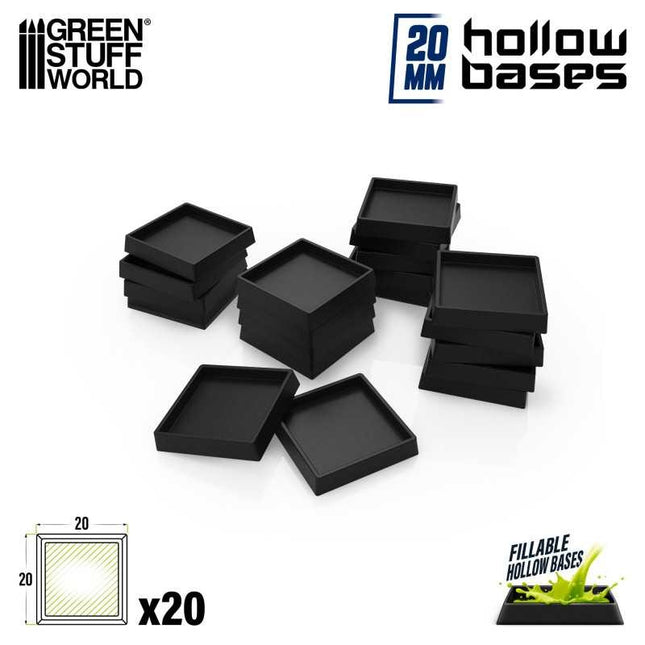
Black Plastic Bases - Square 20mm Hollow
Hollow Plastic Bases - BLACK Plastic bases bevelled and hollowed out on the inside to create water or swamp effects, or even to sink minis and recreate the effect of being in the water or swamp. Compatible with any wargame or board game. Each pack contains 20x 20mm square black plastic bases.
€3,45
-

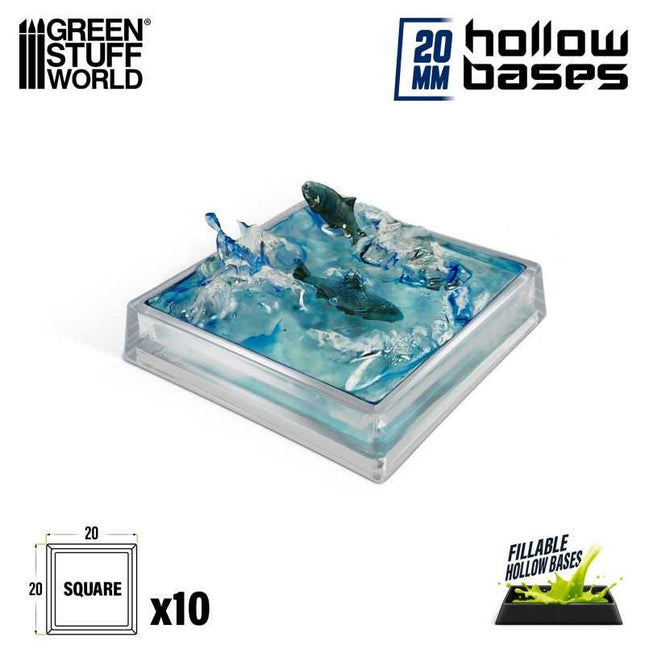
Plastic clear Bases - Square 40mm Hollow
Hollow Plastic Bases -TRANSPARENT Top-quality plastic bases for mounting wargame figures. These bases allow you to place your model in multiple directions to create infinite possibilities and movements. Shape: Square Thickness: 3mm Color: Transparent Bases: 10 per pack
€3,85
-
Touch Up Tool Set (12-delig)
Touch-up Toolset THE PERFECT TOOLS FOR CONVERTING YOUR MINIATURES. A starter set with which you can repair and convert your miniatures. The set contains 1 tape Green Putty (15 cm), 3 Metal Modelling Tools, 5 Silicone Brushes #0, 1 Liquid Green Putty and 2 sets of 20 flexible sandpaper pads. Ideal for beginners and hobbyists, modelers, and other wargames such as Warhammer, 40K, AOS, 9thAge, Star Wars Legion, and Dungeons & Dragons among others. #greenstuffworld #touch #up #tool #kit #set
€36,00
-

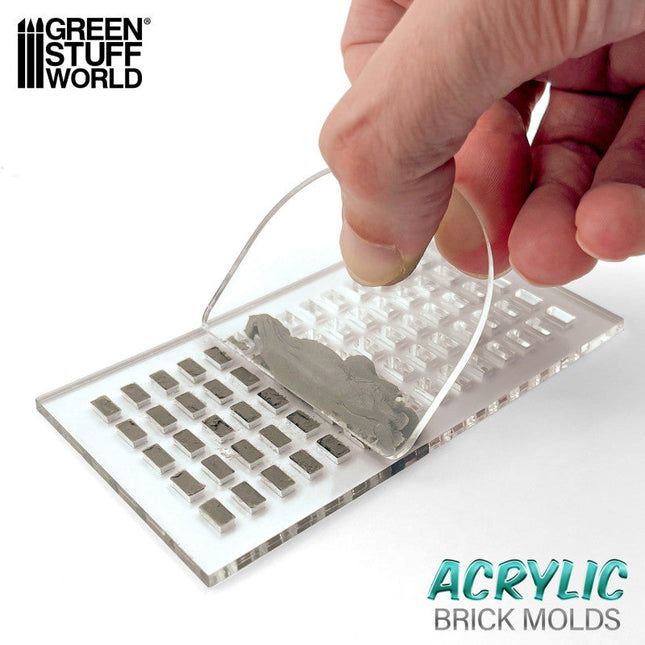
Acrylic Brick molds - Hexagonal Pavement
Elevate your dioramas to an unparalleled level of realism with our acrylic molds for modeling regular bricks. These accessories will allow you to create an infinite number of them with precision and consistency, adding authenticity and depth to your creations. They are specifically designed to create miniature regular bricks for use in scale modeling projects. Each model features a variety of patterns and textures that replicate real ones and that modelers will use to shape the air-drying clay. Our acrylic modeling molds are perfectly complemented by air-drying pastes such as modeling clay, foam clay, and similar products. These options guarantee a faithful and detailed reproduction for your diorama. Instructions for use: Using acrylic brick molds is a straightforward process, but it requires some care to ensure you get the best results. Here's a step-by-step guide on how to use these molds: Prepare the mold: Ensure that your acrylic brick mold is clean and dry. Make sure it's free of any debris or dust. Cover one side of the mold to hold the pieces. You can do this process with baking paper, wet oven paper, mylar plastic, or even airbrush masking tape. Place the mold on a flat surface: Find a flat and stable surface where you can work comfortably. Place the mold with the paper side down to prevent sticking. Add air-drying clay: Take a ball of air-drying clay and place it on the mold. Use your fingers to gently press and work the clay into the cavities of the mold. Make sure you fill each brick cavity completely. You may need to adjust the amount of clay to achieve your desired brick size and thickness. Level the surface: Use the included plastic spatula or the edge of another mold to drag/scrape across the surface of the mold, skimming off any excess clay. This will ensure that the surface is even and smooth. Let it dry: Allow the clay to dry completely. The air-drying paste has a small degree of shrinkage as it dries, which will help the pieces release from the mold. Remove the paper: Once the clay is completely dry, carefully peel off the paper tape from the back of the mold. This will help release the hobby bricks. Remove the pieces: Use a blunt stick (like the reverse end of a brush) to gently push out the individual bricks from the mold. Be careful not to apply too much pressure, as you don't want to damage the delicate acrylic mold. Smooth the edges: To give your bricks a more realistic look and get rid of any sharp edges, gently rub small amounts of them together between the palms of your hands. This will soften the edges and make the bricks look more like real bricks. Use the bricks: You can now use the air-dried clay bricks for your crafting or construction project. We recommend gluing the pieces with PVA glue or an acrylic sealer such as decoupe product (like ModPodge) to secure the pieces. Remember to handle the acrylic mold with care, as it's not as flexible as rubber or silicon molds and can break if bent. With our methacrylate molds, your dioramas will come to life with authentic and captivating details - unleash your creativity and build sets that tell stories of their own! Take your projects to the next level of excellence with this essential accessory for lovers of high-quality dioramas. Quantity: 2x pack Scale: 1:35 (1:48-1:32) The thickness of the pieces: 3 mm Brick size: 2.85 x 5.7 mm Mould size: 6 x 11 cm
€10,00€7,00
-

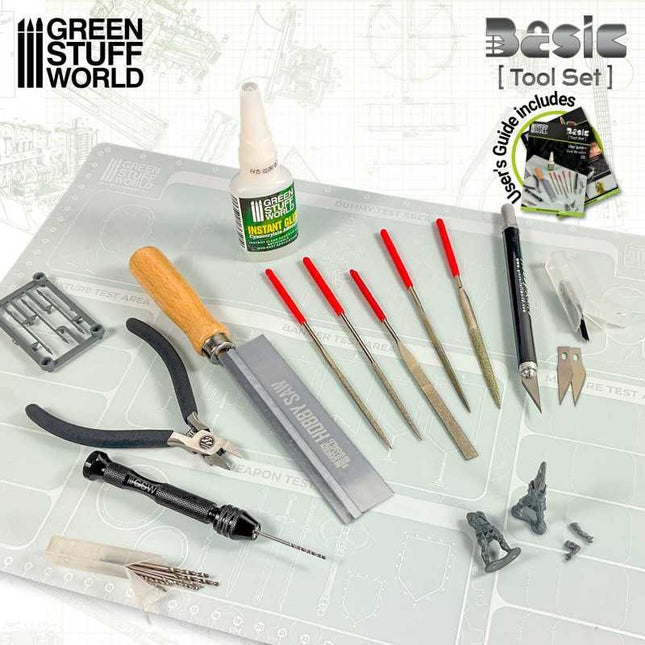
Basic tool kit (30 delig)
Basic Tool kit A basic toolkit for modeling purposes typically includes a range of tools that are commonly used in modeling, DIY, prototyping, and crafting. This basic tool set has been designed to cover all the needs of a beginner and more advanced model maker in the miniature hobby. Ideal for beginners and hobbyists, modelers, and role-playing games such as Warhammer, 40K, AOS, 9thAge, Star Wars Legion, and Dungeons & Dragons. It should cover the basics for most modeling projects, depending on the specific type of modeling you're interested in e.g., scale models, architectural models, dioramas. This Basic Tool kit includes: Hobby Hand drill with 10 drills Hobby saw Modeling cutter + 10 refills CA instant glue 5x modeling files Flat Cutting Nipper #greenstuffworld #basic #tool #kit #set
€42,50
-

Magneten zelfklevende rond 55mm (13st)
Magnetic Sheet - SELF ADHESIVE Self-adhesive flexible magnetic sheets provide a quick and simple way of magnetizing your wargames units without the necessity of drilling bases and gluing magnets. Square, rectangular, round, and oval most common shapes are available in a variety of sizes, but also as complete sheets to be cut to convenience with a pair of scissors or a craft knife. Use them alone, together with our rubber steel sheets, or together with our Neodymium Magnets depending on the attraction strength needed. Using magnetically-based figures allows you to field large units on the tabletop on their movement trays as one item. This removes the time spent moving figures one-by-one across the table. Even if the trays are knocked or tipped, you have a good chance of your figures staying attached and undamaged. Applying is very easy. Simply take the protective paper off the underside of the magnetic foil and stick it to the bottom of the bases. The thickness of the stickers is 0,9mm. Content: 13 rounds Gebruik een rubber sheet in een box om ze magnetisch vast te zetten. #magnetisch #rond #magnetic #round #55mm #zelfklevend #self #adhesive #greenstuffworld
€3,75
-

Ultimate Wet Palette XL
Miniature Ultimate Wet Palette XL The GSW Ultimate Wet Palette is a next-generation painting palette designed to significantly extend the working time of acrylic paints compared to traditional palettes. By maintaining moisture beneath a semi-permeable membrane, it keeps your paints fresh and workable for days or even months, minimizing waste and maximizing efficiency during long painting sessions. This Ultimate edition includes everything from the original one XL, plus two exclusive add-ons: Drybrush Texture Palette – Manufactured in plastic, it has been specifically designed to help you load the perfect amount of paint onto your brush for drybrushing techniques. It allows for greater control, improved consistency, and cleaner results when highlighting miniatures or creating weathered effects. It’s also easy to clean and built to last. Flexible Push-Pop Mixing Palette – Made from high-quality flexible silicone, this innovative article features soft wells that let you mix metallic paints, inks, or washes with ease. When you're done, simply press from underneath to pop out any leftover dried paint, making cleanup effortless. Its non-stick surface ensures minimal waste and quick color changes, making it ideal for both studio work and travel. Hydro Paper: Sulphurised semi-permeable paper with high-strength grammage and a semi-translucent finish. It permits the absorption of water without letting paint through. Has right-angled corners. Size:180x270mm Hydro Foams: High-performance hydro foam pads. High-thickness hydrophilic foam for increased fluid retention, whilst preventing wrinkles when drying out. Treated by Sanitized® to prevent mould and impurities, ensuring their longevity and capability to be reused. This treatment is not infinite, so it will lose effectiveness against fungi with time, water changes, and high temperatures. There is no minimum or maximum date from which the fungi will be generated, but good conservation will extend their effectiveness for many months. Size: 175x265mm. An elastic band is included to securely hold the container shut during transport or storage, preventing spills and keeping contents intact. Perfect for acrylic paints, this article is especially useful in hot or dry climates, where paint tends to dry out quickly. Whether you're painting miniatures, models, or wargaming terrain, this upgraded version gives you a professional-grade solution at just a slightly higher price than the standard version. Suitable only for acrylic paints. It is ideal for warm and dry environments. Size: 190x280mm (useful work area) Contains: 1x original Wet palette XL 190x280mm 1x Drybrush texture palette 130x180mm 1x Push-Pop Mixing Palette 130x180mm 50-sheet refill of Sulphurized semi-permeable paper 180x270mm 2 Sanitized® treated sponges in White color 175x265mm 1 Elastic band Complete instruction manual with tips and tricks
€26,95
-

Oval Magnetic Sheet (zelfklevend) - 30x65mm
Self-adhesive flexible magnetic sheets provide a quick and simple way of magnetizing your wargames units without the necessity of drilling bases and gluing magnets. Square, rectangular, round, and oval most common shapes are available in a variety of sizes, but also as complete sheets to be cut to convenience with a pair of scissors or a craft knife. Use them alone, together with our rubber steel sheets, or together with our Neodymium Magnets depending on the attraction strength needed. Using magnetically-based figures allows you to field large units on the tabletop on their movement trays as one item. This removes the time spent moving figures one-by-one across the table. Even if the trays are knocked or tipped, you have a good chance of your figures staying attached and undamaged. Applying is very easy. Simply take the protective paper off the underside of the magnetic foil and stick it to the bottom of the bases. The thickness of the stickers is 0,9mm.
€3,75
-

Black Plastic Bases - rectangular 30x60mm
Plastic Rectangular Bases 30x60mm Set of rectangular plastic bases, compatible with traditional Warhammer the Old World cavalry units, as well as in other wargames or miniatures role-playing games. The back of these cavalry bases have 2 covered slots so you can open them and insert figures that have supports on the feet that need this type of coupling. They can be opened with hobby scissors, a hobby knife, a measuring ruler, or any other resistant metallic element. Shape: Rectangular (cavalry type) Thickness: 3mm Bases: x10
€3,45
-

Foam Sanding Pads Coarse Grit 400 (10st)
Foam Sanding Pads Coarse grit (400) Hobby foam sandpaper pads are available in different grits and they are valid either for rough or fine sanding. Each grit is marked with a different color and made of soft and flexible EVA foam which makes them perfect for sanding curved edges as well as to be cut into any size or shape allowing to reach the most difficult areas. Measurements: 70x18 mmThis set includes 10 pieces
€3,75
-

Cement glue for plastics Blue 40ml
Blue Cement Glue for Plastic Models The glue for plastics, specially designed for model making and model kits, known as cement glue, is now available in a blue-coloured version. This adhesive retains all the effectiveness and strength of the original transparent version, with the additional advantage of a blue tint that clearly indicates the areas where the glue has been applied. This blue modelling glue comes in liquid form and is applied directly onto the surfaces intended to be joined. Its blue coloration provides excellent visual contrast, allowing precise identification of glue placement before it dries. This feature is particularly beneficial given the fast-drying properties typical of cement glues. With transparent versions, it can sometimes be difficult to see where the adhesive has been applied before it sets, making accurate placement challenging. Like the transparent variant, the blue cement glue works by partially melting the surfaces it contacts, creating a chemical "weld" between them. This chemical fusion results in a strong bond, free of visible joints, like metal welding. It is especially effective for materials commonly used in model-making, such as polystyrene, ABS, plasticard, and HIPS. Key advantages of using blue plastic glue include enhanced ease and accuracy during application due to the visibility of its colour, along with maintaining the bond strength, rapid drying time, and compatibility with a variety of modelling materials. This results in a cleaner, more professional finish, ensuring durable and seamless connections. As with transparent cement glues, it is essential to use the blue version in a well-ventilated area to avoid harmful inhalation caused by vapours released during the drying process. To achieve optimal bonding with blue cement glue, surfaces must be properly prepared. This includes thorough cleaning to remove any dirt or grease, lightly sanding to enhance adhesion, and precise application using a fine brush or needle. Firmly pressing and holding the parts together during drying ensures strong, bubble-free bonding. Any excess glue should be promptly removed to maintain a neat finish. Valid for the following types of materials: Polystyrene PE, ABS, and PVC. CONTENTS: 1x square glass jar with 40ml (bottle dimension 44x44x60mm)1x extra fine applicator brush
€6,90€6,30
-

Hot Glue Gun sticks black 11mm
Hot Glue Sticks for glue gun are made from a thermoplastic material designed to be melted in hot glue guns. When heated, the glue stick turns into a liquid form, allowing it to be applied easily to various surfaces. As it cools, the glue solidifies, creating a strong bond between the materials being joined. They are the perfect solution for all your crafting, DIY, and repair needs and they are designed to fit most standard hot glue guns, ensuring a smooth and reliable flow for quick and durable adhesion on various materials such as fabric, plasticard, wood, ceramics, metal, foams, cork, and more. Available in both transparent and black, they offer versatile options depending on the nature of your project. Transparent color: they are ideal for general use, allowing for discreet bonding without leaving visible marks. Whether you're working on crafts, home decor, or repairs, the clear adhesive blends seamlessly into your materials, providing a strong hold while maintaining the appearance of your project. Black color: they are perfect for tasks where you want the adhesive to either blend into dark materials or stand out as part of your design. They’re a popular choice for cosplay, electronics, automotive repairs, and any creative project that involves darker color schemes. They provide a clean, and polished look for professional results, making it a favorite for artists, designers, and hobbyists alike. These glue sticks heat up quickly and bond strongly, providing a fast-setting adhesive that ensures your projects stay in place. Perfect for beginners and experts, these hot glue sticks are non-toxic and safe to use with proper handling. Each pack contains 30x hot glue sticks 11mm in diameter and 190 mm in length offering excellent value for money. Whether you're fixing, crafting, or creating, these are the ideal tool to help bring your ideas to life!
€10,50
-

Rolling pin Greek
Textured Rolling Pins capable of pressing a continuous repeated pattern on clay and putties. Made of clear PMMA plastic with amazing non-stick properties. Non-toxic. They come in several different textures that you can purchase based on your specific needs. Length: 14'50 cm (5’5 inches)Diameter: 2’5cm (1 inch) USE INSTRUCTIONS: 1st - Properly mix the putty/clay until ready according to the manufacturer's recommendations. 2nd - Extend the putty/clay on a surface to be textured. For optimal results, make sure you have got a smooth and even surface before impressing with the Rolling Pins. *** We recommend using a plain Rolling Pin for this. 3rd - Depending on the type of putty/clay, it is advisable to wet the Rolling Pin to prevent any sticking. 4th - Slowly move the Rolling Pin applying equal pressure at all points for an even texture. 5th - Trim any excess putty/clay with a sharp knife. It is recommended to do this once it has dried to avoid any deformations in the putty/clay. MATERIALS: There are plenty of different putties and clays on the market and all of them can be textured using the proper technique. Usually polymer clay (Fimo or Sculpey type) are quite simple to work with these Rolling Pins as they allow for an easy correction of mistakes before they are baked. If the aim is to make textured bases, we recommend using MDF bases, because you can texture the polymer clay directly onto an MDF base, and then put it all in the oven, including the base. The cooking time of these clays are around 15 minutes at 150ºC. MDF Wood may leave a slight scent similar to that of toasted bread, but don't worry it won’t burn! In the case of epoxy putties, there are a variety of techniques which achieve similar results. Good thing is. you do not need to bake them, so they may be applied directly onto plastic bases. For Green Stuff putty, which is particularly sticky, it is required to slightly wet either the putty or the Rolling Pin with some water before texturing. You may also reduce the stickiness by applying talcum powder, or using (Sculptor) Vaseline. Other epoxy putties like the Milliput putty, for example, are also suitable, but we wouldn't recommend to wet them much since it will hinder your work. Furthermore, if the mixture is too sticky, it is better to continue kneading until the stickiness is gone. *** For this type of epoxy putties, it is very important to clean the rolling pins properly after use. CARE INSTRUCTIONS: After working with the Rolling Pins, use a Scratch Brush and plenty of water to clean off any residue on the Rolling Pins if required. SAFETY: To ensure safety, children should be closely monitored by a responsible adult.
€13,00
-

Blood Bowl Bases 40mm with Skill Rings
Miniature bases with Skill Rings 40 mm Enhance your Blood Bowl and fantasy football games with our complete pack of 10 versatile Blood Bowl Bases and 100 colored skill rings to represent all possible equipment options. They have been designed to accommodate up to 4 different skill rings per miniature. These bases feature fittings that allow for quick and easy exchange of skill rings between games or even during play. Our innovative system includes nine different interchangeable skill rings, allowing you to add both functionality and visual flair to your game. By mixing and matching various colors, you can give your miniatures a vibrant and engaging look. Whether you're playing a casual match with friends or competing in a league, this basing system will elevate your gameplay experience. The 32mm are perfect for standard player models, such as linemen, throwers, catchers, and blitzers. These core players fit well on the standard-sized squares of the game board. In contrast, the 40mm are designed for larger models, like Ogres, Trolls, Minotaurs, and Treemen. The larger ones provide stability for bigger figures and help distinguish them from regular players, enhancing both gameplay clarity and visual distinction. Additionally, this product includes two pre-drilled holes to fit 5x2mm magnets, or you can glue other sizes directly onto the inner supports. These neodymium magnets offer two key benefits: Magnetize Your Miniatures for Easy Transport: Secure your miniatures in a miniature carry case with ease. Interchangeable skill rings: Use the same Blood Bowl bases with skill rings on different miniatures without needing to change all the bases. Simply attach a coin or piece of metal to the miniature, allowing the neodymium magnet to hold it securely on the new base, making it easily interchangeable. Upgrade your Blood Bowl and fantasy football games with our 10-pack of versatile bases + 100 colored skill rings, designed for both functionality and aesthetic appeal. Content: x10 miniature bases 40mm (thickness 5mm) x20 Black arches x10 Red arches x10 Blue arches x10 Yellow arches x10 White arches x10 Grey arches x10 Green arches x10 Orange arches x10 Purple arches
€12,50
-

Rectangular Magnetic Sheet (zelfklevend) - 60x100mm
Magnetic Sheet - SELF ADHESIVE Self-adhesive flexible magnetic sheets provide a quick and simple way of magnetizing your wargames units without the necessity of drilling bases and gluing magnets. Square, rectangular, round, and oval most common shapes are available in a variety of sizes, but also as complete sheets to be cut to convenience with a pair of scissors or a craft knife. Use them alone, together with our rubber steel sheets, or together with our Neodymium Magnets depending on the attraction strength needed. Using magnetically-based figures allows you to field large units on the tabletop on their movement trays as one item. This removes the time spent moving figures one-by-one across the table. Even if the trays are knocked or tipped, you have a good chance of your figures staying attached and undamaged. Applying is very easy. Simply take the protective paper off the underside of the magnetic foil and stick it to the bottom of the bases. The thickness of the stickers is 0,9mm.
€3,75
-

Plastic clear Bases - Square 20mm Hollow
Hollow Plastic Bases -TRANSPARENT Top-quality plastic bases for mounting wargame figures. These bases allow you to place your model in multiple directions to create infinite possibilities and movements. Shape: Square Thickness: 3mm Color: Transparent Bases: 20 per pack
€3,85
-

Plastic clear Bases - Square 25mm Hollow
Hollow Plastic Bases -TRANSPARENT Top-quality plastic bases for mounting wargame figures. These bases allow you to place your model in multiple directions to create infinite possibilities and movements. Shape: Square Thickness: 3mm Color: Transparent Bases: 20 per pack
€3,85