


Tools all products


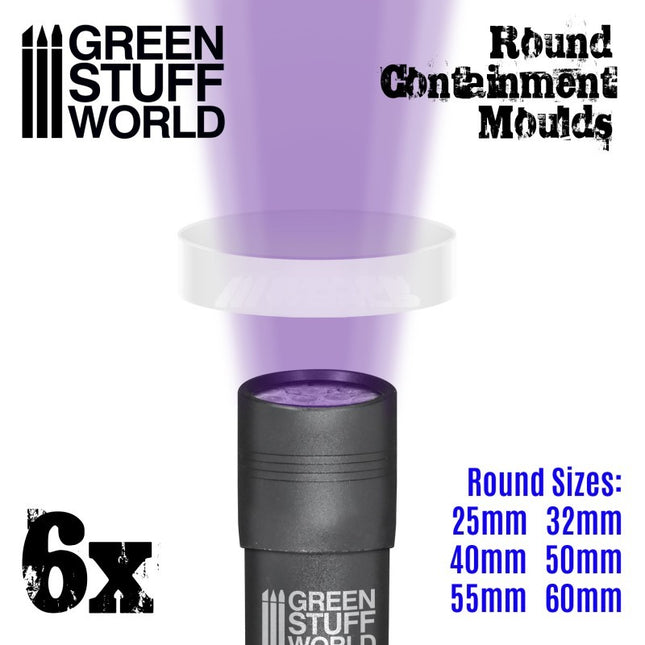
Set ronde doorzichtige mallen (6 st/6 verschillende maten)
Siliconen mal rond - 6 maten - doorzichtig Gemaakt van hoogwaardige voedingswaren siliconen. Makkelijk in gebruik en zo gesneden dat er vele steenvormen in de mallen aanwezig is. Deze mallen zijn hittebestendig en duurzaam. De mallen zijn flexibel voor optimale bruikbaarheid. De mallen werken geweldig met elk soort materiaal inclusief hars en resin. Ook geschikt voor voedsel.Met deze flexibele mallen kunt u eindeloze hoeveelheden miniatuur bases maken en ook met resin werken en allerlei andere creatieve uitvoering waar u een ronde mal voor wilt gebruiken.Hittebestendig rubber tot 240ºCVoedingswaardeResin-GradeSchaal 1:35 (1:32-1:43) 10mm hoog Zeer geschikt in maatvoering voor alle wargaming and tabletop games. Bevat de volgende maten: 25mm 32mm 40mm 50mm 55mm 60mm
€12,00
-

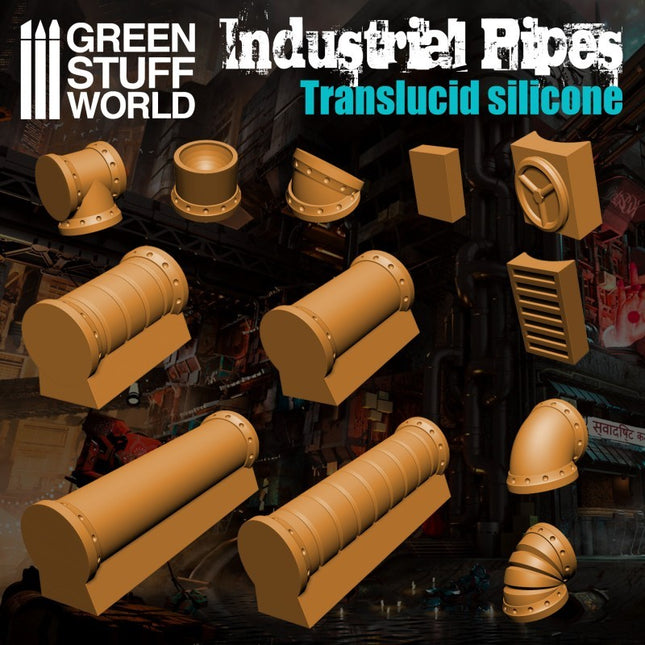
Siliconen mal Industriele pijpen (doorzichtig)
Siliconen mal industriele (pijp)leidingen Gemaakt van hoogwaardige voedingswaren siliconen. Makkelijk in gebruik en zo gesneden dat er vele steenvormen in de mallen aanwezig is. Deze mallen zijn hittebestendig en duurzaam. De mallen zijn extra diep om zeer gedetailleerde mooie resultaten te geven voor zowel dimensionaal ontwerp als oppervlaktedruk. De mal heeft een groot oppervlak van 2,5x5 inch (6x12cm) en is flexibel voor optimale bruikbaarheid. De mallen werken geweldig met en elk soort materiaal inclusief hars.Met deze mal maak je pijpleidingen met bochten en verbindingenHittebestendig rubber tot 240ºC (dus ja ook voor voeding en cakedecoratie!) Doorzichtig rubber waardoor je ook UV resin kunt gebruiken met een ultraviolet zaklampVoedingswaardeResin-GradeWe raden aan om klei boetseer schrapers te gebruiken om het overtollige kit / klei uit de vormen te verwijderen om beschadigingen te voorkomen Bevat 1 mal Gebruik onze acrylic resin voor de mooiste resultaten. Na het gebruik van de mal de vormen bijvijlen (wanneer er toch teveel resin is gebruikt), voorbewerken met bijvoorbeeld mod podge of een sealer en schilder daarna in elke kleur. Plaatsen met epoxy, lijm of andere middelen.
€12,50
-

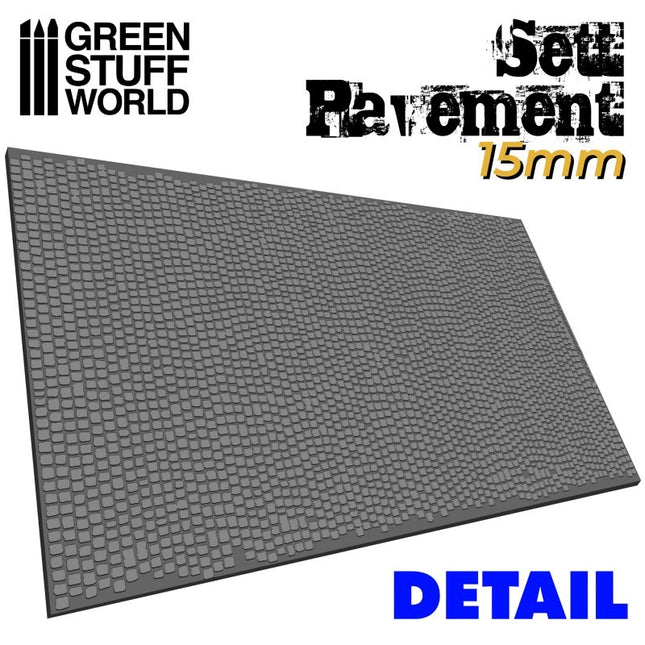
Rolling pin Sett pavement 15mm - figuur roller Straat 15mm
Figuur roller straatweg 15mm - straat 15mm Roller voorzien van een basisfiguur waarmee een continu herhaald patroon op klei en plamuren kan worden gedrukt. Gemaakt van helder PMMA-plastic met verbazingwekkende antikleefeigenschappen. Niet giftig. Ze zijn er in verschillende texturen die u kunt kopen op basis van uw specifieke behoeften.Lengte: 14'50 cm (5'5 inches)Diameter: 2'5cm (1 inch) Patroonafmetingen: 1x4 mm (variabel met meerdere soorten stenen, allemaal verschillend)Aanbevolen schaal: 1/72-1/100-1/144 (12-15-20mm miniaturen) GEBRUIK INSTRUCTIES of bekijk deze video1e - Meng de epoxyhars / klei / polymer klei tot een egaal plakkaat2e - Zorg voor een optimaal resultaat voor een glad en egaal oppervlak zodat het patroon goed zal overkomen. Gebruik desnoods een deegroller, fles of ander glad rond voorwerp. 3e - Afhankelijk van het type plamuur / klei is het raadzaam om de figuurroller nat te maken om vastzitten te voorkomen.4e - Verplaats de figuurroller langzaam en oefen gelijkmatige druk uit op alle punten voor een gelijkmatige afdruk op de klei, epoxy kneedhars of ander materiaal5e - Haal overtollig klei weg met een scherp mes. Het wordt aanbevolen om dit te doen als het eenmaal is opgedroogd om vervormingen in de stopverf / klei te voorkomen.Materialen:Er zijn veel verschillende kleien of epoxyhars op de markt en ze kunnen allemaal worden voorzien van een afdruk met de roller. Gebruik verschillende druk bij de verschillende materialen.Gewoonlijk zijn polymeerklei (Fimo of Sculpey-type) vrij eenvoudig om met deze Rolling Pins te bewerken, omdat ze een gemakkelijke correctie van fouten toelaten voordat ze worden gebakken. Wil je de structuur overbrengen op een basis, gebruik dan een MDF basis. Dit omdat je de polymeerklei direct op een MDF-basis kunt zetten en alles in de oven, inclusief de basis, kunt plaatsen. De droogtijd van deze klei is ongeveer 15 minuten bij 150ºC. MDF hout laat wel een lichte geur achter zoals bij geroosterd brood, maar maak je geen zorgen dat het niet zal branden! Wil je alleen een prachtig pad, veranda, straat of iets anders maken dan kun je dit natuurlijk op een platte plaat drogen in de oven.In het geval van epoxy basis zoals GreenStuff zijn er verschillende technieken die vergelijkbare resultaten opleveren. Het goede is: je hoeft ze niet te bakken, alleen te laten drogen en daarna kun je ze direct verwerken. Met Green Stuff, dat bijzonder kleverig is, is het het beste om de roller of de klei enigszins te bevochtigen voor je de figuur roller erover heen walst. U kunt ook de kleverigheid verminderen door talkpoeder toe te passen of door een oliebasis als Vaseline te gebruiken.Andere epoxy klei zoals de Milliput putty, bijvoorbeeld, zijn ook geschikt, maar we zouden niet aanraden om ze veel nat te maken. Als het mengsel te plakkerig is, is het beter om door te gaan met kneden totdat de plakkerigheid verdwenen is. Voor dit soort epoxyplamuren is het erg belangrijk om de figuurrollen na gebruik goed te reinigen.Schoonmaak instructies:Gebruik na het werken met de roller een penseel met harde haren en voldoende water om eventuele resten op de roller te verwijderen, indien nodig. Om de veiligheid te garanderen, moeten kinderen nauwlettend worden gecontroleerd door een verantwoordelijke volwassene.
€13,00
-

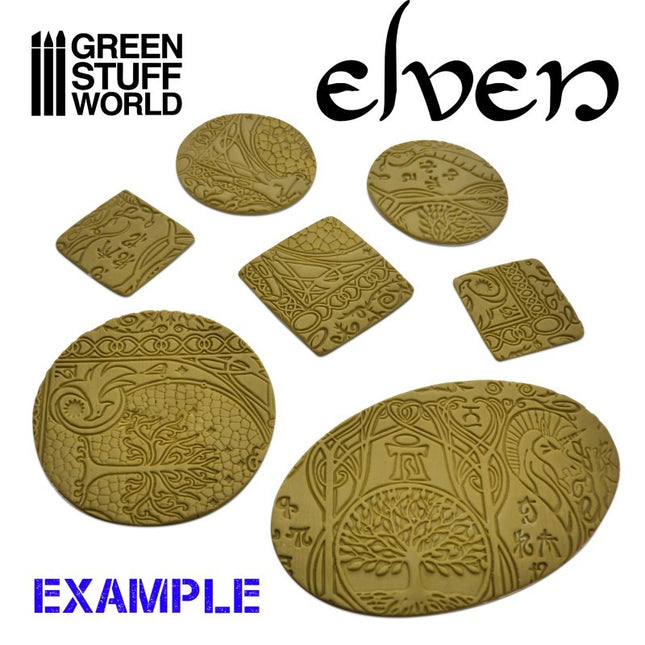
Rolling pin Elven - figuur roller Elven
Figuur roller Elven Roller voorzien van een basisfiguur waarmee een continu herhaald patroon op klei en plamuren kan worden gedrukt. Gemaakt van helder PMMA-plastic met verbazingwekkende antikleefeigenschappen. Niet giftig. Ze zijn er in verschillende texturen die u kunt kopen op basis van uw specifieke behoeften.Lengte: 14'50 cm (5'5 inches)Diameter: 2'5cm (1 inch) Game size 28-35mmGEBRUIK INSTRUCTIES:1e - Meng de epoxyhars / klei / polymer klei tot een egaal plakkaat2e - Zorg voor een optimaal resultaat voor een glad en egaal oppervlak zodat het patroon goed zal overkomen. Gebruik desnoods een deegroller, fles of ander glad rond voorwerp. 3e - Afhankelijk van het type plamuur / klei is het raadzaam om de figuurroller nat te maken om vastzitten te voorkomen.4e - Verplaats de figuurroller langzaam en oefen gelijkmatige druk uit op alle punten voor een gelijkmatige afdruk op de klei, epoxy kneedhars of ander materiaal5e - Haal overtollig klei weg met een scherp mes. Het wordt aanbevolen om dit te doen als het eenmaal is opgedroogd om vervormingen in de stopverf / klei te voorkomen.Materialen:Er zijn veel verschillende kleien of epoxyhars op de markt en ze kunnen allemaal worden voorzien van een afdruk met de roller. Gebruik verschillende druk bij de verschillende materialen.Gewoonlijk zijn polymeerklei (Fimo of Sculpey-type) vrij eenvoudig om met deze Rolling Pins te bewerken, omdat ze een gemakkelijke correctie van fouten toelaten voordat ze worden gebakken. Wil je de structuur overbrengen op een basis, gebruik dan een MDF basis. Dit omdat je de polymeerklei direct op een MDF-basis kunt zetten en alles in de oven, inclusief de basis, kunt plaatsen. De droogtijd van deze klei is ongeveer 15 minuten bij 150ºC. MDF hout laat wel een lichte geur achter zoals bij geroosterd brood, maar maak je geen zorgen dat het niet zal branden! In het geval van epoxy basis zoals GreenStuff zijn er verschillende technieken die vergelijkbare resultaten opleveren. Het goede is: je hoeft ze niet te bakken, alleen te laten drogen en daarna kun je ze direct verwerken. Met Green Stuff, dat bijzonder kleverig is, is het het beste om de roller of de klei enigszins te bevochtigen voor je de figuur roller erover heen walst. U kunt ook de kleverigheid verminderen door talkpoeder toe te passen of door een oliebasis als Vaseline te gebruiken.Andere epoxy klei zoals de Milliput putty, bijvoorbeeld, zijn ook geschikt, maar we zouden niet aanraden om ze veel nat te maken. Als het mengsel te plakkerig is, is het beter om door te gaan met kneden totdat de plakkerigheid verdwenen is. Voor dit soort epoxyplamuren is het erg belangrijk om de roller na gebruik goed te reinigen.Schoonmaak instructies:Gebruik na het werken met de roller een penseel met harde haren en voldoende water om eventuele resten op de roller te verwijderen, indien nodig. Om de veiligheid te garanderen, moeten kinderen nauwlettend worden begeleid door een verantwoordelijke volwassene.
€13,00
-

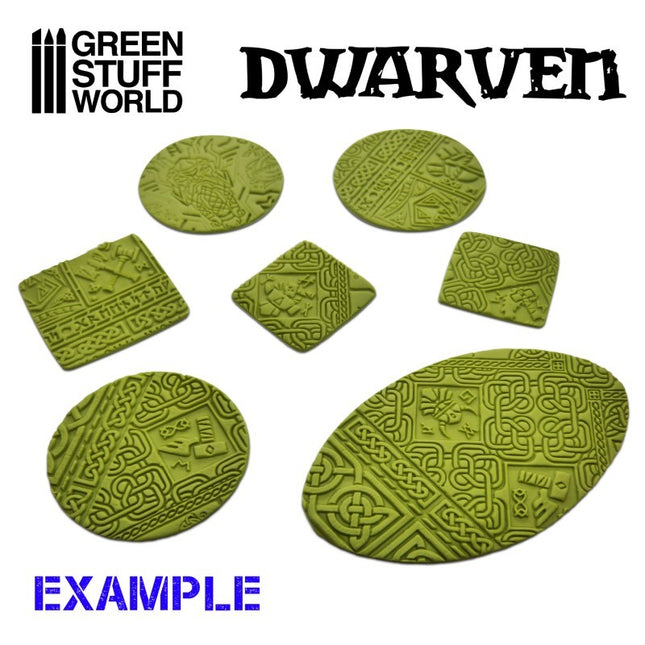
Rolling pin Dwarven - figuur roller Dwarven
Figuur roller Dwarven Roller voorzien van een basisfiguur waarmee een continu herhaald patroon op klei en plamuren kan worden gedrukt. Gemaakt van helder PMMA-plastic met verbazingwekkende antikleefeigenschappen. Niet giftig. Ze zijn er in verschillende texturen die u kunt kopen op basis van uw specifieke behoeften.Lengte: 14'50 cm (5'5 inches)Diameter: 2'5cm (1 inch) Game size 28-35mmGEBRUIK INSTRUCTIES:1e - Meng de epoxyhars / klei / polymer klei tot een egaal plakkaat2e - Zorg voor een optimaal resultaat voor een glad en egaal oppervlak zodat het patroon goed zal overkomen. Gebruik desnoods een deegroller, fles of ander glad rond voorwerp. 3e - Afhankelijk van het type plamuur / klei is het raadzaam om de figuurroller nat te maken om vastzitten te voorkomen.4e - Verplaats de figuurroller langzaam en oefen gelijkmatige druk uit op alle punten voor een gelijkmatige afdruk op de klei, epoxy kneedhars of ander materiaal5e - Haal overtollig klei weg met een scherp mes. Het wordt aanbevolen om dit te doen als het eenmaal is opgedroogd om vervormingen in de stopverf / klei te voorkomen.Materialen:Er zijn veel verschillende kleien of epoxyhars op de markt en ze kunnen allemaal worden voorzien van een afdruk met de roller. Gebruik verschillende druk bij de verschillende materialen.Gewoonlijk zijn polymeerklei (Fimo of Sculpey-type) vrij eenvoudig om met deze Rolling Pins te bewerken, omdat ze een gemakkelijke correctie van fouten toelaten voordat ze worden gebakken. Wil je de structuur overbrengen op een basis, gebruik dan een MDF basis. Dit omdat je de polymeerklei direct op een MDF-basis kunt zetten en alles in de oven, inclusief de basis, kunt plaatsen. De droogtijd van deze klei is ongeveer 15 minuten bij 150ºC. MDF hout laat wel een lichte geur achter zoals bij geroosterd brood, maar maak je geen zorgen dat het zal branden! In het geval van epoxy basis zoals GreenStuff zijn er verschillende technieken die vergelijkbare resultaten opleveren. Het goede is: je hoeft ze niet te bakken, alleen te laten drogen en daarna kun je ze direct verwerken. Met Green Stuff, dat bijzonder kleverig is, is het het beste om de roller of de klei enigszins te bevochtigen voor je de figuur roller erover heen walst. U kunt ook de kleverigheid verminderen door talkpoeder toe te passen of door een oliebasis als Vaseline te gebruiken.Andere epoxy klei zoals de Milliput putty, bijvoorbeeld, zijn ook geschikt, maar we zouden niet aanraden om ze veel nat te maken. Als het mengsel te plakkerig is, is het beter om door te gaan met kneden totdat de plakkerigheid verdwenen is. Voor dit soort epoxyplamuren is het erg belangrijk om de roller na gebruik goed te reinigen.Schoonmaak instructies:Gebruik na het werken met de deegroller een penseel met harde haren en voldoende water om eventuele resten op de deegroller te verwijderen, indien nodig. Om de veiligheid te garanderen, moeten kinderen nauwlettend worden gecontroleerd door een verantwoordelijke volwassene.
€13,00
-

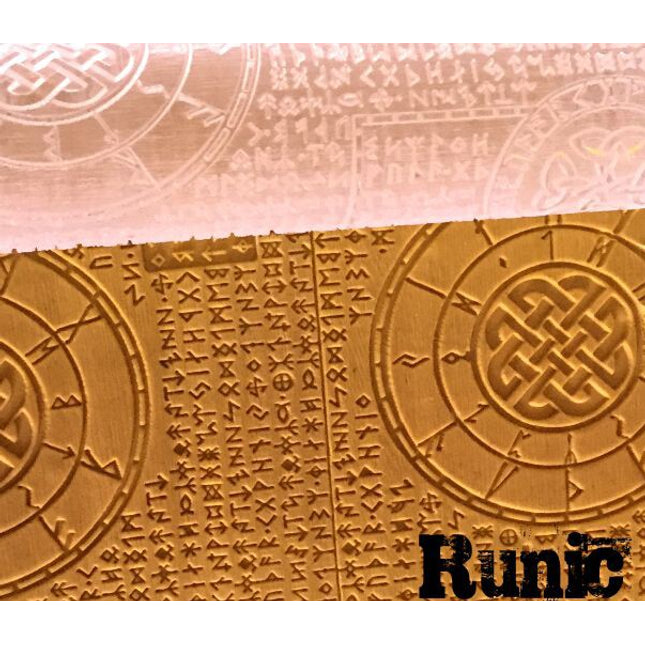
Rolling pin Runic - figuur roller Runen
Figuur roller Runen - RunicRoller voorzien van een basisfiguur waarmee een continu herhaald patroon op klei en plamuren kan worden gedrukt. Gemaakt van helder PMMA-plastic met verbazingwekkende antikleefeigenschappen. Niet giftig. Ze zijn er in verschillende texturen die u kunt kopen op basis van uw specifieke behoeften.Lengte: 14'50 cm (5'5 inches)Diameter: 2'5cm (1 inch)GEBRUIK INSTRUCTIES:1e - Meng de epoxyhars / klei / polymer klei tot een egaal plakkaat2e - Zorg voor een optimaal resultaat voor een glad en egaal oppervlak zodat het patroon goed zal overkomen. Gebruik desnoods een deegroller, fles of ander glad rond voorwerp. 3e - Afhankelijk van het type plamuur / klei is het raadzaam om de figuurroller nat te maken om vastzitten te voorkomen.4e - Verplaats de figuurroller langzaam en oefen gelijkmatige druk uit op alle punten voor een gelijkmatige afdruk op de klei, epoxy kneedhars of ander materiaal5e - Haal overtollig klei weg met een scherp mes. Het wordt aanbevolen om dit te doen als het eenmaal is opgedroogd om vervormingen in de stopverf / klei te voorkomen.Materialen:Er zijn veel verschillende kleien of epoxyhars op de markt en ze kunnen allemaal worden voorzien van een afdruk met de roller. Gebruik verschillende druk bij de verschillende materialen.Gewoonlijk zijn polymeerklei (Fimo of Sculpey-type) vrij eenvoudig om met deze Rolling Pins te bewerken, omdat ze een gemakkelijke correctie van fouten toelaten voordat ze worden gebakken. Wil je de structuur overbrengen op een basis, gebruik dan een MDF basis. Dit omdat je de polymeerklei direct op een MDF-basis kunt zetten en alles in de oven, inclusief de basis, kunt plaatsen. De droogtijd van deze klei is ongeveer 15 minuten bij 150ºC. MDF hout laat wel een lichte geur achter zoals bij geroosterd brood, maar maak je geen zorgen dat het niet zal branden! In het geval van epoxy basis zoals GreenStuff zijn er verschillende technieken die vergelijkbare resultaten opleveren. Het goede is: je hoeft ze niet te bakken, alleen te laten drogen en daarna kun je ze direct verwerken. Met Green Stuff, dat bijzonder kleverig is, is het het beste om de roller of de klei enigszins te bevochtigen voor je de figuur roller erover heen walst. U kunt ook de kleverigheid verminderen door talkpoeder toe te passen of door een oliebasis als Vaseline te gebruiken.Andere epoxy klei zoals de Milliput putty, bijvoorbeeld, zijn ook geschikt, maar we zouden niet aanraden om ze veel nat te maken. Als het mengsel te plakkerig is, is het beter om door te gaan met kneden totdat de plakkerigheid verdwenen is. Voor dit soort epoxyplamuren is het erg belangrijk om de roller na gebruik goed te reinigen.Schoonmaak instructies:Gebruik na het werken met de deegroller een penseel met harde haren en voldoende water om eventuele resten op de deegroller te verwijderen, indien nodig. Om de veiligheid te garanderen, moeten kinderen nauwlettend worden gecontroleerd door een verantwoordelijke volwassene.
€13,00
-

Siliconen mal Band en Wieldoppen
Tires and Hubcaps mold Made of high-quality food-grade silicone, easy to use, and intricately cut for great impressions, these silicone molds are heat resistant (up to 240ºC) and durable. The molds are carefully carved for highly detailed and thorough results for both dimensional design and surface imprinting. Each mold has a large surface area measuring 6x12cm. The silicone molds work great with any sort of resin, we highly recommend using acrylic resin. Wait until the resin has dried completely before removing the pieces. Other materials such as milliput, milliput mixed with Plasteline, magic sculpt and others also work but are harder to use. We recommend the use of flexible steel scrapers to remove excess putty/clay without damaging them. With this article you can make: 8 Tires of 12.5 x 4.2mm. 8 Hubcapped wheels of 12.5 x 4.2mm. 5 Tires of 18 x 5mm. 4 Hubcapped wheels of 18x5mm.
€12,50
-

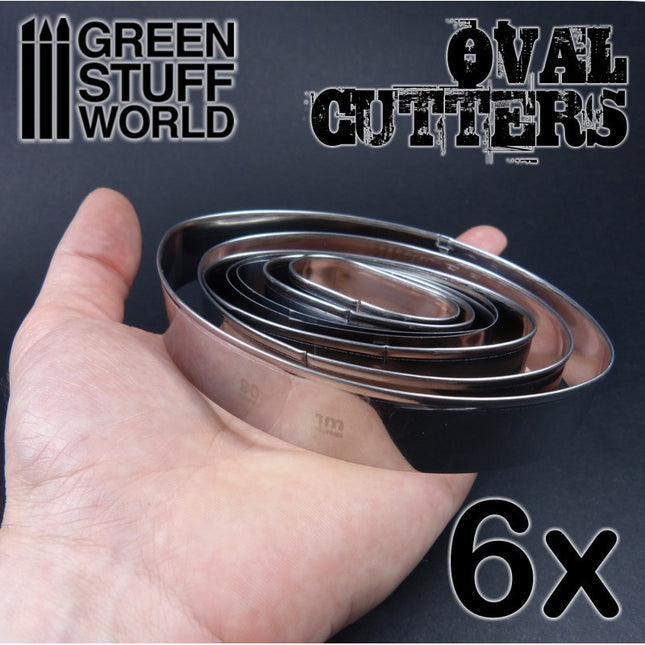
Set ovale stalen snijmallen (6 st/6 verschillende maten)
Stalen mallen ovaal - 6 maten Gemaakt van hoogwaardig roestvrijstaal. Makkelijk in gebruik. Ideaal voor klei, epoxy, etc te snijden maar je kunt deze mallen ook prima voor voedsel gebruiken of als werkbasis. Een werkbasis is dat je deze mal gebruik om materialen bij elkaar te houden. Makkelijk als je wilt dat gelijmde materialen ook goed op de basis drogen. Ook geschikt voor voedsel.Roostvrijstaal Zeer geschikt in maatvoering voor alle wargaming and tabletop games. Bevat de volgende maten: 25mmx50mm 35mmx60mm 42mmx75mm 52mmx90mm 70mmx105mm 90mmx120mm
€9,85
-

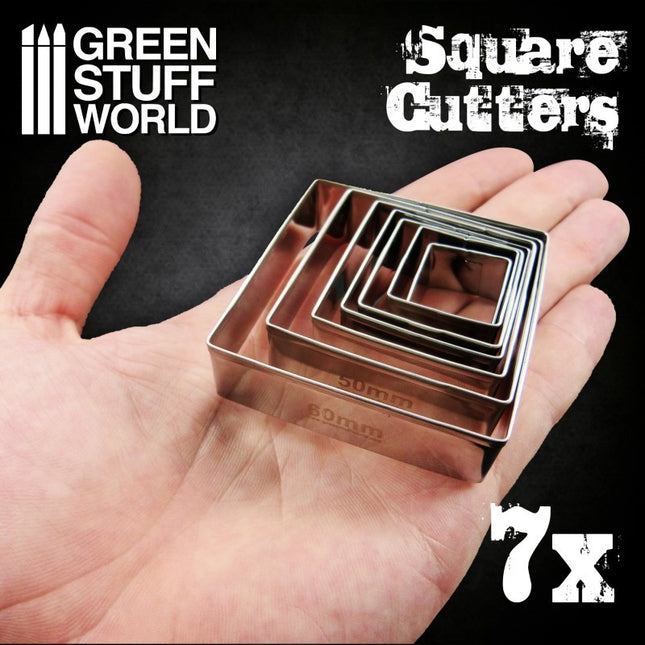
Set vierkante stalen snijmallen (7 st/7 verschillende maten)
Stalen mallen rond - 7 maten Gemaakt van hoogwaardig roestvrijstaal. Makkelijk in gebruik. Ideaal voor klei, epoxy, etc te snijden maar je kunt deze mallen ook prima voor voedsel gebruiken of als werkbasis. Een werkbasis is dat je deze mal gebruik om materialen bij elkaar te houden. Makkelijk als je wilt dat gelijmde materialen ook goed op de basis drogen. Ook geschikt voor voedsel.Roostvrijstaal Zeer geschikt in maatvoering voor alle wargaming and tabletop games. Bevat de volgende maten: 20mm 25mm 30mm 35mm 40mm 50mm 60mm
€9,85
-

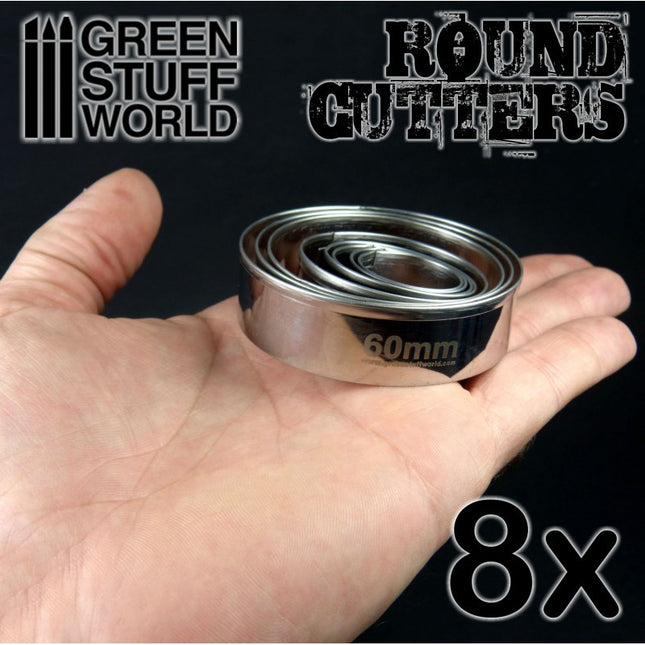
Set ronde stalen snijmallen (8 st/8 verschillende maten)
Stalen mallen rond - 8 maten Gemaakt van hoogwaardig roestvrijstaal. Makkelijk in gebruik. Ideaal voor klei, epoxy, etc te snijden maar je kunt deze mallen ook prima voor voedsel gebruiken of als werkbasis. Een werkbasis is dat je deze mal gebruik om materialen bij elkaar te houden. Makkelijk als je wilt dat gelijmde materialen ook goed op de basis drogen. Ook geschikt voor voedsel.Roostvrijstaal Zeer geschikt in maatvoering voor alle wargaming and tabletop games. Bevat de volgende maten: 22mm 25mm 30mm 32mm 40mm 50mm 55mm 60mm
€9,85
-

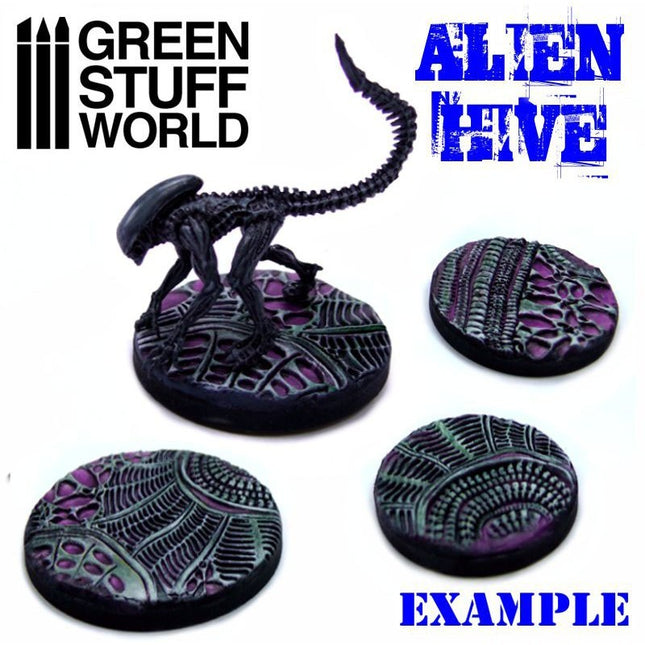
Rolling pin Alien Hive - figuur roller Alien Hive
Figuur roller Alien Hive Roller voorzien van een basisfiguur waarmee een continu herhaald patroon op klei en plamuren kan worden gedrukt. Gemaakt van helder PMMA-plastic met verbazingwekkende antikleefeigenschappen. Niet giftig. Ze zijn er in verschillende texturen die u kunt kopen op basis van uw specifieke behoeften.Lengte: 14,50 cm (5'5 inches)Diameter: 2,5cm (1 inch) Patroon varieert met ruggegraat, fossielen, bladeren GEBRUIK INSTRUCTIES:1e - Meng de epoxyhars / klei / polymer klei tot een egaal plakkaat2e - Zorg voor een optimaal resultaat voor een glad en egaal oppervlak zodat het patroon goed zal overkomen. Gebruik desnoods een deegroller, fles of ander glad rond voorwerp. 3e - Afhankelijk van het type plamuur / klei is het raadzaam om de figuurroller nat te maken om vastzitten te voorkomen.4e - Verplaats de figuurroller langzaam en oefen gelijkmatige druk uit op alle punten voor een gelijkmatige afdruk op de klei, epoxy kneedhars of ander materiaal5e - Haal overtollig klei weg met een scherp mes. Het wordt aanbevolen om dit te doen als het eenmaal is opgedroogd om vervormingen in de stopverf / klei te voorkomen.Materialen:Er zijn veel verschillende kleien of epoxyhars op de markt en ze kunnen allemaal worden voorzien van een afdruk met de roller. Gebruik verschillende druk bij de verschillende materialen.Gewoonlijk zijn polymeerklei (Fimo of Sculpey-type) vrij eenvoudig om met deze Rolling Pins te bewerken, omdat ze een gemakkelijke correctie van fouten toelaten voordat ze worden gebakken. Wil je de structuur overbrengen op een basis, gebruik dan een MDF basis. Dit omdat je de polymeerklei direct op een MDF-basis kunt zetten en alles in de oven, inclusief de basis, kunt plaatsen. De droogtijd van deze klei is ongeveer 15 minuten bij 150ºC. MDF hout laat wel een lichte geur achter zoals bij geroosterd brood, maar maak je geen zorgen dat het niet zal branden! In het geval van epoxy basis zoals GreenStuff zijn er verschillende technieken die vergelijkbare resultaten opleveren. Het goede is: je hoeft ze niet te bakken, alleen te laten drogen en daarna kun je ze direct verwerken. Met Green Stuff, dat bijzonder kleverig is, is het het beste om de roller of de klei enigszins te bevochtigen voor je de figuur roller erover heen walst. U kunt ook de kleverigheid verminderen door talkpoeder toe te passen of door een oliebasis als Vaseline te gebruiken.Andere epoxy klei zoals de Milliput putty, bijvoorbeeld, zijn ook geschikt, maar we zouden niet aanraden om ze veel nat te maken. Als het mengsel te plakkerig is, is het beter om door te gaan met kneden totdat de plakkerigheid verdwenen is. Voor dit soort epoxyplamuren is het erg belangrijk om de deegrollen na gebruik goed te reinigen.Schoonmaak instructies:Gebruik na het werken met de deegroller een penseel met harde haren en voldoende water om eventuele resten op de deegroller te verwijderen, indien nodig. Om de veiligheid te garanderen, moeten kinderen nauwlettend worden gecontroleerd door een verantwoordelijke volwassene.
€13,00
-

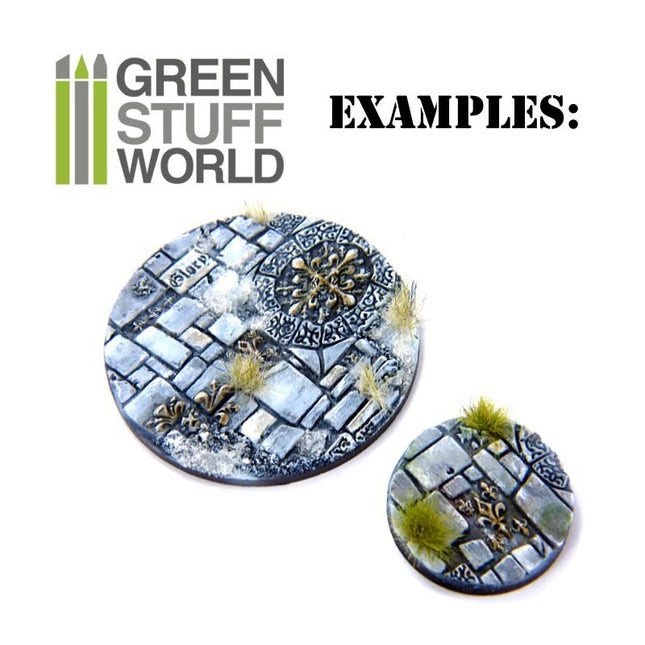
Rolling pin Temple - figuur roller Tempel
Figuur roller TempelRoller voorzien van een basisfiguur waarmee een continu herhaald patroon op klei en plamuren kan worden gedrukt. Gemaakt van helder PMMA-plastic met verbazingwekkende antikleefeigenschappen. Niet giftig. Ze zijn er in verschillende texturen die u kunt kopen op basis van uw specifieke behoeften.Lengte: 14,50 cm (5'5 inches)Diameter: 2,5cm (1 inch) Patroon varieert met verschillende steensoorten, motieven (fleur de lis) en een filigree / rasters GEBRUIK INSTRUCTIES:1e - Meng de epoxyhars / klei / polymer klei tot een egaal plakkaat2e - Zorg voor een optimaal resultaat voor een glad en egaal oppervlak zodat het patroon goed zal overkomen. Gebruik desnoods een deegroller, fles of ander glad rond voorwerp. 3e - Afhankelijk van het type plamuur / klei is het raadzaam om de figuurroller nat te maken om vastzitten te voorkomen.4e - Verplaats de figuurroller langzaam en oefen gelijkmatige druk uit op alle punten voor een gelijkmatige afdruk op de klei, epoxy kneedhars of ander materiaal5e - Haal overtollig klei weg met een scherp mes. Het wordt aanbevolen om dit te doen als het eenmaal is opgedroogd om vervormingen in de stopverf / klei te voorkomen.Materialen:Er zijn veel verschillende kleien of epoxyhars op de markt en ze kunnen allemaal worden voorzien van een afdruk met de roller. Gebruik verschillende druk bij de verschillende materialen.Gewoonlijk zijn polymeerklei (Fimo of Sculpey-type) vrij eenvoudig om met deze Rolling Pins te bewerken, omdat ze een gemakkelijke correctie van fouten toelaten voordat ze worden gebakken. Wil je de structuur overbrengen op een basis, gebruik dan een MDF basis. Dit omdat je de polymeerklei direct op een MDF-basis kunt zetten en alles in de oven, inclusief de basis, kunt plaatsen. De droogtijd van deze klei is ongeveer 15 minuten bij 150ºC. MDF hout laat wel een lichte geur achter zoals bij geroosterd brood, maar maak je geen zorgen dat het niet zal branden! In het geval van epoxy basis zoals GreenStuff zijn er verschillende technieken die vergelijkbare resultaten opleveren. Het goede is: je hoeft ze niet te bakken, alleen te laten drogen en daarna kun je ze direct verwerken. Met Green Stuff, dat bijzonder kleverig is, is het het beste om de roller of de klei enigszins te bevochtigen voor je de figuur roller erover heen walst. U kunt ook de kleverigheid verminderen door talkpoeder toe te passen of door een oliebasis als Vaseline te gebruiken.Andere epoxy klei zoals de Milliput putty, bijvoorbeeld, zijn ook geschikt, maar we zouden niet aanraden om ze veel nat te maken. Als het mengsel te plakkerig is, is het beter om door te gaan met kneden totdat de plakkerigheid verdwenen is. Voor dit soort epoxyplamuren is het erg belangrijk om de deegrollen na gebruik goed te reinigen.Schoonmaak instructies:Gebruik na het werken met de deegroller een penseel met harde haren en voldoende water om eventuele resten op de deegroller te verwijderen, indien nodig. Om de veiligheid te garanderen, moeten kinderen nauwlettend worden gecontroleerd door een verantwoordelijke volwassene.
€13,00
-

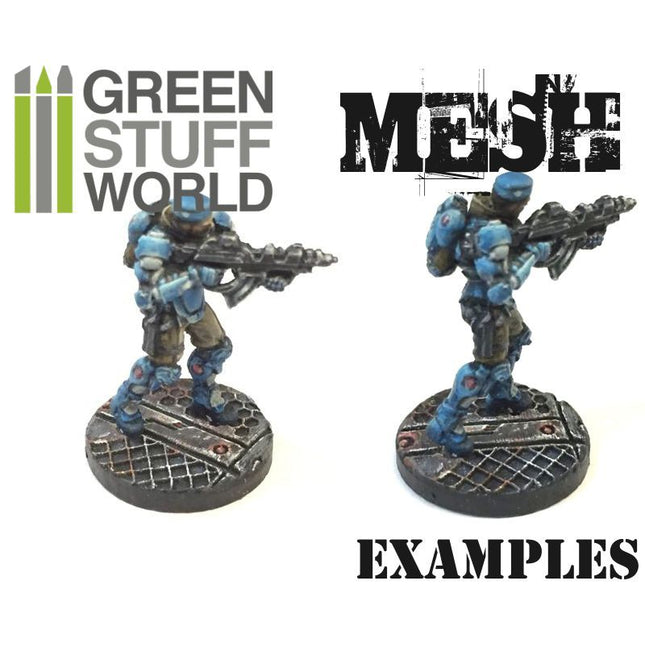
Rolling pin Mesh - figuurroller Mesh
Figuur roller MeshRoller voorzien van een basisfiguur waarmee een continu herhaald patroon op klei en plamuren kan worden gedrukt. Gemaakt van helder PMMA-plastic met verbazingwekkende antikleefeigenschappen. Niet giftig. Ze zijn er in verschillende texturen die u kunt kopen op basis van uw specifieke behoeften.Lengte: 14'50 cm (5'5 inches)Diameter: 2'5cm (1 inch)GEBRUIK INSTRUCTIES:1e - Meng de epoxyhars / klei / polymer klei tot een egaal plakkaat2e - Zorg voor een optimaal resultaat voor een glad en egaal oppervlak zodat het patroon goed zal overkomen. Gebruik desnoods een deegroller, fles of ander glad rond voorwerp. 3e - Afhankelijk van het type plamuur / klei is het raadzaam om de figuurroller nat te maken om vastzitten te voorkomen.4e - Verplaats de figuurroller langzaam en oefen gelijkmatige druk uit op alle punten voor een gelijkmatige afdruk op de klei, epoxy kneedhars of ander materiaal5e - Haal overtollig klei weg met een scherp mes. Het wordt aanbevolen om dit te doen als het eenmaal is opgedroogd om vervormingen in de stopverf / klei te voorkomen.Materialen:Er zijn veel verschillende kleien of epoxyhars op de markt en ze kunnen allemaal worden voorzien van een afdruk met de roller. Gebruik verschillende druk bij de verschillende materialen.Gewoonlijk zijn polymeerklei (Fimo of Sculpey-type) vrij eenvoudig om met deze Rolling Pins te bewerken, omdat ze een gemakkelijke correctie van fouten toelaten voordat ze worden gebakken. Wil je de structuur overbrengen op een basis, gebruik dan een MDF basis. Dit omdat je de polymeerklei direct op een MDF-basis kunt zetten en alles in de oven, inclusief de basis, kunt plaatsen. De droogtijd van deze klei is ongeveer 15 minuten bij 150ºC. MDF hout laat wel een lichte geur achter zoals bij geroosterd brood, maar maak je geen zorgen dat het niet zal branden! In het geval van epoxy basis zoals GreenStuff zijn er verschillende technieken die vergelijkbare resultaten opleveren. Het goede is: je hoeft ze niet te bakken, alleen te laten drogen en daarna kun je ze direct verwerken. Met Green Stuff, dat bijzonder kleverig is, is het het beste om de roller of de klei enigszins te bevochtigen voor je de figuur roller erover heen walst. U kunt ook de kleverigheid verminderen door talkpoeder toe te passen of door een oliebasis als Vaseline te gebruiken.Andere epoxy klei zoals de Milliput putty, bijvoorbeeld, zijn ook geschikt, maar we zouden niet aanraden om ze veel nat te maken. Als het mengsel te plakkerig is, is het beter om door te gaan met kneden totdat de plakkerigheid verdwenen is. Voor dit soort epoxyplamuren is het erg belangrijk om de deegrollen na gebruik goed te reinigen.Schoonmaak instructies:Gebruik na het werken met de deegroller een penseel met harde haren en voldoende water om eventuele resten op de deegroller te verwijderen, indien nodig. Om de veiligheid te garanderen, moeten kinderen nauwlettend worden gecontroleerd door een verantwoordelijke volwassene.
€13,00
-

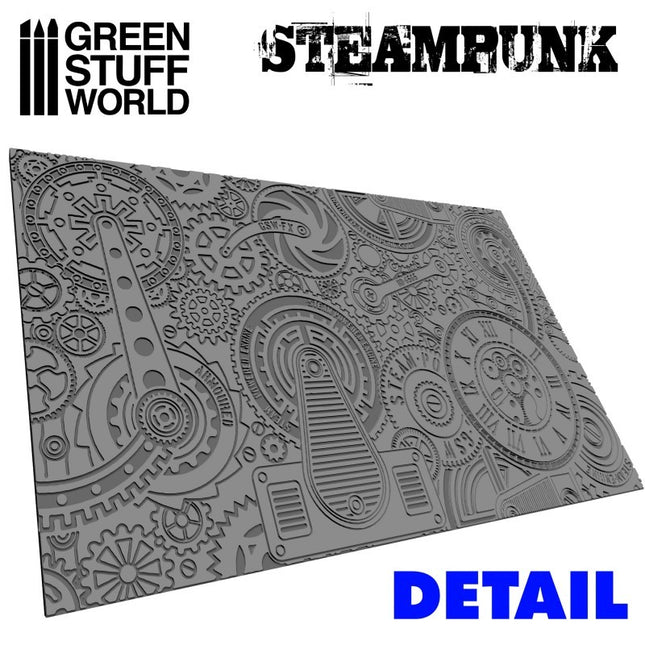
Rolling pin Steampunk - figuur roller Steampunk
Figuur roller Steampunk - SteampunkRoller voorzien van een basisfiguur waarmee een continu herhaald patroon op klei en plamuren kan worden gedrukt. Gemaakt van helder PMMA-plastic met verbazingwekkende antikleefeigenschappen. Niet giftig. Ze zijn er in verschillende texturen die u kunt kopen op basis van uw specifieke behoeften.Lengte: 14'50 cm (5'5 inches)Diameter: 2'5cm (1 inch)Patroongrootte/schaal voor 28-35mm figurenGEBRUIK INSTRUCTIES:1e - Meng de epoxyhars / klei / polymer klei tot een egaal plakkaat2e - Zorg voor een optimaal resultaat voor een glad en egaal oppervlak zodat het patroon goed zal overkomen. Gebruik desnoods een deegroller, fles of ander glad rond voorwerp. 3e - Afhankelijk van het type plamuur / klei is het raadzaam om de figuurroller nat te maken om vastzitten te voorkomen.4e - Verplaats de figuurroller langzaam en oefen gelijkmatige druk uit op alle punten voor een gelijkmatige afdruk op de klei, epoxy kneedhars of ander materiaal5e - Haal overtollig klei weg met een scherp mes. Het wordt aanbevolen om dit te doen als het eenmaal is opgedroogd om vervormingen in de stopverf / klei te voorkomen.Materialen:Er zijn veel verschillende kleien of epoxyhars op de markt en ze kunnen allemaal worden voorzien van een afdruk met de roller. Gebruik verschillende druk bij de verschillende materialen.Gewoonlijk zijn polymeerklei (Fimo of Sculpey-type) vrij eenvoudig om met deze Rolling Pins te bewerken, omdat ze een gemakkelijke correctie van fouten toelaten voordat ze worden gebakken. Wil je de structuur overbrengen op een basis, gebruik dan een MDF basis. Dit omdat je de polymeerklei direct op een MDF-basis kunt zetten en alles in de oven, inclusief de basis, kunt plaatsen. De droogtijd van deze klei is ongeveer 15 minuten bij 150ºC. MDF hout laat wel een lichte geur achter zoals bij geroosterd brood, maar maak je geen zorgen dat het niet zal branden! In het geval van epoxy basis zoals GreenStuff zijn er verschillende technieken die vergelijkbare resultaten opleveren. Het goede is: je hoeft ze niet te bakken, alleen te laten drogen en daarna kun je ze direct verwerken. Met Green Stuff, dat bijzonder kleverig is, is het het beste om de roller of de klei enigszins te bevochtigen voor je de figuur roller erover heen walst. U kunt ook de kleverigheid verminderen door talkpoeder toe te passen of door een oliebasis als Vaseline te gebruiken.Andere epoxy klei zoals de Milliput putty, bijvoorbeeld, zijn ook geschikt, maar we zouden niet aanraden om ze veel nat te maken. Als het mengsel te plakkerig is, is het beter om door te gaan met kneden totdat de plakkerigheid verdwenen is.Voor dit soort epoxyplamuren is het erg belangrijk om de deegrollen na gebruik goed te reinigen.Schoonmaak instructies:Gebruik na het werken met de deegroller een penseel met harde haren en voldoende water om eventuele resten op de deegroller te verwijderen, indien nodig. Om de veiligheid te garanderen, moeten kinderen nauwlettend worden gecontroleerd door een verantwoordelijke volwassene. Het kan een wapen zijn...(althans in de verkeerde kinderhanden uiteraard!)
€13,00
-

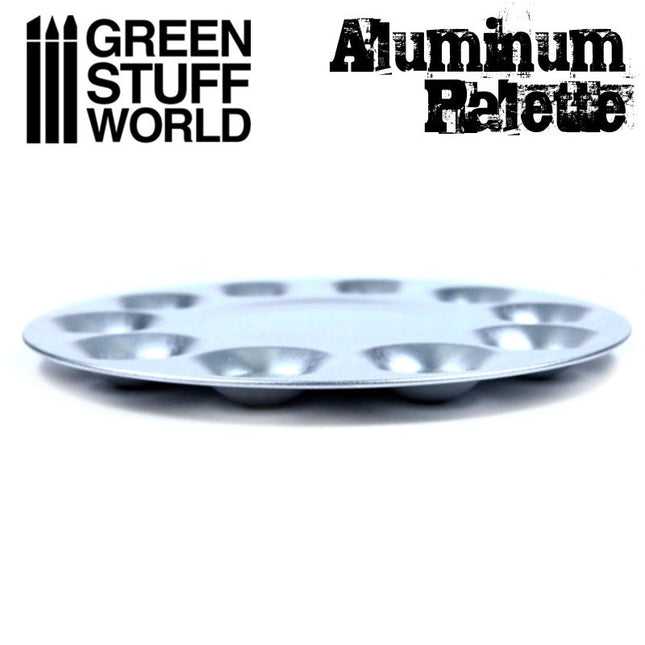
Aluminium palette (10 reservoirs)
Metalen mengpalet voor schilder- en modelleerwerken. Gemaakt van stevig aluminium met 10 reservoirs. Lichtgewicht en gemakkelijk schoon te maken. Bestand tegen zowel synthetische als acrylverdunners, evenals aceton, terpetine en stopverf. Diameter: 17 cm Materiaal: aluminium Inhoud: 1 metalen palet met 10 reservoirs
€2,70
-

Siliconen mallen tegels (set van 2)
Paving stones molds Made of high-quality food-grade silicone, easy to use, and intricately cut for great impressions, these silicone molds are heat resistant and durable. The molds are extra deep to give highly detailed beautiful results for both dimensional design and surface imprinting. Each mold has a large surface area measuring 2,5x5 inches (6x12cm) and is unmounted for optimal usability. The molds work great with any sort of material including acrylic resin. These flexible molds will allow you to create endless amounts of pavement stones valid for 1:35. Heat-resistant rubber up to 240ºC Food-gradeResin-Grade Scale 1:35 (1:32-1:48) We recommend using flexible steel scrapers to remove the excess putty/clay from the molds without cutting them. Contains 2 molds with 8 pavement types as follows:
€12,50
-

Set ovale mallen (5 st/5 verschillende maten)
Containment Moulds Set of Silicone Containment Moulds that allow you to limit the edges of the bases of your miniatures when pouring liquids and resins, such as our Ultraviolet Resin. Resin will not stick to the silicone nor will it affect the transparency of the resins. These moulds have the standard measurements of wargame bases. During the filling with resins, to reduce any potential deformities due to the high temperatures generated, we recommend the application of the resin in thin layers. Do not move or manipulate these moulds with resin inside until they have been completely hardened, since air may have trapped inside, releasing it and generating internal bubbles. These moulds are heat resistant up to 240ºC and very durable. Dimensions: 60x35mm75x42mm90x52mm105x70mm70x25mm Height: 10mm
€12,00€10,80
-

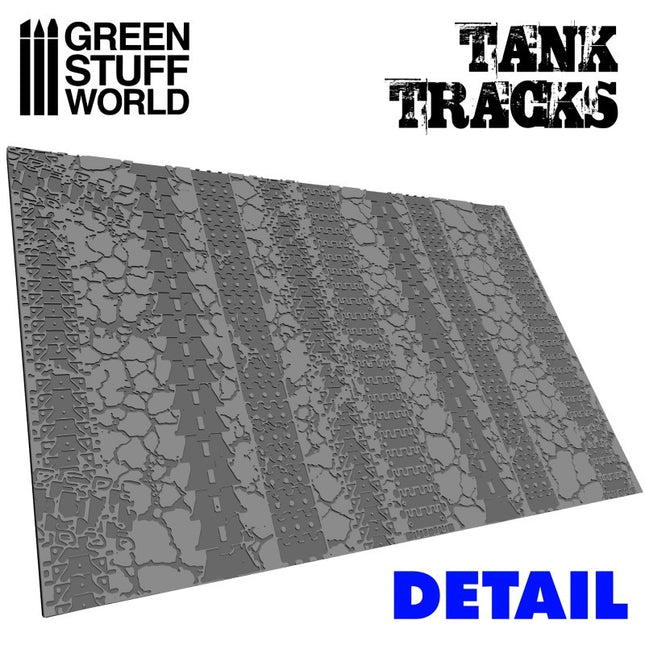
Rolling pin Tank tracks - figuur roller Rupsbanden
Figuur roller Rupsbanden - Tank TracksRoller voorzien van een basisfiguur waarmee een continu herhaald patroon op klei en plamuren kan worden gedrukt. Gemaakt van helder PMMA-plastic met verbazingwekkende antikleefeigenschappen. Niet giftig. Ze zijn er in verschillende texturen die u kunt kopen op basis van uw specifieke behoeften.Lengte: 14'50 cm (5'5 inches)Diameter: 2'5cm (1 inch)Patroongrootte/schaal voor 28-32mm figurenGEBRUIK INSTRUCTIES:1e - Meng de epoxyhars / klei / polymer klei tot een egaal plakkaat2e - Zorg voor een optimaal resultaat voor een glad en egaal oppervlak zodat het patroon goed zal overkomen. Gebruik desnoods een deegroller, fles of ander glad rond voorwerp. 3e - Afhankelijk van het type plamuur / klei is het raadzaam om de figuurroller nat te maken om vastzitten te voorkomen.4e - Verplaats de figuurroller langzaam en oefen gelijkmatige druk uit op alle punten voor een gelijkmatige afdruk op de klei, epoxy kneedhars of ander materiaal5e - Haal overtollig klei weg met een scherp mes. Het wordt aanbevolen om dit te doen als het eenmaal is opgedroogd om vervormingen in de stopverf / klei te voorkomen.Materialen:Er zijn veel verschillende kleien of epoxyhars op de markt en ze kunnen allemaal worden voorzien van een afdruk met de roller. Gebruik verschillende druk bij de verschillende materialen.Gewoonlijk zijn polymeerklei (Fimo of Sculpey-type) vrij eenvoudig om met deze Rolling Pins te bewerken, omdat ze een gemakkelijke correctie van fouten toelaten voordat ze worden gebakken. Wil je de structuur overbrengen op een basis, gebruik dan een MDF basis. Dit omdat je de polymeerklei direct op een MDF-basis kunt zetten en alles in de oven, inclusief de basis, kunt plaatsen. De droogtijd van deze klei is ongeveer 15 minuten bij 150ºC. MDF hout laat wel een lichte geur achter zoals bij geroosterd brood, maar maak je geen zorgen dat het zal branden! Wil je alleen een prachtig pad, veranda, straat of iets anders maken dan kun je dit natuurlijk op een platte plaat drogen in de oven.In het geval van epoxy basis zoals GreenStuff zijn er verschillende technieken die vergelijkbare resultaten opleveren. Het goede is: je hoeft ze niet te bakken, alleen te laten drogen en daarna kun je ze direct verwerken. Met Green Stuff, dat bijzonder kleverig is, is het het beste om de roller of de klei enigszins te bevochtigen voor je de figuur roller erover heen walst. U kunt ook de kleverigheid verminderen door talkpoeder toe te passen of door een oliebasis als Vaseline te gebruiken.Andere epoxy klei zoals de Milliput putty, bijvoorbeeld, zijn ook geschikt, maar we zouden niet aanraden om ze veel nat te maken. Als het mengsel te plakkerig is, is het beter om door te gaan met kneden totdat de plakkerigheid verdwenen is. Voor dit soort epoxyplamuren is het erg belangrijk om de rollen na gebruik goed te reinigen.Schoonmaak instructies:Gebruik na het werken met de deegroller een penseel met harde haren en voldoende water om eventuele resten op de roller te verwijderen, indien nodig. Om de veiligheid te garanderen, moeten kinderen nauwlettend worden gecontroleerd door een verantwoordelijke volwassene. #rolling #pin #tank #tracks #greenstuffworld
€13,00
-

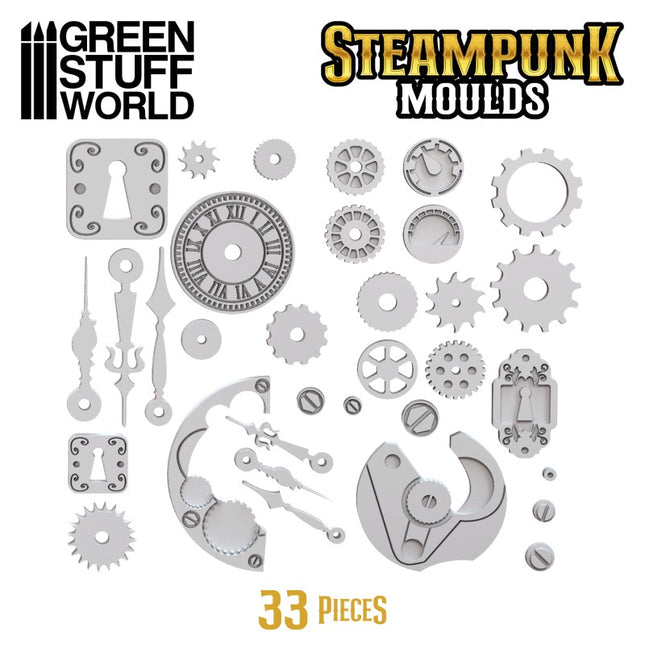
Siliconen mal Victoriaans - Steampunk
Siliconen mal Victoriaans - Steampunk Gemaakt van hoogwaardige voedingswaren siliconen. Makkelijk in gebruik en zo gesneden dat er vele steenvormen in de mallen aanwezig is. Deze mallen zijn hittebestendig en duurzaam. De mallen zijn extra diep om zeer gedetailleerde mooie resultaten te geven voor zowel dimensionaal ontwerp als oppervlaktedruk. De mal heeft een groot oppervlak van 2,5x5 inch (6x12cm) en is flexibel voor optimale bruikbaarheid. De mallen werken geweldig met en elk soort materiaal inclusief hars.Met deze mal maak je onderdelen voor steampunk items maar ook als je Victoriaanse onderdelen en decoratie wilt gebruiken Hittebestendig rubber tot 240ºC (dus ja ook voor voeding en cakedecoratie!)VoedingswaardeResin-GradeWe raden aan om klei boetseer schrapers te gebruiken om het overtollige kit / klei uit de vormen te verwijderen om beschadigingen te voorkomen Mal is 4mm dik en de vormen maken modellen van 3mm dik. Bevat 2 mallen Gebruik onze acrylic resin voor de mooiste resultaten. Na het gebruik van de mal de vormen bijvijlen (wanneer er toch teveel resin is gebruikt), voorbewerken met bijvoorbeeld mod podge of een sealer en schilder daarna in elke kleur. Plaatsen met epoxy, lijm of andere middelen. Kleur de acrylic resin met pigment en je hebt direct de juiste kleur!
€10,50
-

Siliconen mal Grids & Fans
Grids & Fans molds Made of high-quality food-grade silicone, easy to use, and intricately cut for great impressions, these silicone molds are heat resistant (up to 240ºC) and durable. The molds are carefully carved for highly detailed and thorough results for both dimensional design and surface imprinting. Each mold has a large surface area measuring 6x12cm. The molds work great with any sort of resin, we highly recommend using acrylic resin. Wait until the resin has dried completely before removing the pieces. Other materials such as milliput, milliput mixed with Plasteline, magic sculpt and others also work but are harder to use. We recommend the use of flexible steel scrapers to remove excess putty/clay from the molds without damaging them.
€12,50
-

Siliconen mal Control panels
Control Panels molds Made of high-quality food-grade silicone, easy to use, and intricately cut for great impressions, these silicone molds are heat resistant (up to 240ºC) and durable. The molds are carefully carved for highly detailed and thorough results for both dimensional design and surface imprinting. Each mold has a large surface area measuring 6x12cm. The molds work great with any sort of resin, we highly recommend using acrylic resin. Wait until the resin has dried completely before removing the pieces. Other materials such as milliput, milliput mixed with Plasteline, magic sculpt and others also work but are harder to use. We recommend the use of flexible steel scrapers to remove excess putty/clay from the molds without damaging them.
€12,50
-

Siliconen mal Leidingen
Pipe Circuit molds Made of high-quality food-grade silicone, easy to use, and intricately cut for great impressions, these silicone molds are heat resistant (up to 240ºC) and durable. The molds are carefully carved for highly detailed and thorough results for both dimensional design and surface imprinting. Each mold has a large surface area measuring 6x12cm. The molds work great with any sort of resin, we highly recommend using acrylic resin. Wait until the resin has dried completely before removing the pieces. Other materials such as milliput, milliput mixed with Plasteline, magic sculpt and others also work but are harder to use. We recommend the use of flexible steel scrapers to remove excess putty/clay from the molds without damaging them.
€12,50
-

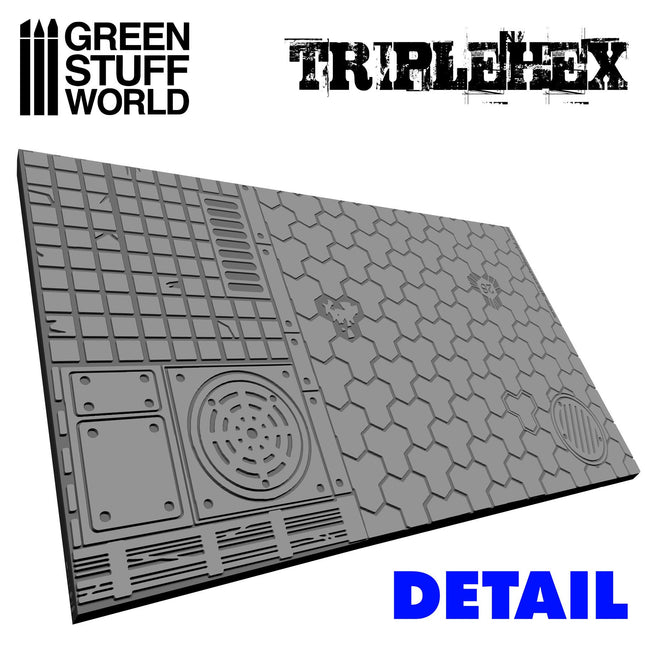
Rolling pin TripleHex - figuur roller TripleHex
Figuur roller TripleHex Infinity Roller voorzien van een basisfiguur waarmee een continu herhaald patroon op klei en plamuren kan worden gedrukt. Gemaakt van helder PMMA-plastic met verbazingwekkende antikleefeigenschappen. Niet giftig. Ze zijn er in verschillende texturen die u kunt kopen op basis van uw specifieke behoeften.Lengte: 14'50 cm (5'5 inches)Diameter: 2'5cm (1 inch) Patroonafmetingen: 10x10 mm Aanbevolen schaal: 1/35-1/43-1/48-1/76 GEBRUIK INSTRUCTIES of bekijk deze video1e - Meng de epoxyhars / klei / polymer klei tot een egaal plakkaat2e - Zorg voor een optimaal resultaat voor een glad en egaal oppervlak zodat het patroon goed zal overkomen. Gebruik desnoods een deegroller, fles of ander glad rond voorwerp. 3e - Afhankelijk van het type plamuur / klei is het raadzaam om de figuurroller nat te maken om vastzitten te voorkomen.4e - Verplaats de figuurroller langzaam en oefen gelijkmatige druk uit op alle punten voor een gelijkmatige afdruk op de klei, epoxy kneedhars of ander materiaal5e - Haal overtollig klei weg met een scherp mes. Het wordt aanbevolen om dit te doen als het eenmaal is opgedroogd om vervormingen in de stopverf / klei te voorkomen.Materialen:Er zijn veel verschillende kleien of epoxyhars op de markt en ze kunnen allemaal worden voorzien van een afdruk met de roller. Gebruik verschillende druk bij de verschillende materialen.Gewoonlijk zijn polymeerklei (Fimo of Sculpey-type) vrij eenvoudig om met deze Rolling Pins te bewerken, omdat ze een gemakkelijke correctie van fouten toelaten voordat ze worden gebakken. Wil je de structuur overbrengen op een basis, gebruik dan een MDF basis. Dit omdat je de polymeerklei direct op een MDF-basis kunt zetten en alles in de oven, inclusief de basis, kunt plaatsen. De droogtijd van deze klei is ongeveer 15 minuten bij 150ºC. MDF hout laat wel een lichte geur achter zoals bij geroosterd brood, maar maak je geen zorgen dat het niet zal branden! Wil je alleen een prachtig pad, veranda, straat of iets anders maken dan kun je dit natuurlijk op een platte plaat drogen in de oven.In het geval van epoxy basis zoals GreenStuff zijn er verschillende technieken die vergelijkbare resultaten opleveren. Het goede is: je hoeft ze niet te bakken, alleen te laten drogen en daarna kun je ze direct verwerken. Met Green Stuff, dat bijzonder kleverig is, is het het beste om de roller of de klei enigszins te bevochtigen voor je de figuur roller erover heen walst. U kunt ook de kleverigheid verminderen door talkpoeder toe te passen of door een oliebasis als Vaseline te gebruiken.Andere epoxy klei zoals de Milliput putty, bijvoorbeeld, zijn ook geschikt, maar we zouden niet aanraden om ze veel nat te maken. Als het mengsel te plakkerig is, is het beter om door te gaan met kneden totdat de plakkerigheid verdwenen is. Voor dit soort epoxyplamuren is het erg belangrijk om de deegrollen na gebruik goed te reinigen.Schoonmaak instructies:Gebruik na het werken met de deegroller een penseel met harde haren en voldoende water om eventuele resten op de deegroller te verwijderen, indien nodig. Om de veiligheid te garanderen, moeten kinderen nauwlettend worden gecontroleerd door een verantwoordelijke volwassene.
€13,00
-

Set vierkante mallen (5 st/5 verschillende maten)
Containment Moulds Set of Silicone Containment Moulds that allow you to limit the edges of the bases of your miniatures when pouring liquids and resins, such as our Ultraviolet Resin (LINK). Resin will not stick to the silicone nor will it affect the transparency of the resins. These moulds have the standard measurements of wargame bases. During the filling with resins, to reduce any potential deformities due to the high temperatures generated, we recommend the application of the resin in thin layers. Do not move or manipulate these moulds with resin inside until they have been completely hardened, since air may have trapped inside, releasing it and generating internal bubbles. These moulds are heat resistant up to 240ºC and very durable. Dimensions: 20mm25mm40mm50mm25x50mm Height: 10mm
€12,00
-

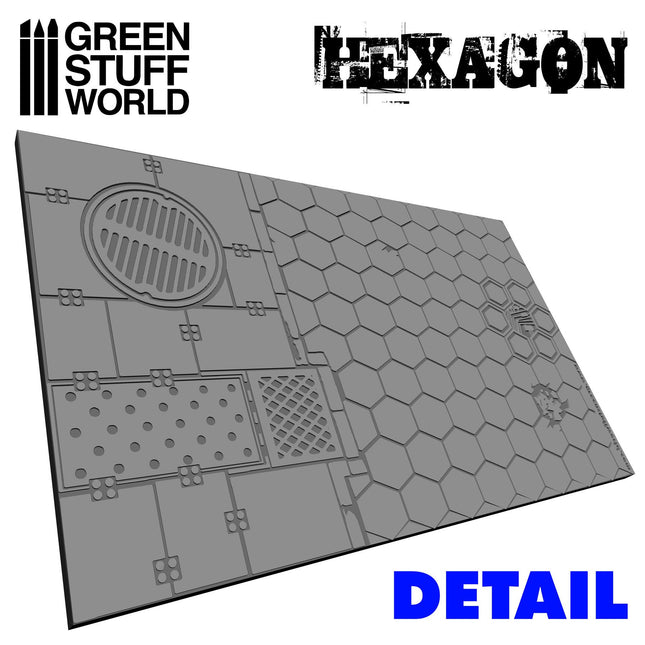
Rolling pin Hexagons - figuur roller Zeshoekig
Figuur roller Hexagons - Zeshoekig Roller voorzien van een basisfiguur waarmee een continu herhaald patroon op klei en plamuren kan worden gedrukt. Gemaakt van helder PMMA-plastic met verbazingwekkende antikleefeigenschappen. Niet giftig. Ze zijn er in verschillende texturen die u kunt kopen op basis van uw specifieke behoeften.Lengte: 14'50 cm (5'5 inches)Diameter: 2'5cm (1 inch) Patroonafmetingen: 10x10 mm Aanbevolen schaal: 1/35-1/43-1/48-1/76 GEBRUIK INSTRUCTIES of bekijk deze video1e - Meng de epoxyhars / klei / polymer klei tot een egaal plakkaat2e - Zorg voor een optimaal resultaat voor een glad en egaal oppervlak zodat het patroon goed zal overkomen. Gebruik desnoods een deegroller, fles of ander glad rond voorwerp. 3e - Afhankelijk van het type plamuur / klei is het raadzaam om de figuurroller nat te maken om vastzitten te voorkomen.4e - Verplaats de figuurroller langzaam en oefen gelijkmatige druk uit op alle punten voor een gelijkmatige afdruk op de klei, epoxy kneedhars of ander materiaal5e - Haal overtollig klei weg met een scherp mes. Het wordt aanbevolen om dit te doen als het eenmaal is opgedroogd om vervormingen in de stopverf / klei te voorkomen.Materialen:Er zijn veel verschillende kleien of epoxyhars op de markt en ze kunnen allemaal worden voorzien van een afdruk met de roller. Gebruik verschillende druk bij de verschillende materialen.Gewoonlijk zijn polymeerklei (Fimo of Sculpey-type) vrij eenvoudig om met deze Rolling Pins te bewerken, omdat ze een gemakkelijke correctie van fouten toelaten voordat ze worden gebakken. Wil je de structuur overbrengen op een basis, gebruik dan een MDF basis. Dit omdat je de polymeerklei direct op een MDF-basis kunt zetten en alles in de oven, inclusief de basis, kunt plaatsen. De droogtijd van deze klei is ongeveer 15 minuten bij 150ºC. MDF hout laat wel een lichte geur achter zoals bij geroosterd brood, maar maak je geen zorgen dat het zal branden! Wil je alleen een prachtig pad, veranda, straat of iets anders maken dan kun je dit natuurlijk op een platte plaat drogen in de oven.In het geval van epoxy basis zoals GreenStuff zijn er verschillende technieken die vergelijkbare resultaten opleveren. Het goede is: je hoeft ze niet te bakken, alleen te laten drogen en daarna kun je ze direct verwerken. Met Green Stuff, dat bijzonder kleverig is, is het het beste om de roller of de klei enigszins te bevochtigen voor je de figuur roller erover heen walst. U kunt ook de kleverigheid verminderen door talkpoeder toe te passen of door een oliebasis als Vaseline te gebruiken.Andere epoxy klei zoals de Milliput putty, bijvoorbeeld, zijn ook geschikt, maar we zouden niet aanraden om ze veel nat te maken. Als het mengsel te plakkerig is, is het beter om door te gaan met kneden totdat de plakkerigheid verdwenen is. Voor dit soort epoxyplamuren is het erg belangrijk om de rollen na gebruik goed te reinigen.Schoonmaak instructies:Gebruik na het werken met de deegroller een penseel met harde haren en voldoende water om eventuele resten op de deegroller te verwijderen, indien nodig. Om de veiligheid te garanderen, moeten kinderen nauwlettend worden gecontroleerd door een verantwoordelijke volwassene.
€13,00
-

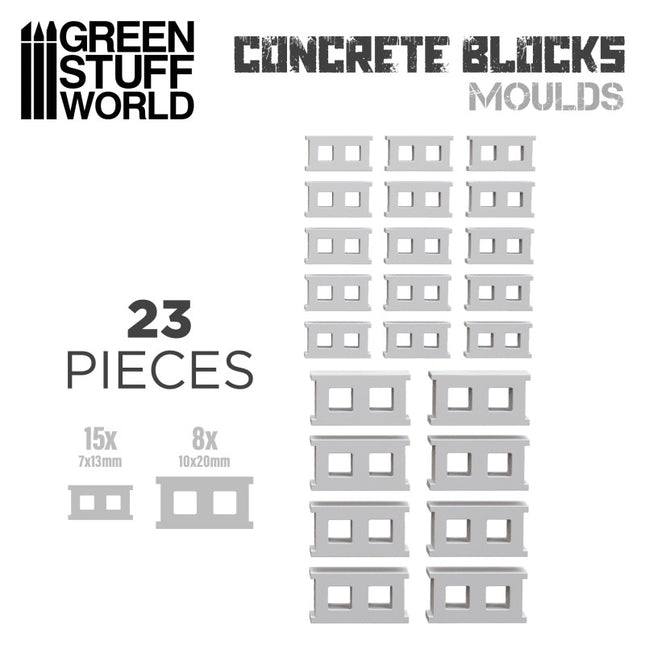
Siliconen mal Betonblok
Silicone molds - Concrete Bricks Made of high quality foodgrade silicone, easy to use and intricately cut for great impressions, these molds are heat resistant and durable. The molds are extra deep to give highly detailed beautiful results for both dimensional design and surface imprinting. Each mold has a large surface area measuring 6x12cm, and is unmounted for optimal usability. The molds work great with any sort of resin. These flexible molds will allow you to create endless amounts of concrete brick valid for 1:35 (1:32-1:43). Heat resistant rubber up to 240ºC Food-grade and Resin-Grade We recommend using liquid Resins (UV resins too as the molds are transparant). Other putties such as milliput, milliput mixed with plasteline, magic sculpt or similars may also work, but because of the depth of the bricks in the pattern, they will need a bit of help when filling them in. We recommend using SCRAPERS (LINK) to remove the excess of putty/clay from the molds without cutting them. Contains 1 molds with 2 brick types as follows:
€12,50
-

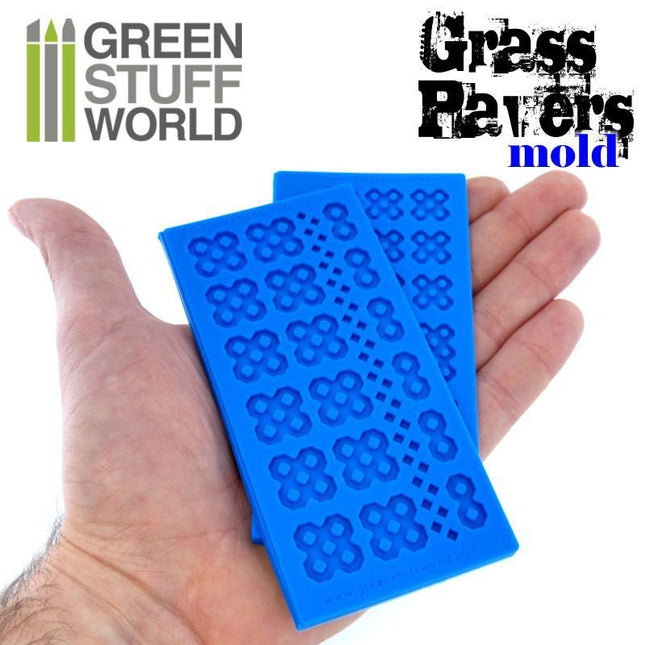
Siliconen mallen grasstenen (set van 2)
2 soorten Siliconen mallen grasstenen Gemaakt van hoogwaardige voedingswaren siliconen. Makkelijk in gebruik en zo gesneden dat er vele steenvormen in de mallen aanwezig is. Deze mallen zijn hittebestendig en duurzaam. De mallen zijn extra diep om zeer gedetailleerde mooie resultaten te geven voor zowel dimensionaal ontwerp als oppervlaktedruk. Elke mal heeft een groot oppervlak van 2,5x5 inch (6x12cm) en is flexibel voor optimale bruikbaarheid. De mallen werken geweldig met en elk soort materiaal inclusief hars.Met deze flexibele mallen kunt u eindeloze hoeveelheden baksteen en straten te maken die bruikbaar zijn voor de schaal 1:35.Hittebestendig rubber tot 240ºCVoedingswaardeResin-GradeSchaal 1:35 (1:32-1:43) We raden aan om klei boetseer schrapers te gebruiken om het overtollige kit / klei uit de vormen te verwijderen om beschadigingen te voorkomen Bevat 2 vormen met 4 type stenen. Voeg los static grass 3mm toe na droogtijd om het grasstuk na te bootsen.
€12,50
-

Rolling pin Aztec - figuur roller Azteeks
Figuur roller AztecRoller voorzien van een basisfiguur waarmee een continu herhaald patroon op klei en plamuren kan worden gedrukt. Gemaakt van helder PMMA-plastic met verbazingwekkende antikleefeigenschappen. Niet giftig. Ze zijn er in verschillende texturen die u kunt kopen op basis van uw specifieke behoeften.Lengte: 14'50 cm (5'5 inches)Diameter: 2'5cm (1 inch)GEBRUIK INSTRUCTIES:1e - Meng de epoxyhars / klei / polymer klei tot een egaal plakkaat2e - Zorg voor een optimaal resultaat voor een glad en egaal oppervlak zodat het patroon goed zal overkomen. Gebruik desnoods een deegroller, fles of ander glad rond voorwerp. 3e - Afhankelijk van het type plamuur / klei is het raadzaam om de figuurroller nat te maken om vastzitten te voorkomen.4e - Verplaats de figuurroller langzaam en oefen gelijkmatige druk uit op alle punten voor een gelijkmatige afdruk op de klei, epoxy kneedhars of ander materiaal5e - Haal overtollig klei weg met een scherp mes. Het wordt aanbevolen om dit te doen als het eenmaal is opgedroogd om vervormingen in de stopverf / klei te voorkomen.Materialen:Er zijn veel verschillende kleien of epoxyhars op de markt en ze kunnen allemaal worden voorzien van een afdruk met de roller. Gebruik verschillende druk bij de verschillende materialen.Gewoonlijk zijn polymeerklei (Fimo of Sculpey-type) vrij eenvoudig om met deze Rolling Pins te bewerken, omdat ze een gemakkelijke correctie van fouten toelaten voordat ze worden gebakken. Wil je de structuur overbrengen op een basis, gebruik dan een MDF basis. Dit omdat je de polymeerklei direct op een MDF-basis kunt zetten en alles in de oven, inclusief de basis, kunt plaatsen. De droogtijd van deze klei is ongeveer 15 minuten bij 150ºC. MDF hout laat wel een lichte geur achter zoals bij geroosterd brood, maar maak je geen zorgen dat het niet zal branden! In het geval van epoxy basis zoals GreenStuff zijn er verschillende technieken die vergelijkbare resultaten opleveren. Het goede is: je hoeft ze niet te bakken, alleen te laten drogen en daarna kun je ze direct verwerken. Met Green Stuff, dat bijzonder kleverig is, is het het beste om de roller of de klei enigszins te bevochtigen voor je de figuur roller erover heen walst. U kunt ook de kleverigheid verminderen door talkpoeder toe te passen of door een oliebasis als Vaseline te gebruiken.Andere epoxy klei zoals de Milliput putty, bijvoorbeeld, zijn ook geschikt, maar we zouden niet aanraden om ze veel nat te maken. Als het mengsel te plakkerig is, is het beter om door te gaan met kneden totdat de plakkerigheid verdwenen is. Voor dit soort epoxyplamuren is het erg belangrijk om de deegrollen na gebruik goed te reinigen.Schoonmaak instructies:Gebruik na het werken met de deegroller een penseel met harde haren en voldoende water om eventuele resten op de deegroller te verwijderen, indien nodig. Om de veiligheid te garanderen, moeten kinderen nauwlettend worden gecontroleerd door een verantwoordelijke volwassene.
€13,00
-

UltraViolet (UV) Torch
The body of this flashlight is built of high-quality aluminum alloy, and it has a very solid construction. Internal wiring applies the highly efficient booster circuit and can utilize the batteries to the largest extent. Excellent waterproof, suitable for outdoor environments, and adverse weather conditions. Perfect for curing UV resin in a few minutes.Specifications: Emitter Type: UV LED (UV-A)WL (wavelength): 385~400nmUltraviolet luminous intensity: 3mWBulb Quantity: 12LED Lifespan: 10,000 hoursModes: 1Battery Configuration: 3 x AAA batteries (NOT INCLUDED)Input Voltage: 4.5 vRuntime: About 4.5 hoursSwitch Type: Clicky/ClickieSwitch Location: Tail-capLens: Coated Glass LensMaterial: Aluminum AlloyBody Color: blackDimensions (L x Head Dia. x Body Dia.):3.8 x 1.1 x 1 inch /9.5 x 2.9 x 2.5cmWeight: 63g / 1.94ozPackage Includes:1 x 9 UV LED Ultra Violet 385~400nm Flashlight Torch
€5,35
-

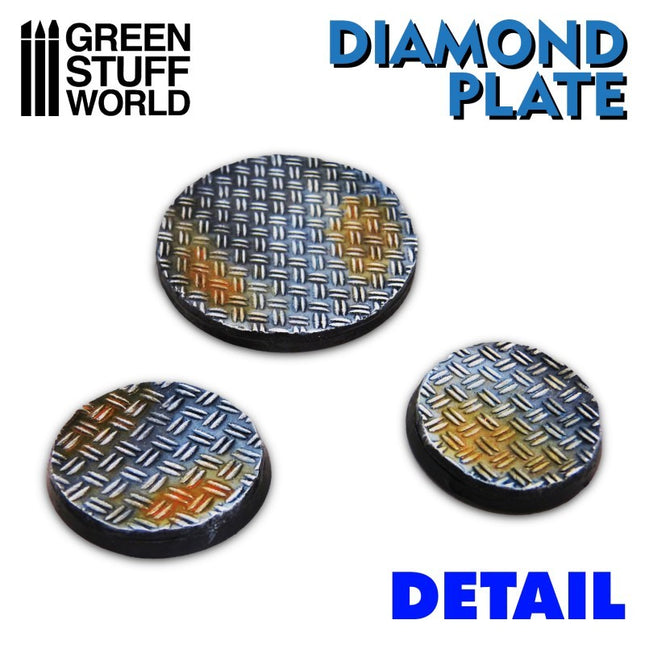
Rolling pin Diamond Plate - figuur roller Diamant plate
Figuur roller Diamant Roller voorzien van een basisfiguur waarmee een continu herhaald patroon op klei en plamuren kan worden gedrukt. Gemaakt van helder PMMA-plastic met verbazingwekkende antikleefeigenschappen. Niet giftig. Ze zijn er in verschillende texturen die u kunt kopen op basis van uw specifieke behoeften.Lengte: 14'50 cm (5'5 inches)Diameter: 2'5cm (1 inch) Diamant grootte: 3x1mm GEBRUIK INSTRUCTIES:1e - Meng de epoxyhars / klei / polymer klei tot een egaal plakkaat2e - Zorg voor een optimaal resultaat voor een glad en egaal oppervlak zodat het patroon goed zal overkomen. Gebruik desnoods een deegroller, fles of ander glad rond voorwerp. 3e - Afhankelijk van het type plamuur / klei is het raadzaam om de figuurroller nat te maken om vastzitten te voorkomen.4e - Verplaats de figuurroller langzaam en oefen gelijkmatige druk uit op alle punten voor een gelijkmatige afdruk op de klei, epoxy kneedhars of ander materiaal5e - Haal overtollig klei weg met een scherp mes. Het wordt aanbevolen om dit te doen als het eenmaal is opgedroogd om vervormingen in de stopverf / klei te voorkomen.Materialen:Er zijn veel verschillende kleien of epoxyhars op de markt en ze kunnen allemaal worden voorzien van een afdruk met de roller. Gebruik verschillende druk bij de verschillende materialen.Gewoonlijk zijn polymeerklei (Fimo of Sculpey-type) vrij eenvoudig om met deze Rolling Pins te bewerken, omdat ze een gemakkelijke correctie van fouten toelaten voordat ze worden gebakken. Wil je de structuur overbrengen op een basis, gebruik dan een MDF basis. Dit omdat je de polymeerklei direct op een MDF-basis kunt zetten en alles in de oven, inclusief de basis, kunt plaatsen. De droogtijd van deze klei is ongeveer 15 minuten bij 150ºC. MDF hout laat wel een lichte geur achter zoals bij geroosterd brood, maar maak je geen zorgen dat het niet zal branden! In het geval van epoxy basis zoals GreenStuff zijn er verschillende technieken die vergelijkbare resultaten opleveren. Het goede is: je hoeft ze niet te bakken, alleen te laten drogen en daarna kun je ze direct verwerken. Met Green Stuff, dat bijzonder kleverig is, is het het beste om de roller of de klei enigszins te bevochtigen voor je de figuur roller erover heen walst. U kunt ook de kleverigheid verminderen door talkpoeder toe te passen of door een oliebasis als Vaseline te gebruiken.Andere epoxy klei zoals de Milliput putty, bijvoorbeeld, zijn ook geschikt, maar we zouden niet aanraden om ze veel nat te maken. Als het mengsel te plakkerig is, is het beter om door te gaan met kneden totdat de plakkerigheid verdwenen is. Voor dit soort epoxyplamuren is het erg belangrijk om de deegrollen na gebruik goed te reinigen.Schoonmaak instructies:Gebruik na het werken met de deegroller een penseel met harde haren en voldoende water om eventuele resten op de deegroller te verwijderen, indien nodig. Om de veiligheid te garanderen, moeten kinderen nauwlettend worden gecontroleerd door een verantwoordelijke volwassene.
€13,00
-

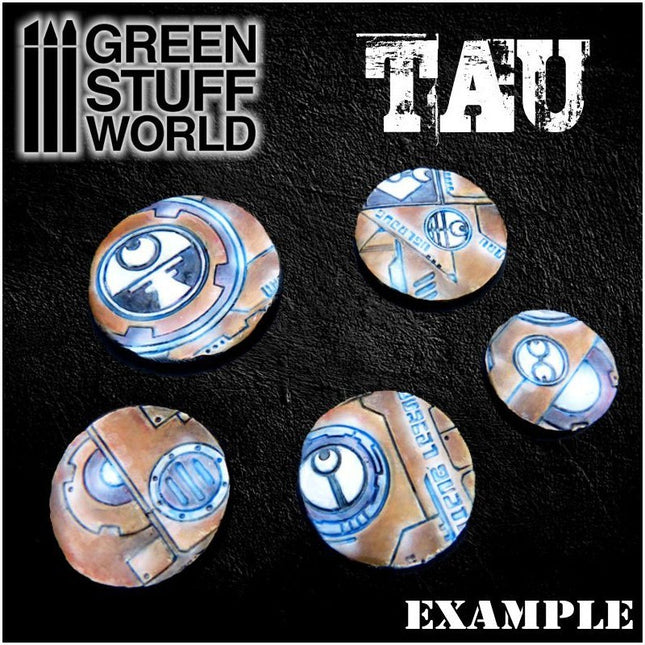
Rolling pin T'au (Tau) - figuur roller T'au (Warhammer)
Figuur roller T'au of Tau Empire Roller voorzien van een basisfiguur waarmee een continu herhaald patroon op klei en plamuren kan worden gedrukt. Gemaakt van helder PMMA-plastic met verbazingwekkende antikleefeigenschappen. Niet giftig. Ze zijn er in verschillende texturen die u kunt kopen op basis van uw specifieke behoeften.Lengte: 14'50 cm (5'5 inches)Diameter: 2'5cm (1 inch)GEBRUIK INSTRUCTIES:1e - Meng de epoxyhars / klei / polymer klei tot een egaal plakkaat2e - Zorg voor een optimaal resultaat voor een glad en egaal oppervlak zodat het patroon goed zal overkomen. Gebruik desnoods een deegroller, fles of ander glad rond voorwerp. 3e - Afhankelijk van het type plamuur / klei is het raadzaam om de figuurroller nat te maken om vastzitten te voorkomen.4e - Verplaats de figuurroller langzaam en oefen gelijkmatige druk uit op alle punten voor een gelijkmatige afdruk op de klei, epoxy kneedhars of ander materiaal5e - Haal overtollig klei weg met een scherp mes. Het wordt aanbevolen om dit te doen als het eenmaal is opgedroogd om vervormingen in de stopverf / klei te voorkomen.Materialen:Er zijn veel verschillende kleien of epoxyhars op de markt en ze kunnen allemaal worden voorzien van een afdruk met de roller. Gebruik verschillende druk bij de verschillende materialen.Gewoonlijk zijn polymeerklei (Fimo of Sculpey-type) vrij eenvoudig om met deze Rolling Pins te bewerken, omdat ze een gemakkelijke correctie van fouten toelaten voordat ze worden gebakken. Wil je de structuur overbrengen op een basis, gebruik dan een MDF basis. Dit omdat je de polymeerklei direct op een MDF-basis kunt zetten en alles in de oven, inclusief de basis, kunt plaatsen. De droogtijd van deze klei is ongeveer 15 minuten bij 150ºC. MDF hout laat wel een lichte geur achter zoals bij geroosterd brood, maar maak je geen zorgen dat het niet zal branden! In het geval van epoxy basis zoals GreenStuff zijn er verschillende technieken die vergelijkbare resultaten opleveren. Het goede is: je hoeft ze niet te bakken, alleen te laten drogen en daarna kun je ze direct verwerken. Met Green Stuff, dat bijzonder kleverig is, is het het beste om de roller of de klei enigszins te bevochtigen voor je de figuur roller erover heen walst. U kunt ook de kleverigheid verminderen door talkpoeder toe te passen of door een oliebasis als Vaseline te gebruiken.Andere epoxy klei zoals de Milliput putty, bijvoorbeeld, zijn ook geschikt, maar we zouden niet aanraden om ze veel nat te maken. Als het mengsel te plakkerig is, is het beter om door te gaan met kneden totdat de plakkerigheid verdwenen is. Voor dit soort epoxyplamuren is het erg belangrijk om de deegrollen na gebruik goed te reinigen.Schoonmaak instructies:Gebruik na het werken met de deegroller een penseel met harde haren en voldoende water om eventuele resten op de deegroller te verwijderen, indien nodig. Om de veiligheid te garanderen, moeten kinderen nauwlettend worden gecontroleerd door een verantwoordelijke volwassene.
€13,00
-

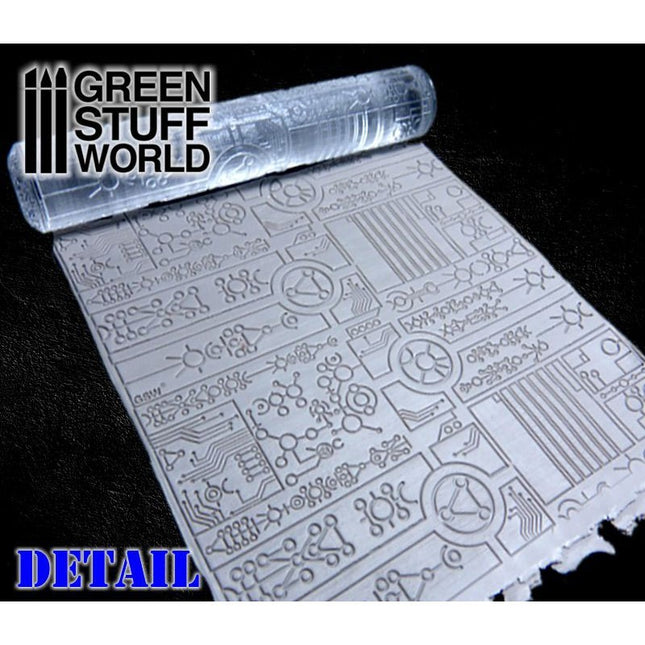
Rolling pin Necronic - figuur roller Necronic (Warhammer Necrons)
Figuur roller NecronicRoller voorzien van een basisfiguur waarmee een continu herhaald patroon op klei en plamuren kan worden gedrukt. Gemaakt van helder PMMA-plastic met verbazingwekkende antikleefeigenschappen. Niet giftig. Ze zijn er in verschillende texturen die u kunt kopen op basis van uw specifieke behoeften.Lengte: 14'50 cm (5'5 inches)Diameter: 2'5cm (1 inch)GEBRUIK INSTRUCTIES:1e - Meng de epoxyhars / klei / polymer klei tot een egaal plakkaat2e - Zorg voor een optimaal resultaat voor een glad en egaal oppervlak zodat het patroon goed zal overkomen. Gebruik desnoods een deegroller, fles of ander glad rond voorwerp. 3e - Afhankelijk van het type plamuur / klei is het raadzaam om de figuurroller nat te maken om vastzitten te voorkomen.4e - Verplaats de figuurroller langzaam en oefen gelijkmatige druk uit op alle punten voor een gelijkmatige afdruk op de klei, epoxy kneedhars of ander materiaal5e - Haal overtollig klei weg met een scherp mes. Het wordt aanbevolen om dit te doen als het eenmaal is opgedroogd om vervormingen in de stopverf / klei te voorkomen.Materialen:Er zijn veel verschillende kleien of epoxyhars op de markt en ze kunnen allemaal worden voorzien van een afdruk met de roller. Gebruik verschillende druk bij de verschillende materialen.Gewoonlijk zijn polymeerklei (Fimo of Sculpey-type) vrij eenvoudig om met deze Rolling Pins te bewerken, omdat ze een gemakkelijke correctie van fouten toelaten voordat ze worden gebakken. Wil je de structuur overbrengen op een basis, gebruik dan een MDF basis. Dit omdat je de polymeerklei direct op een MDF-basis kunt zetten en alles in de oven, inclusief de basis, kunt plaatsen. De droogtijd van deze klei is ongeveer 15 minuten bij 150ºC. MDF hout laat wel een lichte geur achter zoals bij geroosterd brood, maar maak je geen zorgen dat het zal branden! In het geval van epoxy basis zoals GreenStuff zijn er verschillende technieken die vergelijkbare resultaten opleveren. Het goede is: je hoeft ze niet te bakken, alleen te laten drogen en daarna kun je ze direct verwerken. Met Green Stuff, dat bijzonder kleverig is, is het het beste om de roller of de klei enigszins te bevochtigen voor je de figuur roller erover heen walst. U kunt ook de kleverigheid verminderen door talkpoeder toe te passen of door een oliebasis als Vaseline te gebruiken.Andere epoxy klei zoals de Milliput putty, bijvoorbeeld, zijn ook geschikt, maar we zouden niet aanraden om ze veel nat te maken. Als het mengsel te plakkerig is, is het beter om door te gaan met kneden totdat de plakkerigheid verdwenen is. Voor dit soort epoxyplamuren is het erg belangrijk om de rollen na gebruik goed te reinigen.Schoonmaak instructies:Gebruik na het werken met de deegroller een penseel met harde haren en voldoende water om eventuele resten op de roller te verwijderen, indien nodig. Om de veiligheid te garanderen, moeten kinderen nauwlettend worden gecontroleerd door een verantwoordelijke volwassene.
€13,00
-

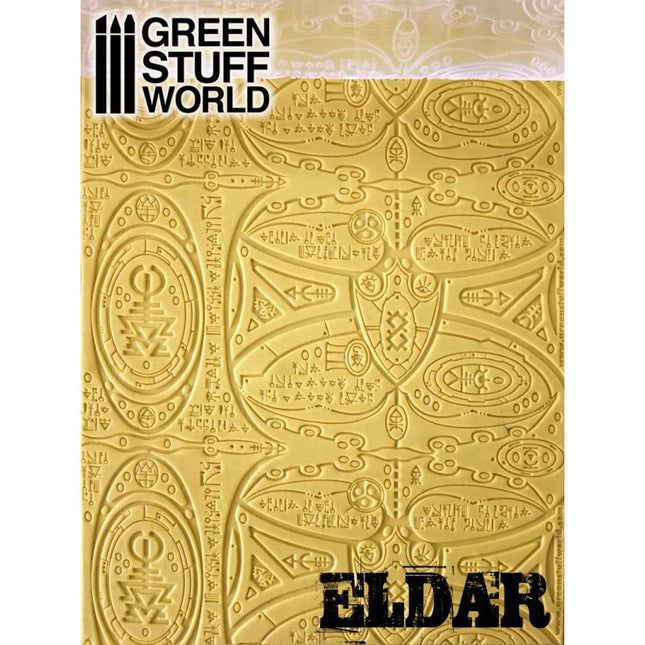
Rolling pin Eldar - figuur roller Eldar (Warhammer)
Figuur roller EldarRoller voorzien van een basisfiguur waarmee een continu herhaald patroon op klei en plamuren kan worden gedrukt. Gemaakt van helder PMMA-plastic met verbazingwekkende antikleefeigenschappen. Niet giftig. Ze zijn er in verschillende texturen die u kunt kopen op basis van uw specifieke behoeften.Lengte: 14'50 cm (5'5 inches)Diameter: 2'5cm (1 inch)GEBRUIK INSTRUCTIES:1e - Meng de epoxyhars / klei / polymer klei tot een egaal plakkaat2e - Zorg voor een optimaal resultaat voor een glad en egaal oppervlak zodat het patroon goed zal overkomen. Gebruik desnoods een deegroller, fles of ander glad rond voorwerp. 3e - Afhankelijk van het type plamuur / klei is het raadzaam om de figuurroller nat te maken om vastzitten te voorkomen.4e - Verplaats de figuurroller langzaam en oefen gelijkmatige druk uit op alle punten voor een gelijkmatige afdruk op de klei, epoxy kneedhars of ander materiaal5e - Haal overtollig klei weg met een scherp mes. Het wordt aanbevolen om dit te doen als het eenmaal is opgedroogd om vervormingen in de stopverf / klei te voorkomen.Materialen:Er zijn veel verschillende kleien of epoxyhars op de markt en ze kunnen allemaal worden voorzien van een afdruk met de roller. Gebruik verschillende druk bij de verschillende materialen.Gewoonlijk zijn polymeerklei (Fimo of Sculpey-type) vrij eenvoudig om met deze Rolling Pins te bewerken, omdat ze een gemakkelijke correctie van fouten toelaten voordat ze worden gebakken. Wil je de structuur overbrengen op een basis, gebruik dan een MDF basis. Dit omdat je de polymeerklei direct op een MDF-basis kunt zetten en alles in de oven, inclusief de basis, kunt plaatsen. De droogtijd van deze klei is ongeveer 15 minuten bij 150ºC. MDF hout laat wel een lichte geur achter zoals bij geroosterd brood, maar maak je geen zorgen dat het niet zal branden! In het geval van epoxy basis zoals GreenStuff zijn er verschillende technieken die vergelijkbare resultaten opleveren. Het goede is: je hoeft ze niet te bakken, alleen te laten drogen en daarna kun je ze direct verwerken. Met Green Stuff, dat bijzonder kleverig is, is het het beste om de roller of de klei enigszins te bevochtigen voor je de figuur roller erover heen walst. U kunt ook de kleverigheid verminderen door talkpoeder toe te passen of door een oliebasis als Vaseline te gebruiken.Andere epoxy klei zoals de Milliput putty, bijvoorbeeld, zijn ook geschikt, maar we zouden niet aanraden om ze veel nat te maken. Als het mengsel te plakkerig is, is het beter om door te gaan met kneden totdat de plakkerigheid verdwenen is. Voor dit soort epoxyplamuren is het erg belangrijk om de deegrollen na gebruik goed te reinigen.Schoonmaak instructies:Gebruik na het werken met de deegroller een penseel met harde haren en voldoende water om eventuele resten op de deegroller te verwijderen, indien nodig. Om de veiligheid te garanderen, moeten kinderen nauwlettend worden gecontroleerd door een verantwoordelijke volwassene.
€13,00
-

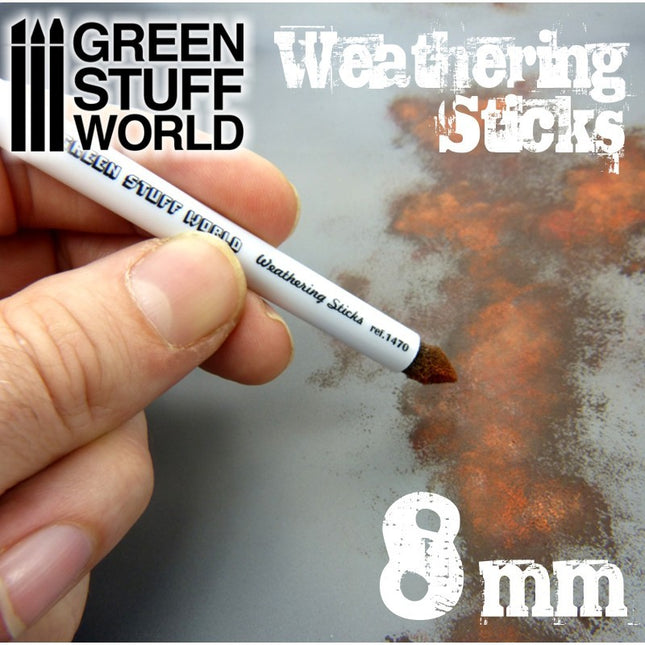
Weathering brushes - Sponskwasten 8mm (3st)
- Met deze kwasten kun je gemakkelijk: objecten ouder maken zoals kastjes, stoelen onderdelen viezer maken zoals buitenkant laarzen een effect aanbrengen op een groenen onderlaag zodat dit bloemen lijken manier om te muren te sponzen in een poppenhuis waardoor je uniek behang krijgt - 3 staven die door een hardere buitenkant aanvoelen als pennen - Voor gebruik kun je de kop in vorm knippen (en daarna afknippen om opnieuw te beginnen) - uitschuifbaar sponsje waardoor je tot de laatste cm de sponskop kan gebruiken - 15mm sponsjes - ideaal voor pigment, acryl verf en ink
€4,85
-

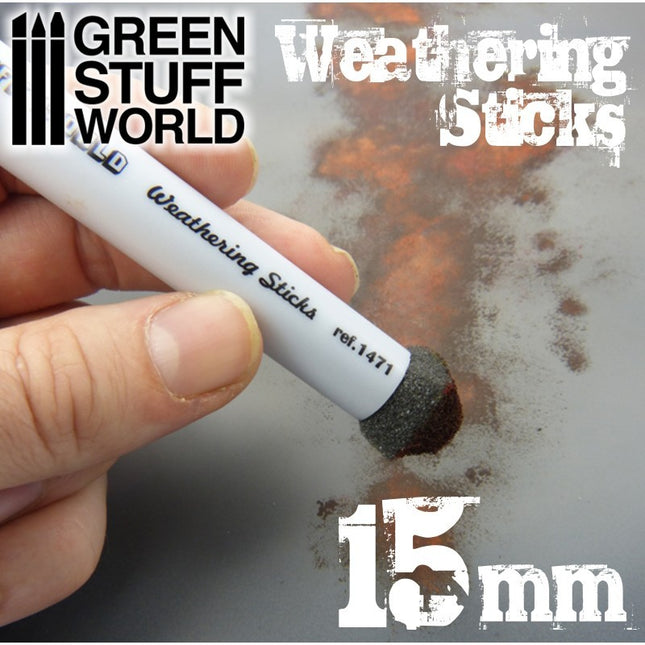
Weathering brushes - Sponskwasten 15mm (2st)
- Met deze kwasten kun je gemakkelijk: objecten ouder maken zoals kastjes, stoelen onderdelen viezer maken zoals buitenkant laarzen een effect aanbrengen op een groenen onderlaag zodat dit bloemen lijken manier om te muren te sponzen in een poppenhuis waardoor je uniek behang krijgt - 2 staven die door een hardere buitenkant aanvoelen als pennen - Voor gebruik kun je de kop in vorm knippen (en daarna afknippen om opnieuw te beginnen) - uitschuifbaar sponsje waardoor je tot de laatste cm de sponskop kan gebruiken - 15mm sponsjes - ideaal voor pigment, acryl verf en ink
€4,85
-

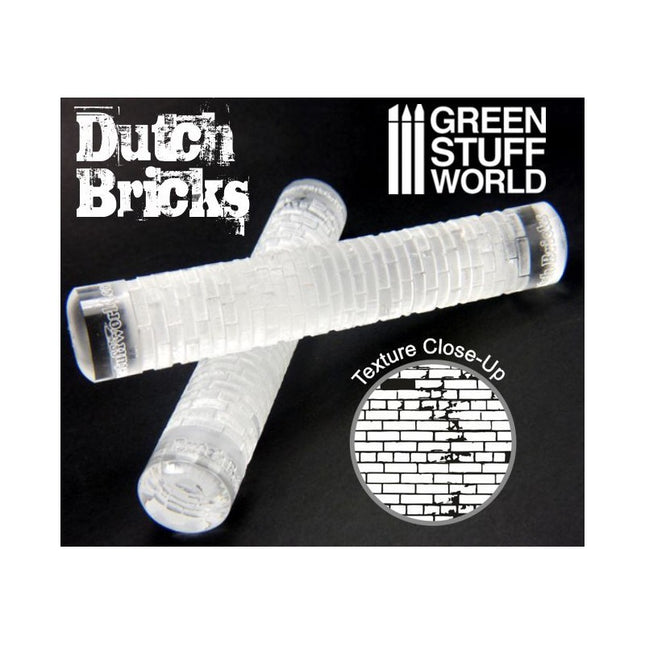
Rolling pin Dutch bricks - figuur roller Nederlandse klinkers
Figuur roller Nederlandse klinkersRoller voorzien van een basisfiguur waarmee een continu herhaald patroon op klei en plamuren kan worden gedrukt. Gemaakt van helder PMMA-plastic met verbazingwekkende antikleefeigenschappen. Niet giftig. Ze zijn er in verschillende texturen die u kunt kopen op basis van uw specifieke behoeften. Lengte: 14'50 cm (5'5 inches)Diameter: 2'5cm (1 inch)Patroon van meerdere stenen in verschillende profielen van 4x3mm tot 10x3mmVoor de schalen 1/22-1/32-1/35-1/43-1/48 GEBRUIK INSTRUCTIES:1e - Meng de epoxyhars / klei / polymer klei tot een egaal plakkaat2e - Zorg voor een optimaal resultaat voor een glad en egaal oppervlak zodat het patroon goed zal overkomen. Gebruik desnoods een deegroller, fles of ander glad rond voorwerp. 3e - Afhankelijk van het type plamuur / klei is het raadzaam om de figuurroller nat te maken om vastzitten te voorkomen.4e - Verplaats de figuurroller langzaam en oefen gelijkmatige druk uit op alle punten voor een gelijkmatige afdruk op de klei, epoxy kneedhars of ander materiaal5e - Haal overtollig klei weg met een scherp mes. Het wordt aanbevolen om dit te doen als het eenmaal is opgedroogd om vervormingen in de stopverf / klei te voorkomen.Materialen:Er zijn veel verschillende kleien of epoxyhars op de markt en ze kunnen allemaal worden voorzien van een afdruk met de roller. Gebruik verschillende druk bij de verschillende materialen.Gewoonlijk zijn polymeerklei (Fimo of Sculpey-type) vrij eenvoudig om met deze Rolling Pins te bewerken, omdat ze een gemakkelijke correctie van fouten toelaten voordat ze worden gebakken. Wil je de structuur overbrengen op een basis, gebruik dan een MDF basis. Dit omdat je de polymeerklei direct op een MDF-basis kunt zetten en alles in de oven, inclusief de basis, kunt plaatsen. De droogtijd van deze klei is ongeveer 15 minuten bij 150ºC. MDF hout laat wel een lichte geur achter zoals bij geroosterd brood, maar maak je geen zorgen dat het niet zal branden! Wil je alleen een prachtig pad, veranda, straat of iets anders maken dan kun je dit natuurlijk op een platte plaat drogen in de oven.In het geval van epoxy basis zoals GreenStuff zijn er verschillende technieken die vergelijkbare resultaten opleveren. Het goede is: je hoeft ze niet te bakken, alleen te laten drogen en daarna kun je ze direct verwerken. Met Green Stuff, dat bijzonder kleverig is, is het het beste om de roller of de klei enigszins te bevochtigen voor je de figuur roller erover heen walst. U kunt ook de kleverigheid verminderen door talkpoeder toe te passen of door een oliebasis als Vaseline te gebruiken.Andere epoxy klei zoals de Milliput putty, bijvoorbeeld, zijn ook geschikt, maar we zouden niet aanraden om ze veel nat te maken. Als het mengsel te plakkerig is, is het beter om door te gaan met kneden totdat de plakkerigheid verdwenen is. Voor dit soort epoxyplamuren is het erg belangrijk om de roller na gebruik goed te reinigen.Schoonmaak instructies:Gebruik na het werken met de roller een penseel met harde haren en voldoende water om eventuele resten op de deegroller te verwijderen, indien nodig. Om de veiligheid te garanderen, moeten kinderen nauwlettend worden gecontroleerd door een verantwoordelijke volwassene.
€13,00