


Laatste kans met korting


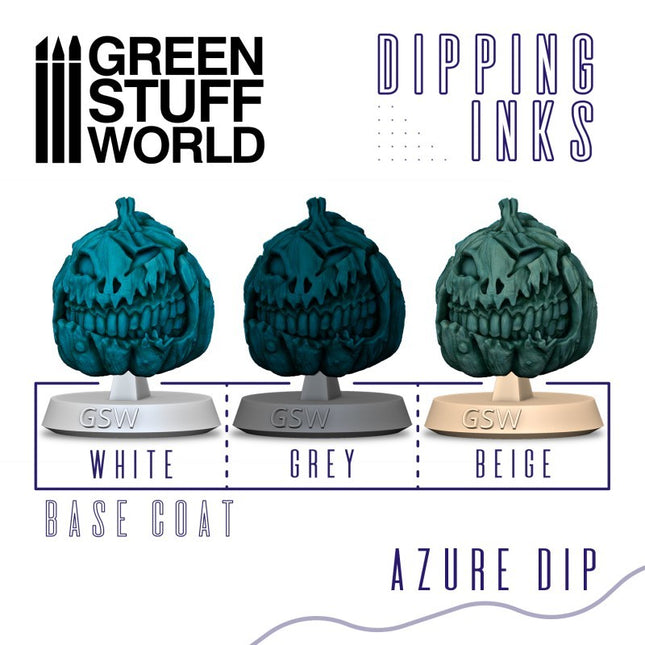
Dipping ink 60 ml - Azure 3496
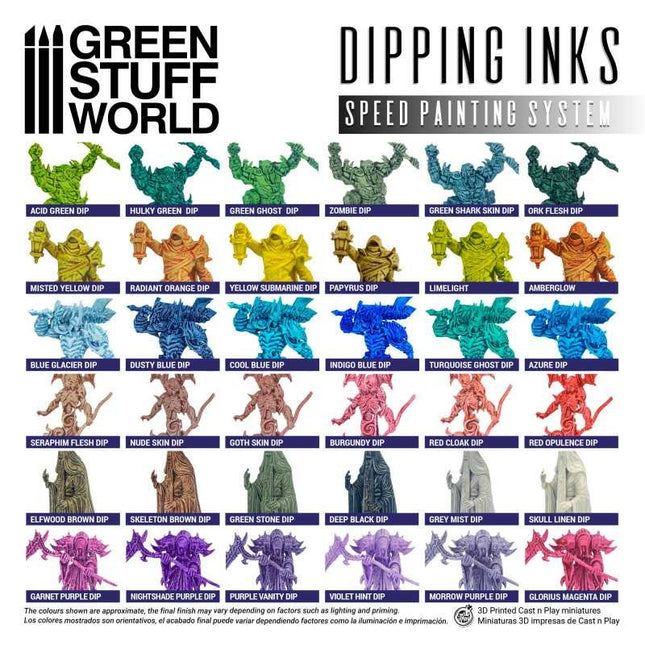
Dipping ink 60 ml Dipping ink semi-transparent paints help you to shade your figures more quickly and easily over a single coat of paint. Apply with a brush over a layer of matt white or a light colour to easily achieve realistic shadows in a single application of Dipping. The Dipping ink range is the best speedpainting solution on the market to contrast your miniatures and gain more time for the game. It can also be used by advanced painters taking advantage of its unique properties to mark shadows and volumes, blend and veil colours with ease, bring out the details of your figure quickly and use it as a starting point for more professional painting. These paints have been designed in a 60ml pot so that you have enough product to paint entire armies with ease. Contents: 1x Dipping ink in 60ml Colour: Azure #speed #paint #azure #dipping #ink #greenstuffworld
€5,00
-

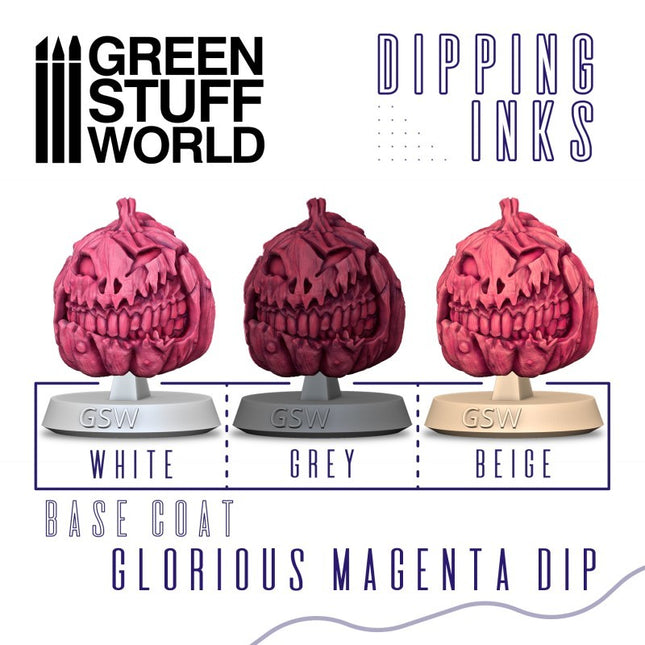
Dipping ink 60 ml - Glorious Magenta 3486
Dipping ink 60 ml Dipping ink semi-transparent paints help you to shade your figures more quickly and easily over a single coat of paint. Apply with a brush over a layer of matt white or a light colour to easily achieve realistic shadows in a single application of Dipping. The Dipping ink range is the best speedpainting solution on the market to contrast your miniatures and gain more time for the game. It can also be used by advanced painters taking advantage of its unique properties to mark shadows and volumes, blend and veil colours with ease, bring out the details of your figure quickly and use it as a starting point for more professional painting. These paints have been designed in a 60ml pot so that you have enough product to paint entire armies with ease. Contents: 1x Dipping ink in 60ml Colour: Glorious Magenta #speed #paint #glorious #magenta #dipping #ink #greenstuffworld
€5,00
-

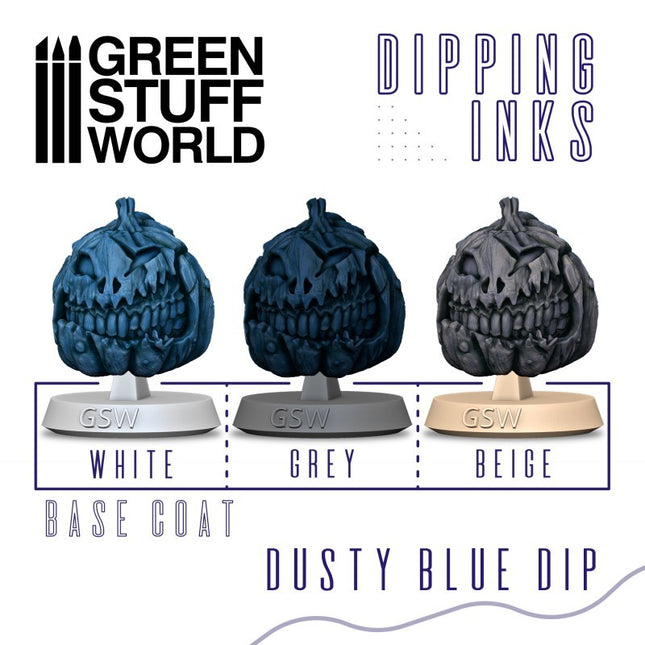
Dipping ink 60 ml - Dusty Blue 3489
Dipping ink 60 ml Dipping ink semi-transparent paints help you to shade your figures more quickly and easily over a single coat of paint. Apply with a brush over a layer of matt white or a light colour to easily achieve realistic shadows in a single application of Dipping. The Dipping ink range is the best speedpainting solution on the market to contrast your miniatures and gain more time for the game. It can also be used by advanced painters taking advantage of its unique properties to mark shadows and volumes, blend and veil colours with ease, bring out the details of your figure quickly and use it as a starting point for more professional painting. These paints have been designed in a 60ml pot so that you have enough product to paint entire armies with ease. Contents: 1x Dipping ink in 60ml Colour: Dusty Blue #speed #paint #dusty #blue #dipping #ink #greenstuffworld
€5,00
-

Dipping ink 60 ml - Grey Mist 3706
Dipping ink 60 ml Dipping ink semi-transparent paints help you to shade your figures more quickly and easily over a single coat of paint. Apply with a brush over a layer of matt white or a light colour to easily achieve realistic shadows in a single application of Dipping. The Dipping ink range is the best speed painting solution on the market to contrast your miniatures and gain more time for the game. It can also be used by advanced painters taking advantage of its unique properties to mark shadows and volumes, blend and glaze colours with ease, bring out the details of your figure quickly and use it as a starting point for more professional painting. These paints have been designed in a 60ml pot so that you have enough product to paint entire armies with ease. Contents: 1x Dipping ink in 60ml #speed #paint #3706 #grey #mist #dipping #ink #greenstuffworld
€5,00
-
€3,00
-
€3,00
-

Dipping ink 60 ml - Blue Glacier 3701
Dipping ink 60 ml Dipping ink semi-transparent paints help you to shade your figures more quickly and easily over a single coat of paint. Apply with a brush over a layer of matt white or a light colour to easily achieve realistic shadows in a single application of Dipping. The Dipping ink range is the best speed painting solution on the market to contrast your miniatures and gain more time for the game. It can also be used by advanced painters taking advantage of its unique properties to mark shadows and volumes, blend and glaze colours with ease, bring out the details of your figure quickly and use it as a starting point for more professional painting. These paints have been designed in a 60ml pot so that you have enough product to paint entire armies with ease. Contents: 1x Dipping ink in 60ml #speed #paint #3701 #blue #glacier #dipping #ink #greenstuffworld
€5,00
-

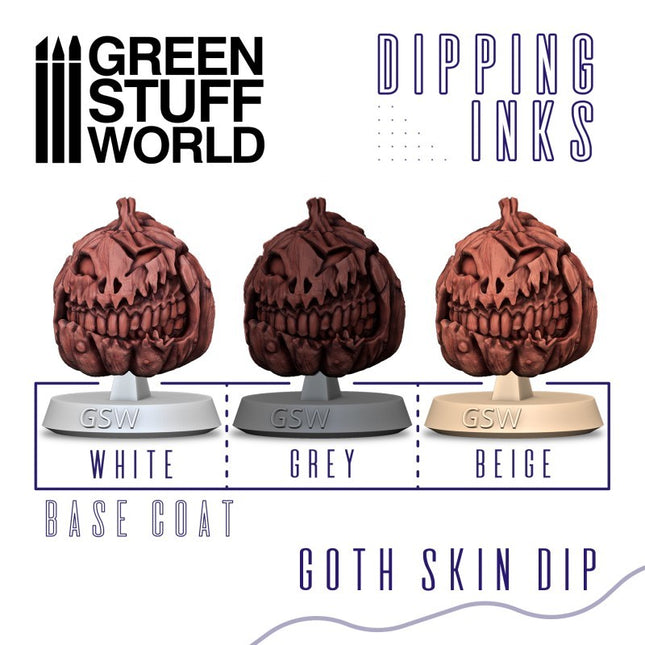
Dipping ink 60 ml - Goth Skin 3503
Dipping ink 60 ml Dipping ink semi-transparent paints help you to shade your figures more quickly and easily over a single coat of paint. Apply with a brush over a layer of matt white or a light colour to easily achieve realistic shadows in a single application of Dipping. The Dipping ink range is the best speedpainting solution on the market to contrast your miniatures and gain more time for the game. It can also be used by advanced painters taking advantage of its unique properties to mark shadows and volumes, blend and veil colours with ease, bring out the details of your figure quickly and use it as a starting point for more professional painting. These paints have been designed in a 60ml pot so that you have enough product to paint entire armies with ease. Contents: 1x Dipping ink in 60ml Colour: Goth Skin #speed #paint #goth #skin #dip #dipping #ink #greenstuffworld
€5,00
-

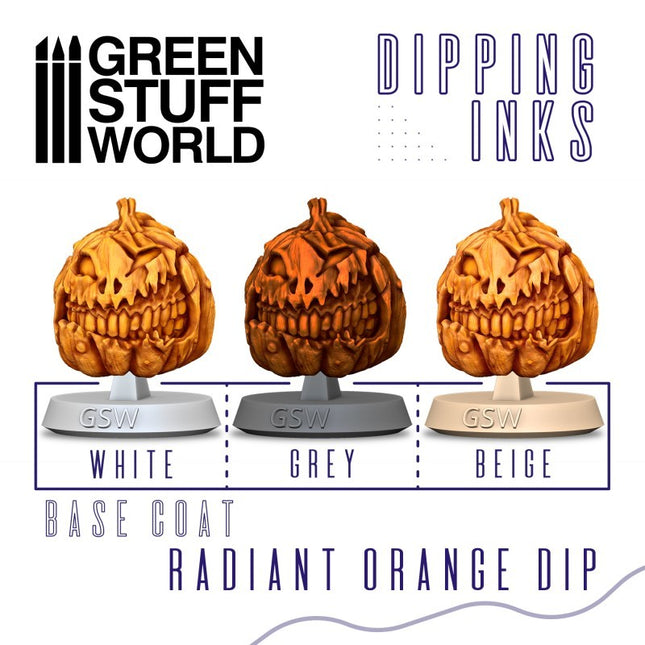
Dipping ink 60 ml - Radiant Orange 3483
Dipping ink 60 ml Dipping ink semi-transparent paints help you to shade your figures more quickly and easily over a single coat of paint. Apply with a brush over a layer of matt white or a light colour to easily achieve realistic shadows in a single application of Dipping. The Dipping ink range is the best speedpainting solution on the market to contrast your miniatures and gain more time for the game. It can also be used by advanced painters taking advantage of its unique properties to mark shadows and volumes, blend and veil colours with ease, bring out the details of your figure quickly and use it as a starting point for more professional painting. These paints have been designed in a 60ml pot so that you have enough product to paint entire armies with ease. Contents: 1x Dipping ink in 60ml Colour: Radiant Orange #speed #paint #radiant #orange #dipping #ink #greenstuffworld
€5,00
-
Xpress Plasma Red
Vallejo Xpress Color Vallejo Xpress Color can be mixed together, or can be diluted with Xpress Medium to change or create new shades. If you want to paint an army of figures quickly, Vallejo Xpress Color Templar White is the ideal choice. These matte colors have been specially developed to paint miniatures in an easy way. It is recommended to apply Vallejo Xpress Color @ on a white or gray primed or painted surface. Express Color has a matte finish, a long drying time and can be mixed with water. Its main feature is the excellent capillarity that allows the turquoise color to flow easily over the miniature surface. The turquoise color of @ creates light areas on the reliefs, saturated midtones and intense shadows in the crevices of the figure. This paint settles on crevices and reliefs of the figure, creating a contrast effect with a single coat of paint. Eyedropper (18ml.) The unique thing about this turquoise paint is that it is supplied in a so-called "eyedropper" jar containing 18 ml. acrylic paint. The cap has an "orange" closure that must be opened the first time you use it. The "eyedropper" (or eye dropper) ensures that the amount of paint can be dosed very easily and the paint does not dry out so quickly. Of course, it can always happen that the opening sometimes becomes a little clogged. You can easily solve this by using a needle or thin cocktail stick to clear the opening. Intense Xpress Color This color has a higher pigment concentration that allows you to paint the miniatures of your favorite units, resulting in more vibrant and intense shades. Sustainable PET bottle The new plastic bottle made from r-PET (recycled/recyclable) is completely transparent, improves color visualization and highlights Acrylicos Vallejo's commitment to sustainability and the environment.
€3,95
-

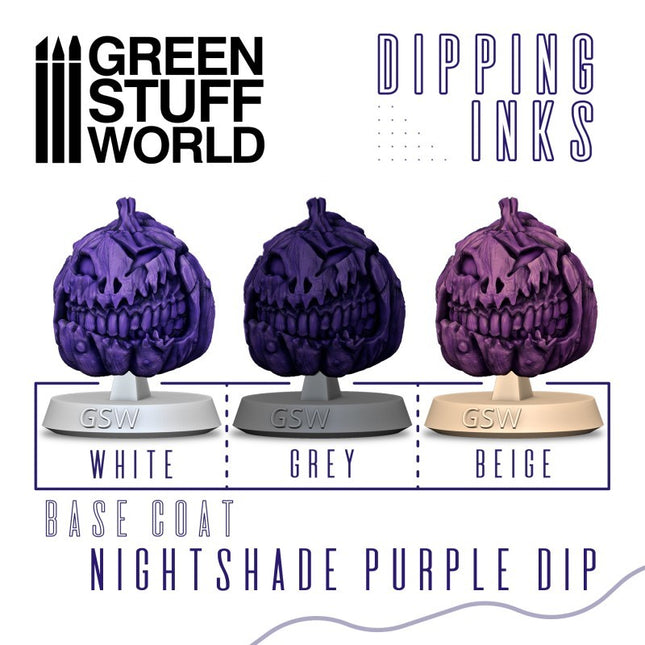
Dipping ink 60 ml - Nightshade Purple 3498
Dipping ink 60 ml Dipping ink semi-transparent paints help you to shade your figures more quickly and easily over a single coat of paint. Apply with a brush over a layer of matt white or a light colour to easily achieve realistic shadows in a single application of Dipping. The Dipping ink range is the best speedpainting solution on the market to contrast your miniatures and gain more time for the game. It can also be used by advanced painters taking advantage of its unique properties to mark shadows and volumes, blend and veil colours with ease, bring out the details of your figure quickly and use it as a starting point for more professional painting. These paints have been designed in a 60ml pot so that you have enough product to paint entire armies with ease. Contents: 1x Dipping ink in 60ml Colour: Nightshade Purple #speed #paint #nightshade #purple #dipping #ink #greenstuffworld
€5,00
-
Xpress Velvet Red
Vallejo Xpress Color Vallejo Xpress Color can be mixed together, or can be diluted with Xpress Medium to change or create new shades. If you want to paint an army of figures quickly, Vallejo Xpress Color Templar White is the ideal choice. These matte colors have been specially developed to paint miniatures in an easy way. It is recommended to apply Vallejo Xpress Color @ on a white or gray primed or painted surface. Express Color has a matte finish, a long drying time and can be mixed with water. Its main feature is the excellent capillarity that allows the turquoise color to flow easily over the miniature surface. The turquoise color of @ creates light areas on the reliefs, saturated midtones and intense shadows in the crevices of the figure. This paint settles on crevices and reliefs of the figure, creating a contrast effect with a single coat of paint. Eyedropper (18ml.) The unique thing about this turquoise paint is that it is supplied in a so-called "eyedropper" jar containing 18 ml. acrylic paint. The cap has an "orange" closure that must be opened the first time you use it. The "eyedropper" (or eye dropper) ensures that the amount of paint can be dosed very easily and the paint does not dry out so quickly. Of course, it can always happen that the opening sometimes becomes a little clogged. You can easily solve this by using a needle or thin cocktail stick to clear the opening. Intense Xpress Color This color has a higher pigment concentration that allows you to paint the miniatures of your favorite units, resulting in more vibrant and intense shades. Sustainable PET bottle The new plastic bottle made from r-PET (recycled/recyclable) is completely transparent, improves color visualization and highlights Acrylicos Vallejo's commitment to sustainability and the environment.
€3,95
-
Xpress Deep Purple
Vallejo Xpress Color Vallejo Xpress Color can be mixed together, or can be diluted with Xpress Medium to change or create new shades. If you want to paint an army of figures quickly, Vallejo Xpress Color Templar White is the ideal choice. These matte colors have been specially developed to paint miniatures in an easy way. It is recommended to apply Vallejo Xpress Color @ on a white or gray primed or painted surface. Express Color has a matte finish, a long drying time and can be mixed with water. Its main feature is the excellent capillarity that allows the turquoise color to flow easily over the miniature surface. The turquoise color of @ creates light areas on the reliefs, saturated midtones and intense shadows in the crevices of the figure. This paint settles on crevices and reliefs of the figure, creating a contrast effect with a single coat of paint. Eyedropper (18ml.) The unique thing about this turquoise paint is that it is supplied in a so-called "eyedropper" jar containing 18 ml. acrylic paint. The cap has an "orange" closure that must be opened the first time you use it. The "eyedropper" (or eye dropper) ensures that the amount of paint can be dosed very easily and the paint does not dry out so quickly. Of course, it can always happen that the opening sometimes becomes a little clogged. You can easily solve this by using a needle or thin cocktail stick to clear the opening. Intense Xpress Color This color has a higher pigment concentration that allows you to paint the miniatures of your favorite units, resulting in more vibrant and intense shades. Sustainable PET bottle The new plastic bottle made from r-PET (recycled/recyclable) is completely transparent, improves color visualization and highlights Acrylicos Vallejo's commitment to sustainability and the environment.
€3,95
-
Game Color Acid
Special FX colors range has been completely reformulated in order to reproduce different effects on miniatures and fantasy sets. Blood, bile, vomit and other organic textures are ideal to apply on fantasy or science fiction figures. Effects such as verdigris, rust or corrosion will allow us to incorporate textures and weathering effects on figures, scenes and dioramas. How to use: Apply with a brush. Packaging: Game Color Special FX is presented in bottles of 18 ml/0.6 fl oz with eyedropper. This packaging prevents the paint from evaporating and drying in the container, so that It can be used in minimal quantities and preserved for a long time.
€3,00
-

Dipping ink 60 ml - Red Opulence 3707
Dipping ink 60 ml Dipping ink semi-transparent paints help you to shade your figures more quickly and easily over a single coat of paint. Apply with a brush over a layer of matt white or a light colour to easily achieve realistic shadows in a single application of Dipping. The Dipping ink range is the best speed painting solution on the market to contrast your miniatures and gain more time for the game. It can also be used by advanced painters taking advantage of its unique properties to mark shadows and volumes, blend and glaze colours with ease, bring out the details of your figure quickly and use it as a starting point for more professional painting. These paints have been designed in a 60ml pot so that you have enough product to paint entire armies with ease. Contents: 1x Dipping ink in 60ml #speed #paint #3707 #red #opulence #dipping #ink #greenstuffworld
€5,00
-

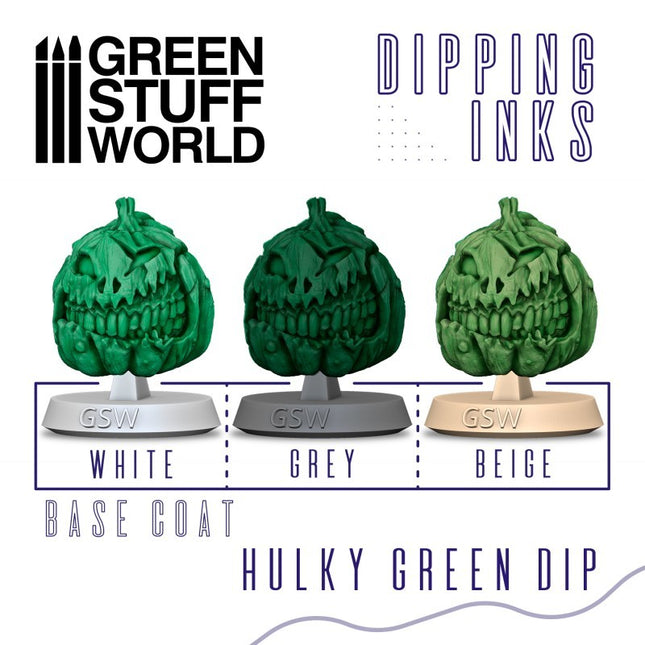
Dipping ink 60 ml - Hulky Green 3494
Dipping ink 60 ml Dipping ink semi-transparent paints help you to shade your figures more quickly and easily over a single coat of paint. Apply with a brush over a layer of matt white or a light colour to easily achieve realistic shadows in a single application of Dipping. The Dipping ink range is the best speedpainting solution on the market to contrast your miniatures and gain more time for the game. It can also be used by advanced painters taking advantage of its unique properties to mark shadows and volumes, blend and veil colours with ease, bring out the details of your figure quickly and use it as a starting point for more professional painting. These paints have been designed in a 60ml pot so that you have enough product to paint entire armies with ease. Contents: 1x Dipping ink in 60ml Colour: Hulky Green #speed #paint #green #hulky #dipping #ink #greenstuffworld
€5,00
-

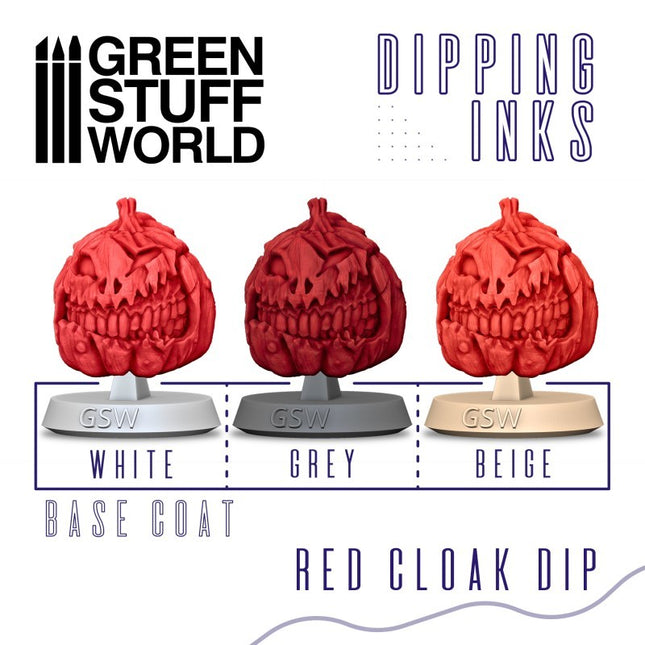
Dipping ink 60 ml - Red Cloak 3484
Dipping ink 60 ml Dipping ink semi-transparent paints help you to shade your figures more quickly and easily over a single coat of paint. Apply with a brush over a layer of matt white or a light colour to easily achieve realistic shadows in a single application of Dipping. The Dipping ink range is the best speedpainting solution on the market to contrast your miniatures and gain more time for the game. It can also be used by advanced painters taking advantage of its unique properties to mark shadows and volumes, blend and veil colours with ease, bring out the details of your figure quickly and use it as a starting point for more professional painting. These paints have been designed in a 60ml pot so that you have enough product to paint entire armies with ease. Contents: 1x Dipping ink in 60ml Colour: Red Cloak #speed #paint #red #cloak #dipping #ink #greenstuffworld
€5,00
-
Xpress Dwarf Skin
Vallejo Xpress Color Vallejo Xpress Color can be mixed together, or can be diluted with Xpress Medium to change or create new shades. If you want to paint an army of figures quickly, Vallejo Xpress Color Templar White is the ideal choice. These matte colors have been specially developed to paint miniatures in an easy way. It is recommended to apply Vallejo Xpress Color @ on a white or gray primed or painted surface. Express Color has a matte finish, a long drying time and can be mixed with water. Its main feature is the excellent capillarity that allows the turquoise color to flow easily over the miniature surface. The turquoise color of @ creates light areas on the reliefs, saturated midtones and intense shadows in the crevices of the figure. This paint settles on crevices and reliefs of the figure, creating a contrast effect with a single coat of paint. Eyedropper (18ml.) The unique thing about this turquoise paint is that it is supplied in a so-called "eyedropper" jar containing 18 ml. acrylic paint. The cap has an "orange" closure that must be opened the first time you use it. The "eyedropper" (or eye dropper) ensures that the amount of paint can be dosed very easily and the paint does not dry out so quickly. Of course, it can always happen that the opening sometimes becomes a little clogged. You can easily solve this by using a needle or thin cocktail stick to clear the opening. Intense Xpress Color This color has a higher pigment concentration that allows you to paint the miniatures of your favorite units, resulting in more vibrant and intense shades. Sustainable PET bottle The new plastic bottle made from r-PET (recycled/recyclable) is completely transparent, improves color visualization and highlights Acrylicos Vallejo's commitment to sustainability and the environment.
€3,95
-

Sunshine Town DIY Book Nook
Come and visit Sunshine Town. Here, you’ll enjoy a wonderful time in the coffee shop, book store and more. This is a DIY miniature house book nook for your bookshelf. Pieces: 246 Assembly Time: 4-6H Difficulty Level: ⭐⭐⭐⭐ Assembled Size: H:7.5″(19cm)*W:3.9″(10cm)*D:9.4″(24cm) This Sunshine Town book nook kit has been beautifully pre-colored, with no paint required. But some parts in the kit may need to be painted. If you have more creative paint ideas, we are happy to see excellent work from you. The package includes important information, and please keep it well for future reference. Children need to assemble under the guidance of adults. The product requires 2 pieces of AAA batteries. Note: Due to customs policy, glue and battery may not be included in the package. https://youtu.be/rHsmHxQFmCU
€44,00€40,00
-
Game Color Bile
Special FX colors range has been completely reformulated in order to reproduce different effects on miniatures and fantasy sets. Blood, bile, vomit and other organic textures are ideal to apply on fantasy or science fiction figures. Effects such as verdigris, rust or corrosion will allow us to incorporate textures and weathering effects on figures, scenes and dioramas. How to use: Apply with a brush. Packaging: Game Color Special FX is presented in bottles of 18 ml/0.6 fl oz with eyedropper. This packaging prevents the paint from evaporating and drying in the container, so that It can be used in minimal quantities and preserved for a long time.
€3,00
-

Dipping ink 60 ml - Yellow Submarine Dip 3698
Dipping ink 60 ml Dipping ink semi-transparent paints help you to shade your figures more quickly and easily over a single coat of paint. Apply with a brush over a layer of matt white or a light colour to easily achieve realistic shadows in a single application of Dipping. The Dipping ink range is the best speed painting solution on the market to contrast your miniatures and gain more time for the game. It can also be used by advanced painters taking advantage of its unique properties to mark shadows and volumes, blend and glaze colours with ease, bring out the details of your figure quickly and use it as a starting point for more professional painting. These paints have been designed in a 60ml pot so that you have enough product to paint entire armies with ease. Contents: 1x Dipping ink in 60ml #speed #paint #yellow #submarine #dipping #ink #greenstuffworld
€5,00
-

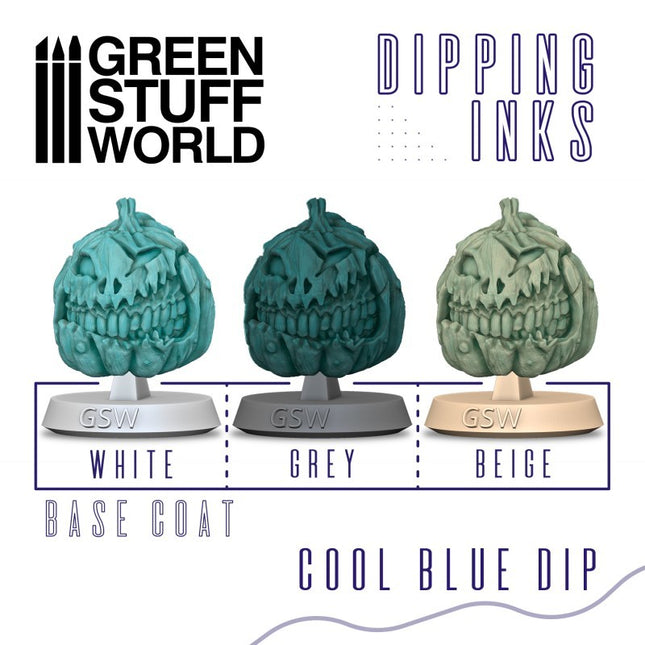
Dipping ink 60 ml - Cool Blue 3488
Dipping ink 60 ml Dipping ink semi-transparent paints help you to shade your figures more quickly and easily over a single coat of paint. Apply with a brush over a layer of matt white or a light colour to easily achieve realistic shadows in a single application of Dipping. The Dipping ink range is the best speedpainting solution on the market to contrast your miniatures and gain more time for the game. It can also be used by advanced painters taking advantage of its unique properties to mark shadows and volumes, blend and veil colours with ease, bring out the details of your figure quickly and use it as a starting point for more professional painting. These paints have been designed in a 60ml pot so that you have enough product to paint entire armies with ease. Contents: 1x Dipping ink in 60ml Colour: Cool Blue #speed #paint #coll #blue #dipping #ink #greenstuffworld
€5,00
-

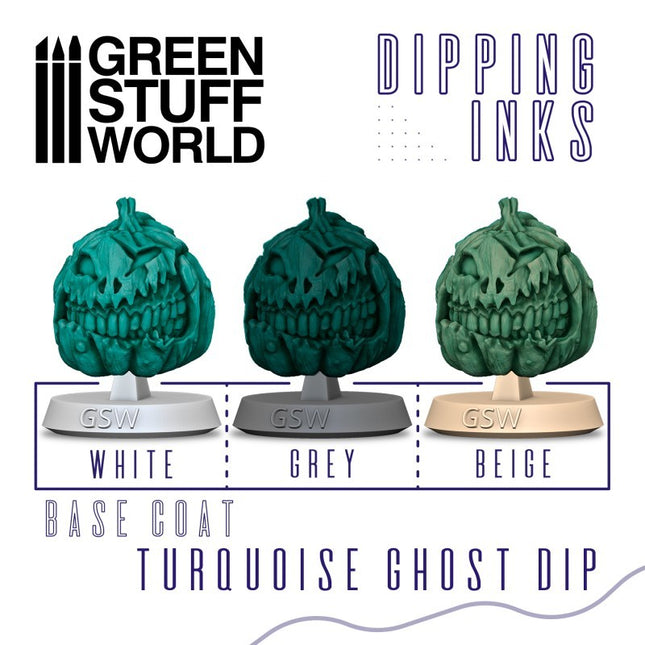
Dipping ink 60 ml - Turquoise Ghost 3502
Dipping ink 60 ml Dipping ink semi-transparent paints help you to shade your figures more quickly and easily over a single coat of paint. Apply with a brush over a layer of matt white or a light colour to easily achieve realistic shadows in a single application of Dipping. The Dipping ink range is the best speedpainting solution on the market to contrast your miniatures and gain more time for the game. It can also be used by advanced painters taking advantage of its unique properties to mark shadows and volumes, blend and veil colours with ease, bring out the details of your figure quickly and use it as a starting point for more professional painting. These paints have been designed in a 60ml pot so that you have enough product to paint entire armies with ease. Contents: 1x Dipping ink in 60ml Colour: Turquoise Ghost #speed #paint #turquoise #ghost #dip #dipping #ink #greenstuffworld
€5,00
-

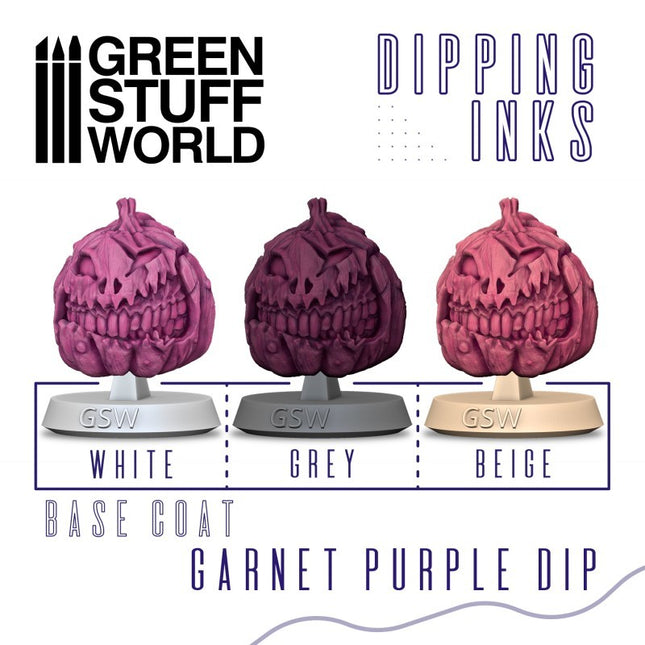
Dipping ink 60 ml - Garnet Purple 3485
Dipping ink 60 ml Dipping ink semi-transparent paints help you to shade your figures more quickly and easily over a single coat of paint. Apply with a brush over a layer of matt white or a light colour to easily achieve realistic shadows in a single application of Dipping. The Dipping ink range is the best speedpainting solution on the market to contrast your miniatures and gain more time for the game. It can also be used by advanced painters taking advantage of its unique properties to mark shadows and volumes, blend and veil colours with ease, bring out the details of your figure quickly and use it as a starting point for more professional painting. These paints have been designed in a 60ml pot so that you have enough product to paint entire armies with ease. Contents: 1x Dipping ink in 60ml Colour: Garnet Purple #speed #paint #garnet #purple #dipping #ink #greenstuffworld
€5,00
-
Opaque Colors - Feral Brown
Range of extra opaque acrylic colors, including white opaque for model making and handicrafts. This range is a specially developed line of paints designed for hobby modeling and miniature painting including 24 unsaturated opaque colors in pigmentation but with a high coverage capacity. They are not transparent or see-through and when applied to a surface, they cover what's underneath, hiding any previous layers or simply using fewer coats, most of the time just one coat. They are thicker and have a high pigment concentration, which makes them excellent for achieving solid and vibrant color coverage. They are commonly used in crafts, and hobbies like model painting, to create rich and creative finishes. Use them as a base paint to start your projects, or in those places where high coverage is necessary. Complement them with other model paints or inks to add saturation and color intensity. Dilute it with water or acrylic thinner to be able to use it with an airbrush. This range is sold in dropper bottles with a metal agitator ball that will allow you a quick mixing. This type of dropper bottle, with the help of its nozzle, will also extend a lot of its shelf life by practically isolating contact with air. Content: 1x 17ml
€2,70
-

Dipping ink 60 ml - Purple Vanity 3704
Dipping ink 60 ml Dipping ink semi-transparent paints help you to shade your figures more quickly and easily over a single coat of paint. Apply with a brush over a layer of matt white or a light colour to easily achieve realistic shadows in a single application of Dipping. The Dipping ink range is the best speed painting solution on the market to contrast your miniatures and gain more time for the game. It can also be used by advanced painters taking advantage of its unique properties to mark shadows and volumes, blend and glaze colours with ease, bring out the details of your figure quickly and use it as a starting point for more professional painting. These paints have been designed in a 60ml pot so that you have enough product to paint entire armies with ease. Contents: 1x Dipping ink in 60ml #speed #paint #3704 #vanity #purple #dipping #ink #greenstuffworld
€5,00
-
Game Color Dark Green
Acrylics colors in a matt and opaque, water based formula, especially designed for brush-on use. Each color has been meticulously developed in collaboration with model-painters who specialize in fantasy figures and dioramas. The formulation of these colors has been developed signed taking into account that some of these figures are used in tabletop games, so that Game Color is manufactured with a revolutionary new resin which offers extraordinary resistance to the damage caused by frequent handling. It is recommended to apply Game Color on a previously primed surface. The colors dry rapidly and form a homogenous and self-leveling film while preserving even the smallest detail of a miniature. Game Color presents an extra ordinary adherence on all grounds, such as resin, plastic, steel and white metal. Painting tools are cleaned with water. Safety: Game Color is not flammable, and does not contain solvents. Please see also certified safety information of the product on the Safety page. Packaging: Game Color is presented in bottles of 17 ml/0.57 fl oz with eyedropper. This packaging prevents the paint from evaporating and drying in the container, so that It can be used in minimal quantities and preserved for a long time.
€3,00
-
Game Color Wash Flesh
Game Wash is the range of colors for wash effects and techniques on figures, which can also be used on other surfaces. It is presented with a new formulation that enhances the capillary properties of the product. A wash is a transparent and very liquid acrylic color, mainly used for shading techniques on figures and vehicles, as well as for creating glazing and filter effects over other colors in the range. How to use: Apply with a brush, it can also be used with an airbrush. Packaging: Game Color Wash is presented in bottles of 18 ml/0.6 fl oz with eyedropper. This packaging prevents the paint from evaporating and drying in the container, so that It can be used in minimal quantities and preserved for a long time.
€3,00
-

Sakura Densya DIY Book Nook
Let’s take a ride on a Japanese train and enjoy the streets of Tokyo in spring with this beautiful book nook kit. Pieces: 340 Assembly Time: 6H Difficulty Level: ⭐⭐⭐⭐ Assembled Size: H:7.5″(19cm)*W:4.7″(12cm)*D:8.7″(22cm) A DIY 3D wooden book nook kit that you can build with your own hands. After finishing this work, it will show a beautiful scene of Tokyo streets in Spring. This book nook will be great home decor for a bookshelf or any other room space. It will also look amazing when you put it in the dark with the warm lights on. More importantly, this bookshelf insert can help create your imagination and increase creativity, which is a perfect hands-on gift for kids & adults. This Sakura Densya book nook kit has been beautifully pre-colored, with no paint required. But some parts in the kit may need to be painted. If you have more creative paint ideas, we are happy to see excellent work from you. The package includes important information, and please keep it well for future reference. Children must assemble under the guidance of adults in case of swallowing. The product requires 2 pieces of AAA batteries. Due to customs policy, glue and battery are not be included in the package. https://youtu.be/uKcXx_bmEd0
€45,00€40,00
-
Xpress Space Grey
Vallejo Xpress Color Vallejo Xpress Color can be mixed together, or can be diluted with Xpress Medium to change or create new shades. If you want to paint an army of figures quickly, Vallejo Xpress Color Templar White is the ideal choice. These matte colors have been specially developed to paint miniatures in an easy way. It is recommended to apply Vallejo Xpress Color @ on a white or gray primed or painted surface. Express Color has a matte finish, a long drying time and can be mixed with water. Its main feature is the excellent capillarity that allows the turquoise color to flow easily over the miniature surface. The turquoise color of @ creates light areas on the reliefs, saturated midtones and intense shadows in the crevices of the figure. This paint settles on crevices and reliefs of the figure, creating a contrast effect with a single coat of paint. Eyedropper (18ml.) The unique thing about this turquoise paint is that it is supplied in a so-called "eyedropper" jar containing 18 ml. acrylic paint. The cap has an "orange" closure that must be opened the first time you use it. The "eyedropper" (or eye dropper) ensures that the amount of paint can be dosed very easily and the paint does not dry out so quickly. Of course, it can always happen that the opening sometimes becomes a little clogged. You can easily solve this by using a needle or thin cocktail stick to clear the opening. Intense Xpress Color This color has a higher pigment concentration that allows you to paint the miniatures of your favorite units, resulting in more vibrant and intense shades. Sustainable PET bottle The new plastic bottle made from r-PET (recycled/recyclable) is completely transparent, improves color visualization and highlights Acrylicos Vallejo's commitment to sustainability and the environment.
€3,95
-
Opaque Colors - Dead Flesh
Range of extra opaque acrylic colors, including white opaque for model making and handicrafts. This range is a specially developed line of paints designed for hobby modeling and miniature painting including 24 unsaturated opaque colors in pigmentation but with a high coverage capacity. They are not transparent or see-through and when applied to a surface, they cover what's underneath, hiding any previous layers or simply using fewer coats, most of the time just one coat. They are thicker and have a high pigment concentration, which makes them excellent for achieving solid and vibrant color coverage. They are commonly used in crafts, and hobbies like model painting, to create rich and creative finishes. Use them as a base paint to start your projects, or in those places where high coverage is necessary. Complement them with other model paints or inks to add saturation and color intensity. Dilute it with water or acrylic thinner to be able to use it with an airbrush. This range is sold in dropper bottles with a metal agitator ball that will allow you a quick mixing. This type of dropper bottle, with the help of its nozzle, will also extend a lot of its shelf life by practically isolating contact with air. Content: 1x 17ml
€2,70
-
Game Color Dead Flesh
Acrylics colors in a matt and opaque, water based formula, especially designed for brush-on use. Each color has been meticulously developed in collaboration with model-painters who specialize in fantasy figures and dioramas. The formulation of these colors has been developed signed taking into account that some of these figures are used in tabletop games, so that Game Color is manufactured with a revolutionary new resin which offers extraordinary resistance to the damage caused by frequent handling. It is recommended to apply Game Color on a previously primed surface. The colors dry rapidly and form a homogenous and self-leveling film while preserving even the smallest detail of a miniature. Game Color presents an extra ordinary adherence on all grounds, such as resin, plastic, steel and white metal. Painting tools are cleaned with water. Safety: Game Color is not flammable, and does not contain solvents. Please see also certified safety information of the product on the Safety page. Packaging: Game Color is presented in bottles of 17 ml/0.57 fl oz with eyedropper. This packaging prevents the paint from evaporating and drying in the container, so that It can be used in minimal quantities and preserved for a long time.
€3,00
-
€3,00
-
Xpress Gloomy Violet
Vallejo Xpress Color Vallejo Xpress Color can be mixed together, or can be diluted with Xpress Medium to change or create new shades. If you want to paint an army of figures quickly, Vallejo Xpress Color Templar White is the ideal choice. These matte colors have been specially developed to paint miniatures in an easy way. It is recommended to apply Vallejo Xpress Color @ on a white or gray primed or painted surface. Express Color has a matte finish, a long drying time and can be mixed with water. Its main feature is the excellent capillarity that allows the turquoise color to flow easily over the miniature surface. The turquoise color of @ creates light areas on the reliefs, saturated midtones and intense shadows in the crevices of the figure. This paint settles on crevices and reliefs of the figure, creating a contrast effect with a single coat of paint. Eyedropper (18ml.) The unique thing about this turquoise paint is that it is supplied in a so-called "eyedropper" jar containing 18 ml. acrylic paint. The cap has an "orange" closure that must be opened the first time you use it. The "eyedropper" (or eye dropper) ensures that the amount of paint can be dosed very easily and the paint does not dry out so quickly. Of course, it can always happen that the opening sometimes becomes a little clogged. You can easily solve this by using a needle or thin cocktail stick to clear the opening. Intense Xpress Color This color has a higher pigment concentration that allows you to paint the miniatures of your favorite units, resulting in more vibrant and intense shades. Sustainable PET bottle The new plastic bottle made from r-PET (recycled/recyclable) is completely transparent, improves color visualization and highlights Acrylicos Vallejo's commitment to sustainability and the environment.
€3,95
-
Xpress Mystic Blue
Vallejo Xpress Color Vallejo Xpress Color can be mixed together, or can be diluted with Xpress Medium to change or create new shades. If you want to paint an army of figures quickly, Vallejo Xpress Color Templar White is the ideal choice. These matte colors have been specially developed to paint miniatures in an easy way. It is recommended to apply Vallejo Xpress Color @ on a white or gray primed or painted surface. Express Color has a matte finish, a long drying time and can be mixed with water. Its main feature is the excellent capillarity that allows the turquoise color to flow easily over the miniature surface. The turquoise color of @ creates light areas on the reliefs, saturated midtones and intense shadows in the crevices of the figure. This paint settles on crevices and reliefs of the figure, creating a contrast effect with a single coat of paint. Eyedropper (18ml.) The unique thing about this turquoise paint is that it is supplied in a so-called "eyedropper" jar containing 18 ml. acrylic paint. The cap has an "orange" closure that must be opened the first time you use it. The "eyedropper" (or eye dropper) ensures that the amount of paint can be dosed very easily and the paint does not dry out so quickly. Of course, it can always happen that the opening sometimes becomes a little clogged. You can easily solve this by using a needle or thin cocktail stick to clear the opening. Intense Xpress Color This color has a higher pigment concentration that allows you to paint the miniatures of your favorite units, resulting in more vibrant and intense shades. Sustainable PET bottle The new plastic bottle made from r-PET (recycled/recyclable) is completely transparent, improves color visualization and highlights Acrylicos Vallejo's commitment to sustainability and the environment.
€3,95
-
Xpress Storm Blue
Vallejo Xpress Color Vallejo Xpress Color can be mixed together, or can be diluted with Xpress Medium to change or create new shades. If you want to paint an army of figures quickly, Vallejo Xpress Color Templar White is the ideal choice. These matte colors have been specially developed to paint miniatures in an easy way. It is recommended to apply Vallejo Xpress Color @ on a white or gray primed or painted surface. Express Color has a matte finish, a long drying time and can be mixed with water. Its main feature is the excellent capillarity that allows the turquoise color to flow easily over the miniature surface. The turquoise color of @ creates light areas on the reliefs, saturated midtones and intense shadows in the crevices of the figure. This paint settles on crevices and reliefs of the figure, creating a contrast effect with a single coat of paint. Eyedropper (18ml.) The unique thing about this turquoise paint is that it is supplied in a so-called "eyedropper" jar containing 18 ml. acrylic paint. The cap has an "orange" closure that must be opened the first time you use it. The "eyedropper" (or eye dropper) ensures that the amount of paint can be dosed very easily and the paint does not dry out so quickly. Of course, it can always happen that the opening sometimes becomes a little clogged. You can easily solve this by using a needle or thin cocktail stick to clear the opening. Intense Xpress Color This color has a higher pigment concentration that allows you to paint the miniatures of your favorite units, resulting in more vibrant and intense shades. Sustainable PET bottle The new plastic bottle made from r-PET (recycled/recyclable) is completely transparent, improves color visualization and highlights Acrylicos Vallejo's commitment to sustainability and the environment.
€3,95