Dry brush paint
Dry brushing is a popular technique used in the scale modeling and wargaming community for creating a variety of effects. This technique involves using brushes with a small amount of paint to selectively highlight raised areas of a model, terrain piece, or miniature figure.
Dry brush paints are specifically designed and are thicker than traditional ones and have a higher pigment concentration, allowing the user to layer gradually to build up the desired effect and therefore making them ideal for creating a more subtle effect. They have a unique texture and consistency, which can help to create specific effects such as rust, weathering, or stone texture.
It is important to use a good quality, flat or round brush with flexible bristles. This will help to create the desired effect and ensure that the paint is applied evenly and without damaging their bristles. The brush should be loaded with a small amount of paint, and the excess should be removed before applying it to the model or terrain piece. This will help to prevent clumping and ensure that the paint is applied smoothly.
These paints are a great option for those who are new to the dry brushing technique, which can be used in a variety of applications, from highlighting the details of miniature figures to creating a weathered appearance on vehicles and terrain pieces. It is a versatile technique that can be used on a range of surfaces.
Common uses in modeling for Dry Brush Paints
These paints, in particular, are often used in this Dry Brushing technique. Here are some common uses in modeling:
Highlighting details: They are often used to highlight the details on miniature figures, such as wrinkles in clothing, facial features, and weapons.
Creating weathering effects: They are ideal for creating weathering effects on models, such as rust, dirt, and grime. By lightly dragging a dry paintbrush loaded with paint over the surface of the model, it creates a worn, weathered appearance.
Adding texture: They can be used to add texture to a model's surface. For example, a dry brush with silver can be used to create the appearance of scratches on metal surfaces.
Enhancing contrast: They can also be used to enhance contrast on a model's surface, creating a more visually appealing appearance. This is particularly useful when painting terrain pieces or large models.
Painting scenery: They can be used to paint scenery, such as rocks, trees, and buildings. By using a dry brushing technique, it creates a more realistic appearance with subtle shades and highlights.
Content: 30ml
#dry #brush #paint #greenstuffworld #modeling #off #white
Dry brush paint
Dry brushing is a popular technique used in the scale modeling and wargaming community for creating a variety of effects. This technique involves using brushes with a small amount of paint to selectively highlight raised areas of a model, terrain piece, or miniature figure.
Dry brush paints are specifically designed and are thicker than traditional ones and have a higher pigment concentration, allowing the user to layer gradually to build up the desired effect and therefore making them ideal for creating a more subtle effect. They have a unique texture and consistency, which can help to create specific effects such as rust, weathering, or stone texture.
It is important to use a good quality, flat or round brush with flexible bristles. This will help to create the desired effect and ensure that the paint is applied evenly and without damaging their bristles. The brush should be loaded with a small amount of paint, and the excess should be removed before applying it to the model or terrain piece. This will help to prevent clumping and ensure that the paint is applied smoothly.
These paints are a great option for those who are new to the dry brushing technique, which can be used in a variety of applications, from highlighting the details of miniature figures to creating a weathered appearance on vehicles and terrain pieces. It is a versatile technique that can be used on a range of surfaces.
Common uses in modeling for Dry Brush Paints
These paints, in particular, are often used in this Dry Brushing technique. Here are some common uses in modeling:
Highlighting details: They are often used to highlight the details on miniature figures, such as wrinkles in clothing, facial features, and weapons.
Creating weathering effects: They are ideal for creating weathering effects on models, such as rust, dirt, and grime. By lightly dragging a dry paintbrush loaded with paint over the surface of the model, it creates a worn, weathered appearance.
Adding texture: They can be used to add texture to a model's surface. For example, a dry brush with silver can be used to create the appearance of scratches on metal surfaces.
Enhancing contrast: They can also be used to enhance contrast on a model's surface, creating a more visually appealing appearance. This is particularly useful when painting terrain pieces or large models.
Painting scenery: They can be used to paint scenery, such as rocks, trees, and buildings. By using a dry brushing technique, it creates a more realistic appearance with subtle shades and highlights.
Content: 30ml
#dry #brush #paint #greenstuffworld #modeling #grimdark #orange
Metallic Dry brush paint
Dry brushing has gained popularity in the scale modeling and wargaming community as a technique for creating a variety of effects. This technique involves using brushes with a small amount of paint to selectively highlight raised areas of a model, terrain piece, or miniature figure.
Metallic dry brush paints are specifically designed and have a special metal pigment concentration, allowing the user to layer gradually to build up the desired effect and therefore making them ideal for creating a more subtle metallic effect. They have a unique texture and consistency, which can help to create specific effects such as metallic rust or weathering.
It is important to use a good quality, flat or round brush with flexible bristles when using metallic dry brush paint. This will help to create the desired metallic effect and ensure that the metallic paint is applied evenly and without damaging the bristles. The brush should be loaded with a small amount of metallic paint, and the excess should be removed before applying it to the model or terrain piece. This will help to prevent clumping and ensure that the metallic paint is applied smoothly.
For those who are new to the metallic dry brushing technique, these paints are an excellent choice. They can be used for various applications, including highlighting miniature figures' details and creating a metallic-weathered look on vehicles and terrain pieces. It is a versatile technique that can be used on a range of surfaces to create unique metallic effects.
Uses for Metallic Dry Brush Paints in modeling
In particular, these paints are frequently employed in the dry brushing technique. Here are some common modeling applications:
Dry brush paints are used to enhance the details of miniature figures, such as wrinkles in clothing, facial features, and weapons. The metallic version is ideal for creating weathering effects on models, such as metallic rust, dirt, and grime. By lightly dragging a dry paintbrush loaded with metallic paint over the surface of the model, it creates a worn, weathered metallic appearance.
Metallic paints can also be used to add texture to a model's surface. For example, a dry brush with metallic silver can be used to create the appearance of scratches on metallic surfaces. They can enhance contrast on a model's surface, creating a visually striking metallic effect. This is particularly useful when painting terrain pieces, weapons, tanks, and other large models.
Content: 30ml
#dry #brush #paint #greenstuffworld #modeling #metallic #dry #aged #silver
Metallic Dry brush paint
Dry brushing has gained popularity in the scale modeling and wargaming community as a technique for creating a variety of effects. This technique involves using brushes with a small amount of paint to selectively highlight raised areas of a model, terrain piece, or miniature figure.
Metallic dry brush paints are specifically designed and have a special metal pigment concentration, allowing the user to layer gradually to build up the desired effect and therefore making them ideal for creating a more subtle metallic effect. They have a unique texture and consistency, which can help to create specific effects such as metallic rust or weathering.
It is important to use a good quality, flat or round brush with flexible bristles when using metallic dry brush paint. This will help to create the desired metallic effect and ensure that the metallic paint is applied evenly and without damaging the bristles. The brush should be loaded with a small amount of metallic paint, and the excess should be removed before applying it to the model or terrain piece. This will help to prevent clumping and ensure that the metallic paint is applied smoothly.
For those who are new to the metallic dry brushing technique, these paints are an excellent choice. They can be used for various applications, including highlighting miniature figures' details and creating a metallic-weathered look on vehicles and terrain pieces. It is a versatile technique that can be used on a range of surfaces to create unique metallic effects.
Uses for Metallic Dry Brush Paints in modeling
In particular, these paints are frequently employed in the dry brushing technique. Here are some common modeling applications:
Dry brush paints are used to enhance the details of miniature figures, such as wrinkles in clothing, facial features, and weapons. The metallic version is ideal for creating weathering effects on models, such as metallic rust, dirt, and grime. By lightly dragging a dry paintbrush loaded with metallic paint over the surface of the model, it creates a worn, weathered metallic appearance.
Metallic paints can also be used to add texture to a model's surface. For example, a dry brush with metallic silver can be used to create the appearance of scratches on metallic surfaces. They can enhance contrast on a model's surface, creating a visually striking metallic effect. This is particularly useful when painting terrain pieces, weapons, tanks, and other large models.
Content: 30ml
#dry #brush #paint #greenstuffworld #modeling #metallic #imperial #copper
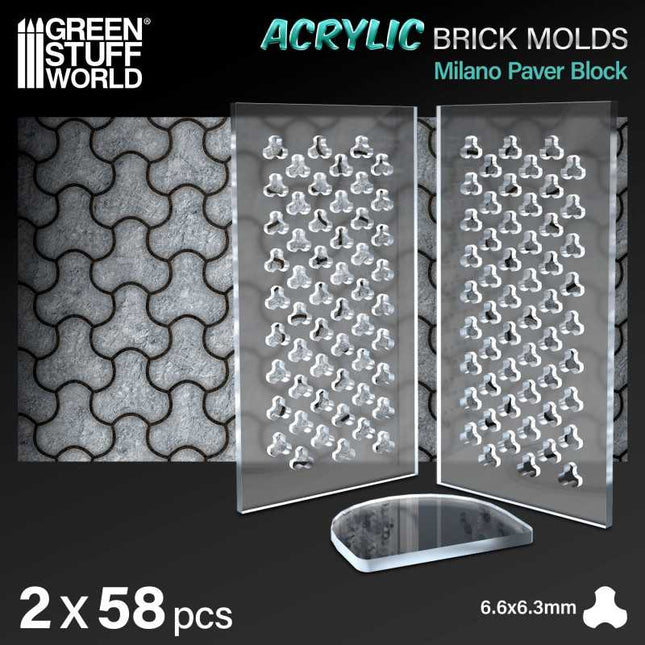
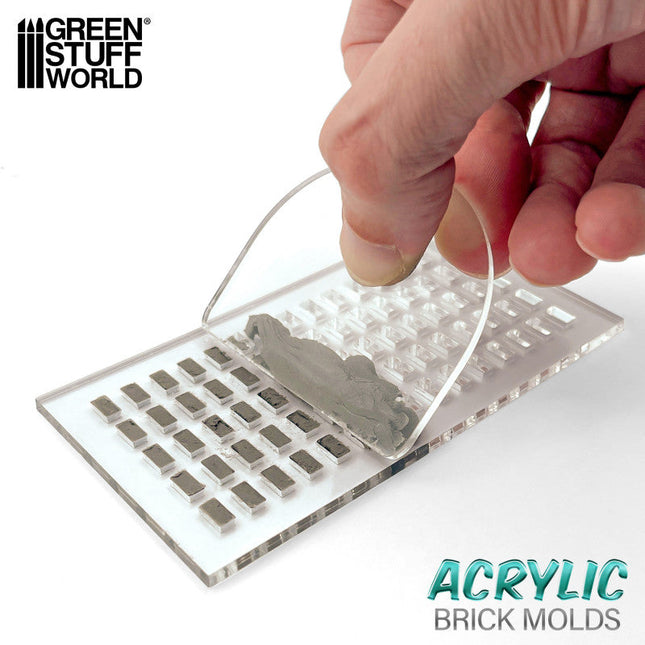
Elevate your dioramas to an unparalleled level of realism with our acrylic molds for modeling regular bricks. These accessories will allow you to create an infinite number of them with precision and consistency, adding authenticity and depth to your creations. They are specifically designed to create miniature regular bricks for use in scale modeling projects. Each model features a variety of patterns and textures that replicate real ones and that modelers will use to shape the air-drying clay.
Our acrylic modeling molds are perfectly complemented by air-drying pastes such as modeling clay, foam clay, and similar products. These options guarantee a faithful and detailed reproduction for your diorama.
Instructions for use:
Using acrylic brick molds is a straightforward process, but it requires some care to ensure you get the best results. Here's a step-by-step guide on how to use these molds:
Prepare the mold: Ensure that your acrylic brick mold is clean and dry. Make sure it's free of any debris or dust.
Cover one side of the mold to hold the pieces. You can do this process with baking paper, wet oven paper, mylar plastic, or even airbrush masking tape.
Place the mold on a flat surface: Find a flat and stable surface where you can work comfortably. Place the mold with the paper side down to prevent sticking.
Add air-drying clay: Take a ball of air-drying clay and place it on the mold. Use your fingers to gently press and work the clay into the cavities of the mold. Make sure you fill each brick cavity completely. You may need to adjust the amount of clay to achieve your desired brick size and thickness.
Level the surface: Use the included plastic spatula or the edge of another mold to drag/scrape across the surface of the mold, skimming off any excess clay. This will ensure that the surface is even and smooth.
Let it dry: Allow the clay to dry completely. The air-drying paste has a small degree of shrinkage as it dries, which will help the pieces release from the mold.
Remove the paper: Once the clay is completely dry, carefully peel off the paper tape from the back of the mold. This will help release the hobby bricks.
Remove the pieces: Use a blunt stick (like the reverse end of a brush) to gently push out the individual bricks from the mold. Be careful not to apply too much pressure, as you don't want to damage the delicate acrylic mold.
Smooth the edges: To give your bricks a more realistic look and get rid of any sharp edges, gently rub small amounts of them together between the palms of your hands. This will soften the edges and make the bricks look more like real bricks.
Use the bricks: You can now use the air-dried clay bricks for your crafting or construction project. We recommend gluing the pieces with PVA glue or an acrylic sealer such as decoupe product (like ModPodge) to secure the pieces.
Remember to handle the acrylic mold with care, as it's not as flexible as rubber or silicon molds and can break if bent.
With our methacrylate molds, your dioramas will come to life with authentic and captivating details - unleash your creativity and build sets that tell stories of their own! Take your projects to the next level of excellence with this essential accessory for lovers of high-quality dioramas.
Quantity: 2x pack
Scale: 1:35 (1:48-1:32)
The thickness of the pieces: 3 mm
Brick size: 2.85 x 5.7 mm
Mould size: 6 x 11 cm
Dry brush paint
Dry brushing is a popular technique used in the scale modeling and wargaming community for creating a variety of effects. This technique involves using brushes with a small amount of paint to selectively highlight raised areas of a model, terrain piece, or miniature figure.
Dry brush paints are specifically designed and are thicker than traditional ones and have a higher pigment concentration, allowing the user to layer gradually to build up the desired effect and therefore making them ideal for creating a more subtle effect. They have a unique texture and consistency, which can help to create specific effects such as rust, weathering, or stone texture.
It is important to use a good quality, flat or round brush with flexible bristles. This will help to create the desired effect and ensure that the paint is applied evenly and without damaging their bristles. The brush should be loaded with a small amount of paint, and the excess should be removed before applying it to the model or terrain piece. This will help to prevent clumping and ensure that the paint is applied smoothly.
These paints are a great option for those who are new to the dry brushing technique, which can be used in a variety of applications, from highlighting the details of miniature figures to creating a weathered appearance on vehicles and terrain pieces. It is a versatile technique that can be used on a range of surfaces.
Common uses in modeling for Dry Brush Paints
These paints, in particular, are often used in this Dry Brushing technique. Here are some common uses in modeling:
Highlighting details: They are often used to highlight the details on miniature figures, such as wrinkles in clothing, facial features, and weapons.
Creating weathering effects: They are ideal for creating weathering effects on models, such as rust, dirt, and grime. By lightly dragging a dry paintbrush loaded with paint over the surface of the model, it creates a worn, weathered appearance.
Adding texture: They can be used to add texture to a model's surface. For example, a dry brush with silver can be used to create the appearance of scratches on metal surfaces.
Enhancing contrast: They can also be used to enhance contrast on a model's surface, creating a more visually appealing appearance. This is particularly useful when painting terrain pieces or large models.
Painting scenery: They can be used to paint scenery, such as rocks, trees, and buildings. By using a dry brushing technique, it creates a more realistic appearance with subtle shades and highlights.
Content: 30ml
#dry #brush #paint #greenstuffworld #modeling #butter #yellow
Dry brush paint
Dry brushing is a popular technique used in the scale modeling and wargaming community for creating a variety of effects. This technique involves using brushes with a small amount of paint to selectively highlight raised areas of a model, terrain piece, or miniature figure.
Dry brush paints are specifically designed and are thicker than traditional ones and have a higher pigment concentration, allowing the user to layer gradually to build up the desired effect and therefore making them ideal for creating a more subtle effect. They have a unique texture and consistency, which can help to create specific effects such as rust, weathering, or stone texture.
It is important to use a good quality, flat or round brush with flexible bristles. This will help to create the desired effect and ensure that the paint is applied evenly and without damaging their bristles. The brush should be loaded with a small amount of paint, and the excess should be removed before applying it to the model or terrain piece. This will help to prevent clumping and ensure that the paint is applied smoothly.
These paints are a great option for those who are new to the dry brushing technique, which can be used in a variety of applications, from highlighting the details of miniature figures to creating a weathered appearance on vehicles and terrain pieces. It is a versatile technique that can be used on a range of surfaces.
Common uses in modeling for Dry Brush Paints
These paints, in particular, are often used in this Dry Brushing technique. Here are some common uses in modeling:
Highlighting details: They are often used to highlight the details on miniature figures, such as wrinkles in clothing, facial features, and weapons.
Creating weathering effects: They are ideal for creating weathering effects on models, such as rust, dirt, and grime. By lightly dragging a dry paintbrush loaded with paint over the surface of the model, it creates a worn, weathered appearance.
Adding texture: They can be used to add texture to a model's surface. For example, a dry brush with silver can be used to create the appearance of scratches on metal surfaces.
Enhancing contrast: They can also be used to enhance contrast on a model's surface, creating a more visually appealing appearance. This is particularly useful when painting terrain pieces or large models.
Painting scenery: They can be used to paint scenery, such as rocks, trees, and buildings. By using a dry brushing technique, it creates a more realistic appearance with subtle shades and highlights.
Content: 30ml
#dry #brush #paint #greenstuffworld #modeling #rock #grey
Metallic Dry brush paint
Dry brushing has gained popularity in the scale modeling and wargaming community as a technique for creating a variety of effects. This technique involves using brushes with a small amount of paint to selectively highlight raised areas of a model, terrain piece, or miniature figure.
Metallic dry brush paints are specifically designed and have a special metal pigment concentration, allowing the user to layer gradually to build up the desired effect and therefore making them ideal for creating a more subtle metallic effect. They have a unique texture and consistency, which can help to create specific effects such as metallic rust or weathering.
It is important to use a good quality, flat or round brush with flexible bristles when using metallic dry brush paint. This will help to create the desired metallic effect and ensure that the metallic paint is applied evenly and without damaging the bristles. The brush should be loaded with a small amount of metallic paint, and the excess should be removed before applying it to the model or terrain piece. This will help to prevent clumping and ensure that the metallic paint is applied smoothly.
For those who are new to the metallic dry brushing technique, these paints are an excellent choice. They can be used for various applications, including highlighting miniature figures' details and creating a metallic-weathered look on vehicles and terrain pieces. It is a versatile technique that can be used on a range of surfaces to create unique metallic effects.
Uses for Metallic Dry Brush Paints in modeling
In particular, these paints are frequently employed in the dry brushing technique. Here are some common modeling applications:
Dry brush paints are used to enhance the details of miniature figures, such as wrinkles in clothing, facial features, and weapons. The metallic version is ideal for creating weathering effects on models, such as metallic rust, dirt, and grime. By lightly dragging a dry paintbrush loaded with metallic paint over the surface of the model, it creates a worn, weathered metallic appearance.
Metallic paints can also be used to add texture to a model's surface. For example, a dry brush with metallic silver can be used to create the appearance of scratches on metallic surfaces. They can enhance contrast on a model's surface, creating a visually striking metallic effect. This is particularly useful when painting terrain pieces, weapons, tanks, and other large models.
Content: 30ml
#dry #brush #paint #greenstuffworld #modeling #metallic #cursed #gold
Dry brush paint
Dry brushing is a popular technique used in the scale modeling and wargaming community for creating a variety of effects. This technique involves using brushes with a small amount of paint to selectively highlight raised areas of a model, terrain piece, or miniature figure.
Dry brush paints are specifically designed and are thicker than traditional ones and have a higher pigment concentration, allowing the user to layer gradually to build up the desired effect and therefore making them ideal for creating a more subtle effect. They have a unique texture and consistency, which can help to create specific effects such as rust, weathering, or stone texture.
It is important to use a good quality, flat or round brush with flexible bristles. This will help to create the desired effect and ensure that the paint is applied evenly and without damaging their bristles. The brush should be loaded with a small amount of paint, and the excess should be removed before applying it to the model or terrain piece. This will help to prevent clumping and ensure that the paint is applied smoothly.
These paints are a great option for those who are new to the dry brushing technique, which can be used in a variety of applications, from highlighting the details of miniature figures to creating a weathered appearance on vehicles and terrain pieces. It is a versatile technique that can be used on a range of surfaces.
Common uses in modeling for Dry Brush Paints
These paints, in particular, are often used in this Dry Brushing technique. Here are some common uses in modeling:
Highlighting details: They are often used to highlight the details on miniature figures, such as wrinkles in clothing, facial features, and weapons.
Creating weathering effects: They are ideal for creating weathering effects on models, such as rust, dirt, and grime. By lightly dragging a dry paintbrush loaded with paint over the surface of the model, it creates a worn, weathered appearance.
Adding texture: They can be used to add texture to a model's surface. For example, a dry brush with silver can be used to create the appearance of scratches on metal surfaces.
Enhancing contrast: They can also be used to enhance contrast on a model's surface, creating a more visually appealing appearance. This is particularly useful when painting terrain pieces or large models.
Painting scenery: They can be used to paint scenery, such as rocks, trees, and buildings. By using a dry brushing technique, it creates a more realistic appearance with subtle shades and highlights.
Content: 30ml
#dry #brush #paint #greenstuffworld #modeling #raptor #green
Dry brush paint
Dry brushing is a popular technique used in the scale modeling and wargaming community for creating a variety of effects. This technique involves using brushes with a small amount of paint to selectively highlight raised areas of a model, terrain piece, or miniature figure.
Dry brush paints are specifically designed and are thicker than traditional ones and have a higher pigment concentration, allowing the user to layer gradually to build up the desired effect and therefore making them ideal for creating a more subtle effect. They have a unique texture and consistency, which can help to create specific effects such as rust, weathering, or stone texture.
It is important to use a good quality, flat or round brush with flexible bristles. This will help to create the desired effect and ensure that the paint is applied evenly and without damaging their bristles. The brush should be loaded with a small amount of paint, and the excess should be removed before applying it to the model or terrain piece. This will help to prevent clumping and ensure that the paint is applied smoothly.
These paints are a great option for those who are new to the dry brushing technique, which can be used in a variety of applications, from highlighting the details of miniature figures to creating a weathered appearance on vehicles and terrain pieces. It is a versatile technique that can be used on a range of surfaces.
Common uses in modeling for Dry Brush Paints
These paints, in particular, are often used in this Dry Brushing technique. Here are some common uses in modeling:
Highlighting details: They are often used to highlight the details on miniature figures, such as wrinkles in clothing, facial features, and weapons.
Creating weathering effects: They are ideal for creating weathering effects on models, such as rust, dirt, and grime. By lightly dragging a dry paintbrush loaded with paint over the surface of the model, it creates a worn, weathered appearance.
Adding texture: They can be used to add texture to a model's surface. For example, a dry brush with silver can be used to create the appearance of scratches on metal surfaces.
Enhancing contrast: They can also be used to enhance contrast on a model's surface, creating a more visually appealing appearance. This is particularly useful when painting terrain pieces or large models.
Painting scenery: They can be used to paint scenery, such as rocks, trees, and buildings. By using a dry brushing technique, it creates a more realistic appearance with subtle shades and highlights.
Content: 30ml
#dry #brush #paint #greenstuffworld #modeling #storm #grey
Elevate your dioramas to an unparalleled level of realism with our acrylic molds for modeling regular bricks. These accessories will allow you to create an infinite number of them with precision and consistency, adding authenticity and depth to your creations. They are specifically designed to create miniature regular bricks for use in scale modeling projects. Each model features a variety of patterns and textures that replicate real ones and that modelers will use to shape the air-drying clay.
Our acrylic modeling molds are perfectly complemented by air-drying pastes such as modeling clay, foam clay, and similar products. These options guarantee a faithful and detailed reproduction for your diorama.
Instructions for use:
Using acrylic brick molds is a straightforward process, but it requires some care to ensure you get the best results. Here's a step-by-step guide on how to use these molds:
Prepare the mold: Ensure that your acrylic brick mold is clean and dry. Make sure it's free of any debris or dust.
Cover one side of the mold to hold the pieces. You can do this process with baking paper, wet oven paper, mylar plastic, or even airbrush masking tape.
Place the mold on a flat surface: Find a flat and stable surface where you can work comfortably. Place the mold with the paper side down to prevent sticking.
Add air-drying clay: Take a ball of air-drying clay and place it on the mold. Use your fingers to gently press and work the clay into the cavities of the mold. Make sure you fill each brick cavity completely. You may need to adjust the amount of clay to achieve your desired brick size and thickness.
Level the surface: Use the included plastic spatula or the edge of another mold to drag/scrape across the surface of the mold, skimming off any excess clay. This will ensure that the surface is even and smooth.
Let it dry: Allow the clay to dry completely. The air-drying paste has a small degree of shrinkage as it dries, which will help the pieces release from the mold.
Remove the paper: Once the clay is completely dry, carefully peel off the paper tape from the back of the mold. This will help release the hobby bricks.
Remove the pieces: Use a blunt stick (like the reverse end of a brush) to gently push out the individual bricks from the mold. Be careful not to apply too much pressure, as you don't want to damage the delicate acrylic mold.
Smooth the edges: To give your bricks a more realistic look and get rid of any sharp edges, gently rub small amounts of them together between the palms of your hands. This will soften the edges and make the bricks look more like real bricks.
Use the bricks: You can now use the air-dried clay bricks for your crafting or construction project. We recommend gluing the pieces with PVA glue or an acrylic sealer such as decoupe product (like ModPodge) to secure the pieces.
Remember to handle the acrylic mold with care, as it's not as flexible as rubber or silicon molds and can break if bent.
With our methacrylate molds, your dioramas will come to life with authentic and captivating details - unleash your creativity and build sets that tell stories of their own! Take your projects to the next level of excellence with this essential accessory for lovers of high-quality dioramas.
Quantity: 2x pack
Scale: 1:35 (1:48-1:32)
The thickness of the pieces: 3 mm
Brick size: 2.85 x 5.7 mm
Mould size: 6 x 11 cm
Dry brush paint
Dry brushing is a popular technique used in the scale modeling and wargaming community for creating a variety of effects. This technique involves using brushes with a small amount of paint to selectively highlight raised areas of a model, terrain piece, or miniature figure.
Dry brush paints are specifically designed and are thicker than traditional ones and have a higher pigment concentration, allowing the user to layer gradually to build up the desired effect and therefore making them ideal for creating a more subtle effect. They have a unique texture and consistency, which can help to create specific effects such as rust, weathering, or stone texture.
It is important to use a good quality, flat or round brush with flexible bristles. This will help to create the desired effect and ensure that the paint is applied evenly and without damaging their bristles. The brush should be loaded with a small amount of paint, and the excess should be removed before applying it to the model or terrain piece. This will help to prevent clumping and ensure that the paint is applied smoothly.
These paints are a great option for those who are new to the dry brushing technique, which can be used in a variety of applications, from highlighting the details of miniature figures to creating a weathered appearance on vehicles and terrain pieces. It is a versatile technique that can be used on a range of surfaces.
Common uses in modeling for Dry Brush Paints
These paints, in particular, are often used in this Dry Brushing technique. Here are some common uses in modeling:
Highlighting details: They are often used to highlight the details on miniature figures, such as wrinkles in clothing, facial features, and weapons.
Creating weathering effects: They are ideal for creating weathering effects on models, such as rust, dirt, and grime. By lightly dragging a dry paintbrush loaded with paint over the surface of the model, it creates a worn, weathered appearance.
Adding texture: They can be used to add texture to a model's surface. For example, a dry brush with silver can be used to create the appearance of scratches on metal surfaces.
Enhancing contrast: They can also be used to enhance contrast on a model's surface, creating a more visually appealing appearance. This is particularly useful when painting terrain pieces or large models.
Painting scenery: They can be used to paint scenery, such as rocks, trees, and buildings. By using a dry brushing technique, it creates a more realistic appearance with subtle shades and highlights.
Content: 30ml
#dry #brush #paint #greenstuffworld #modeling #dry #puck #green
Metallic Dry brush paint
Dry brushing has gained popularity in the scale modeling and wargaming community as a technique for creating a variety of effects. This technique involves using brushes with a small amount of paint to selectively highlight raised areas of a model, terrain piece, or miniature figure.
Metallic dry brush paints are specifically designed and have a special metal pigment concentration, allowing the user to layer gradually to build up the desired effect and therefore making them ideal for creating a more subtle metallic effect. They have a unique texture and consistency, which can help to create specific effects such as metallic rust or weathering.
It is important to use a good quality, flat or round brush with flexible bristles when using metallic dry brush paint. This will help to create the desired metallic effect and ensure that the metallic paint is applied evenly and without damaging the bristles. The brush should be loaded with a small amount of metallic paint, and the excess should be removed before applying it to the model or terrain piece. This will help to prevent clumping and ensure that the metallic paint is applied smoothly.
For those who are new to the metallic dry brushing technique, these paints are an excellent choice. They can be used for various applications, including highlighting miniature figures' details and creating a metallic-weathered look on vehicles and terrain pieces. It is a versatile technique that can be used on a range of surfaces to create unique metallic effects.
Uses for Metallic Dry Brush Paints in modeling
In particular, these paints are frequently employed in the dry brushing technique. Here are some common modeling applications:
Dry brush paints are used to enhance the details of miniature figures, such as wrinkles in clothing, facial features, and weapons. The metallic version is ideal for creating weathering effects on models, such as metallic rust, dirt, and grime. By lightly dragging a dry paintbrush loaded with metallic paint over the surface of the model, it creates a worn, weathered metallic appearance.
Metallic paints can also be used to add texture to a model's surface. For example, a dry brush with metallic silver can be used to create the appearance of scratches on metallic surfaces. They can enhance contrast on a model's surface, creating a visually striking metallic effect. This is particularly useful when painting terrain pieces, weapons, tanks, and other large models.
Content: 30ml
#dry #brush #paint #greenstuffworld #modeling #metallic #dark #forged #iron
Dry brush paint
Dry brushing is a popular technique used in the scale modeling and wargaming community for creating a variety of effects. This technique involves using brushes with a small amount of paint to selectively highlight raised areas of a model, terrain piece, or miniature figure.
Dry brush paints are specifically designed and are thicker than traditional ones and have a higher pigment concentration, allowing the user to layer gradually to build up the desired effect and therefore making them ideal for creating a more subtle effect. They have a unique texture and consistency, which can help to create specific effects such as rust, weathering, or stone texture.
It is important to use a good quality, flat or round brush with flexible bristles. This will help to create the desired effect and ensure that the paint is applied evenly and without damaging their bristles. The brush should be loaded with a small amount of paint, and the excess should be removed before applying it to the model or terrain piece. This will help to prevent clumping and ensure that the paint is applied smoothly.
These paints are a great option for those who are new to the dry brushing technique, which can be used in a variety of applications, from highlighting the details of miniature figures to creating a weathered appearance on vehicles and terrain pieces. It is a versatile technique that can be used on a range of surfaces.
Common uses in modeling for Dry Brush Paints
These paints, in particular, are often used in this Dry Brushing technique. Here are some common uses in modeling:
Highlighting details: They are often used to highlight the details on miniature figures, such as wrinkles in clothing, facial features, and weapons.
Creating weathering effects: They are ideal for creating weathering effects on models, such as rust, dirt, and grime. By lightly dragging a dry paintbrush loaded with paint over the surface of the model, it creates a worn, weathered appearance.
Adding texture: They can be used to add texture to a model's surface. For example, a dry brush with silver can be used to create the appearance of scratches on metal surfaces.
Enhancing contrast: They can also be used to enhance contrast on a model's surface, creating a more visually appealing appearance. This is particularly useful when painting terrain pieces or large models.
Painting scenery: They can be used to paint scenery, such as rocks, trees, and buildings. By using a dry brushing technique, it creates a more realistic appearance with subtle shades and highlights.
Content: 30ml
#dry #brush #paint #greenstuffworld #modeling #coral #touch
Dry brush paint
Dry brushing is a popular technique used in the scale modeling and wargaming community for creating a variety of effects. This technique involves using brushes with a small amount of paint to selectively highlight raised areas of a model, terrain piece, or miniature figure.
Dry brush paints are specifically designed and are thicker than traditional ones and have a higher pigment concentration, allowing the user to layer gradually to build up the desired effect and therefore making them ideal for creating a more subtle effect. They have a unique texture and consistency, which can help to create specific effects such as rust, weathering, or stone texture.
It is important to use a good quality, flat or round brush with flexible bristles. This will help to create the desired effect and ensure that the paint is applied evenly and without damaging their bristles. The brush should be loaded with a small amount of paint, and the excess should be removed before applying it to the model or terrain piece. This will help to prevent clumping and ensure that the paint is applied smoothly.
These paints are a great option for those who are new to the dry brushing technique, which can be used in a variety of applications, from highlighting the details of miniature figures to creating a weathered appearance on vehicles and terrain pieces. It is a versatile technique that can be used on a range of surfaces.
Common uses in modeling for Dry Brush Paints
These paints, in particular, are often used in this Dry Brushing technique. Here are some common uses in modeling:
Highlighting details: They are often used to highlight the details on miniature figures, such as wrinkles in clothing, facial features, and weapons.
Creating weathering effects: They are ideal for creating weathering effects on models, such as rust, dirt, and grime. By lightly dragging a dry paintbrush loaded with paint over the surface of the model, it creates a worn, weathered appearance.
Adding texture: They can be used to add texture to a model's surface. For example, a dry brush with silver can be used to create the appearance of scratches on metal surfaces.
Enhancing contrast: They can also be used to enhance contrast on a model's surface, creating a more visually appealing appearance. This is particularly useful when painting terrain pieces or large models.
Painting scenery: They can be used to paint scenery, such as rocks, trees, and buildings. By using a dry brushing technique, it creates a more realistic appearance with subtle shades and highlights.
Content: 30ml
#dry #brush #paint #greenstuffworld #modeling #blue #wolf #touch
Dry brush paint
Dry brushing is a popular technique used in the scale modeling and wargaming community for creating a variety of effects. This technique involves using brushes with a small amount of paint to selectively highlight raised areas of a model, terrain piece, or miniature figure.
Dry brush paints are specifically designed and are thicker than traditional ones and have a higher pigment concentration, allowing the user to layer gradually to build up the desired effect and therefore making them ideal for creating a more subtle effect. They have a unique texture and consistency, which can help to create specific effects such as rust, weathering, or stone texture.
It is important to use a good quality, flat or round brush with flexible bristles. This will help to create the desired effect and ensure that the paint is applied evenly and without damaging their bristles. The brush should be loaded with a small amount of paint, and the excess should be removed before applying it to the model or terrain piece. This will help to prevent clumping and ensure that the paint is applied smoothly.
These paints are a great option for those who are new to the dry brushing technique, which can be used in a variety of applications, from highlighting the details of miniature figures to creating a weathered appearance on vehicles and terrain pieces. It is a versatile technique that can be used on a range of surfaces.
Common uses in modeling for Dry Brush Paints
These paints, in particular, are often used in this Dry Brushing technique. Here are some common uses in modeling:
Highlighting details: They are often used to highlight the details on miniature figures, such as wrinkles in clothing, facial features, and weapons.
Creating weathering effects: They are ideal for creating weathering effects on models, such as rust, dirt, and grime. By lightly dragging a dry paintbrush loaded with paint over the surface of the model, it creates a worn, weathered appearance.
Adding texture: They can be used to add texture to a model's surface. For example, a dry brush with silver can be used to create the appearance of scratches on metal surfaces.
Enhancing contrast: They can also be used to enhance contrast on a model's surface, creating a more visually appealing appearance. This is particularly useful when painting terrain pieces or large models.
Painting scenery: They can be used to paint scenery, such as rocks, trees, and buildings. By using a dry brushing technique, it creates a more realistic appearance with subtle shades and highlights.
Content: 30ml
#dry #brush #paint #greenstuffworld #modeling #Alpha #Turquoise
Dry brush paint
Dry brushing is a popular technique used in the scale modeling and wargaming community for creating a variety of effects. This technique involves using brushes with a small amount of paint to selectively highlight raised areas of a model, terrain piece, or miniature figure.
Dry brush paints are specifically designed and are thicker than traditional ones and have a higher pigment concentration, allowing the user to layer gradually to build up the desired effect and therefore making them ideal for creating a more subtle effect. They have a unique texture and consistency, which can help to create specific effects such as rust, weathering, or stone texture.
It is important to use a good quality, flat or round brush with flexible bristles. This will help to create the desired effect and ensure that the paint is applied evenly and without damaging their bristles. The brush should be loaded with a small amount of paint, and the excess should be removed before applying it to the model or terrain piece. This will help to prevent clumping and ensure that the paint is applied smoothly.
These paints are a great option for those who are new to the dry brushing technique, which can be used in a variety of applications, from highlighting the details of miniature figures to creating a weathered appearance on vehicles and terrain pieces. It is a versatile technique that can be used on a range of surfaces.
Common uses in modeling for Dry Brush Paints
These paints, in particular, are often used in this Dry Brushing technique. Here are some common uses in modeling:
Highlighting details: They are often used to highlight the details on miniature figures, such as wrinkles in clothing, facial features, and weapons.
Creating weathering effects: They are ideal for creating weathering effects on models, such as rust, dirt, and grime. By lightly dragging a dry paintbrush loaded with paint over the surface of the model, it creates a worn, weathered appearance.
Adding texture: They can be used to add texture to a model's surface. For example, a dry brush with silver can be used to create the appearance of scratches on metal surfaces.
Enhancing contrast: They can also be used to enhance contrast on a model's surface, creating a more visually appealing appearance. This is particularly useful when painting terrain pieces or large models.
Painting scenery: They can be used to paint scenery, such as rocks, trees, and buildings. By using a dry brushing technique, it creates a more realistic appearance with subtle shades and highlights.
Content: 30ml
#dry #brush #paint #greenstuffworld #modeling #aqua #oxide
Dry brush paint
Dry brushing is a popular technique used in the scale modeling and wargaming community for creating a variety of effects. This technique involves using brushes with a small amount of paint to selectively highlight raised areas of a model, terrain piece, or miniature figure.
Dry brush paints are specifically designed and are thicker than traditional ones and have a higher pigment concentration, allowing the user to layer gradually to build up the desired effect and therefore making them ideal for creating a more subtle effect. They have a unique texture and consistency, which can help to create specific effects such as rust, weathering, or stone texture.
It is important to use a good quality, flat or round brush with flexible bristles. This will help to create the desired effect and ensure that the paint is applied evenly and without damaging their bristles. The brush should be loaded with a small amount of paint, and the excess should be removed before applying it to the model or terrain piece. This will help to prevent clumping and ensure that the paint is applied smoothly.
These paints are a great option for those who are new to the dry brushing technique, which can be used in a variety of applications, from highlighting the details of miniature figures to creating a weathered appearance on vehicles and terrain pieces. It is a versatile technique that can be used on a range of surfaces.
Common uses in modeling for Dry Brush Paints
These paints, in particular, are often used in this Dry Brushing technique. Here are some common uses in modeling:
Highlighting details: They are often used to highlight the details on miniature figures, such as wrinkles in clothing, facial features, and weapons.
Creating weathering effects: They are ideal for creating weathering effects on models, such as rust, dirt, and grime. By lightly dragging a dry paintbrush loaded with paint over the surface of the model, it creates a worn, weathered appearance.
Adding texture: They can be used to add texture to a model's surface. For example, a dry brush with silver can be used to create the appearance of scratches on metal surfaces.
Enhancing contrast: They can also be used to enhance contrast on a model's surface, creating a more visually appealing appearance. This is particularly useful when painting terrain pieces or large models.
Painting scenery: They can be used to paint scenery, such as rocks, trees, and buildings. By using a dry brushing technique, it creates a more realistic appearance with subtle shades and highlights.
Content: 30ml
#dry #brush #paint #greenstuffworld #modeling #courage #mauve
Dry brush paint
Dry brushing is a popular technique used in the scale modeling and wargaming community for creating a variety of effects. This technique involves using brushes with a small amount of paint to selectively highlight raised areas of a model, terrain piece, or miniature figure.
Dry brush paints are specifically designed and are thicker than traditional ones and have a higher pigment concentration, allowing the user to layer gradually to build up the desired effect and therefore making them ideal for creating a more subtle effect. They have a unique texture and consistency, which can help to create specific effects such as rust, weathering, or stone texture.
It is important to use a good quality, flat or round brush with flexible bristles. This will help to create the desired effect and ensure that the paint is applied evenly and without damaging their bristles. The brush should be loaded with a small amount of paint, and the excess should be removed before applying it to the model or terrain piece. This will help to prevent clumping and ensure that the paint is applied smoothly.
These paints are a great option for those who are new to the dry brushing technique, which can be used in a variety of applications, from highlighting the details of miniature figures to creating a weathered appearance on vehicles and terrain pieces. It is a versatile technique that can be used on a range of surfaces.
Common uses in modeling for Dry Brush Paints
These paints, in particular, are often used in this Dry Brushing technique. Here are some common uses in modeling:
Highlighting details: They are often used to highlight the details on miniature figures, such as wrinkles in clothing, facial features, and weapons.
Creating weathering effects: They are ideal for creating weathering effects on models, such as rust, dirt, and grime. By lightly dragging a dry paintbrush loaded with paint over the surface of the model, it creates a worn, weathered appearance.
Adding texture: They can be used to add texture to a model's surface. For example, a dry brush with silver can be used to create the appearance of scratches on metal surfaces.
Enhancing contrast: They can also be used to enhance contrast on a model's surface, creating a more visually appealing appearance. This is particularly useful when painting terrain pieces or large models.
Painting scenery: They can be used to paint scenery, such as rocks, trees, and buildings. By using a dry brushing technique, it creates a more realistic appearance with subtle shades and highlights.
Content: 30ml
#dry #brush #paint #greenstuffworld #modeling #ultramarine #touch
Dry brush paint
Dry brushing is a popular technique used in the scale modeling and wargaming community for creating a variety of effects. This technique involves using brushes with a small amount of paint to selectively highlight raised areas of a model, terrain piece, or miniature figure.
Dry brush paints are specifically designed and are thicker than traditional ones and have a higher pigment concentration, allowing the user to layer gradually to build up the desired effect and therefore making them ideal for creating a more subtle effect. They have a unique texture and consistency, which can help to create specific effects such as rust, weathering, or stone texture.
It is important to use a good quality, flat or round brush with flexible bristles. This will help to create the desired effect and ensure that the paint is applied evenly and without damaging their bristles. The brush should be loaded with a small amount of paint, and the excess should be removed before applying it to the model or terrain piece. This will help to prevent clumping and ensure that the paint is applied smoothly.
These paints are a great option for those who are new to the dry brushing technique, which can be used in a variety of applications, from highlighting the details of miniature figures to creating a weathered appearance on vehicles and terrain pieces. It is a versatile technique that can be used on a range of surfaces.
Common uses in modeling for Dry Brush Paints
These paints, in particular, are often used in this Dry Brushing technique. Here are some common uses in modeling:
Highlighting details: They are often used to highlight the details on miniature figures, such as wrinkles in clothing, facial features, and weapons.
Creating weathering effects: They are ideal for creating weathering effects on models, such as rust, dirt, and grime. By lightly dragging a dry paintbrush loaded with paint over the surface of the model, it creates a worn, weathered appearance.
Adding texture: They can be used to add texture to a model's surface. For example, a dry brush with silver can be used to create the appearance of scratches on metal surfaces.
Enhancing contrast: They can also be used to enhance contrast on a model's surface, creating a more visually appealing appearance. This is particularly useful when painting terrain pieces or large models.
Painting scenery: They can be used to paint scenery, such as rocks, trees, and buildings. By using a dry brushing technique, it creates a more realistic appearance with subtle shades and highlights.
Content: 30ml
#dry #brush #paint #greenstuffworld #modeling #red #bark
Dry brush paint
Dry brushing is a popular technique used in the scale modeling and wargaming community for creating a variety of effects. This technique involves using brushes with a small amount of paint to selectively highlight raised areas of a model, terrain piece, or miniature figure.
Dry brush paints are specifically designed and are thicker than traditional ones and have a higher pigment concentration, allowing the user to layer gradually to build up the desired effect and therefore making them ideal for creating a more subtle effect. They have a unique texture and consistency, which can help to create specific effects such as rust, weathering, or stone texture.
It is important to use a good quality, flat or round brush with flexible bristles. This will help to create the desired effect and ensure that the paint is applied evenly and without damaging their bristles. The brush should be loaded with a small amount of paint, and the excess should be removed before applying it to the model or terrain piece. This will help to prevent clumping and ensure that the paint is applied smoothly.
These paints are a great option for those who are new to the dry brushing technique, which can be used in a variety of applications, from highlighting the details of miniature figures to creating a weathered appearance on vehicles and terrain pieces. It is a versatile technique that can be used on a range of surfaces.
Common uses in modeling for Dry Brush Paints
These paints, in particular, are often used in this Dry Brushing technique. Here are some common uses in modeling:
Highlighting details: They are often used to highlight the details on miniature figures, such as wrinkles in clothing, facial features, and weapons.
Creating weathering effects: They are ideal for creating weathering effects on models, such as rust, dirt, and grime. By lightly dragging a dry paintbrush loaded with paint over the surface of the model, it creates a worn, weathered appearance.
Adding texture: They can be used to add texture to a model's surface. For example, a dry brush with silver can be used to create the appearance of scratches on metal surfaces.
Enhancing contrast: They can also be used to enhance contrast on a model's surface, creating a more visually appealing appearance. This is particularly useful when painting terrain pieces or large models.
Painting scenery: They can be used to paint scenery, such as rocks, trees, and buildings. By using a dry brushing technique, it creates a more realistic appearance with subtle shades and highlights.
Content: 30ml
#dry #brush #paint #greenstuffworld #modeling #dry #violet
Elevate your dioramas to an unparalleled level of realism with our acrylic molds for modeling regular bricks. These accessories will allow you to create an infinite number of them with precision and consistency, adding authenticity and depth to your creations. They are specifically designed to create miniature regular bricks for use in scale modeling projects. Each model features a variety of patterns and textures that replicate real ones and that modelers will use to shape the air-drying clay.
Our acrylic modeling molds are perfectly complemented by air-drying pastes such as modeling clay, foam clay, and similar products. These options guarantee a faithful and detailed reproduction for your diorama.
Instructions for use:
Using acrylic brick molds is a straightforward process, but it requires some care to ensure you get the best results. Here's a step-by-step guide on how to use these molds:
Prepare the mold: Ensure that your acrylic brick mold is clean and dry. Make sure it's free of any debris or dust.
Cover one side of the mold to hold the pieces. You can do this process with baking paper, wet oven paper, mylar plastic, or even airbrush masking tape.
Place the mold on a flat surface: Find a flat and stable surface where you can work comfortably. Place the mold with the paper side down to prevent sticking.
Add air-drying clay: Take a ball of air-drying clay and place it on the mold. Use your fingers to gently press and work the clay into the cavities of the mold. Make sure you fill each brick cavity completely. You may need to adjust the amount of clay to achieve your desired brick size and thickness.
Level the surface: Use the included plastic spatula or the edge of another mold to drag/scrape across the surface of the mold, skimming off any excess clay. This will ensure that the surface is even and smooth.
Let it dry: Allow the clay to dry completely. The air-drying paste has a small degree of shrinkage as it dries, which will help the pieces release from the mold.
Remove the paper: Once the clay is completely dry, carefully peel off the paper tape from the back of the mold. This will help release the hobby bricks.
Remove the pieces: Use a blunt stick (like the reverse end of a brush) to gently push out the individual bricks from the mold. Be careful not to apply too much pressure, as you don't want to damage the delicate acrylic mold.
Smooth the edges: To give your bricks a more realistic look and get rid of any sharp edges, gently rub small amounts of them together between the palms of your hands. This will soften the edges and make the bricks look more like real bricks.
Use the bricks: You can now use the air-dried clay bricks for your crafting or construction project. We recommend gluing the pieces with PVA glue or an acrylic sealer such as decoupe product (like ModPodge) to secure the pieces.
Remember to handle the acrylic mold with care, as it's not as flexible as rubber or silicon molds and can break if bent.
With our methacrylate molds, your dioramas will come to life with authentic and captivating details - unleash your creativity and build sets that tell stories of their own! Take your projects to the next level of excellence with this essential accessory for lovers of high-quality dioramas.
Quantity: 2x pack
Scale: 1:35 (1:48-1:32)
The thickness of the pieces: 3 mm
Brick size: 2.85 x 5.7 mm
Mould size: 6 x 11 cm