
Mallen

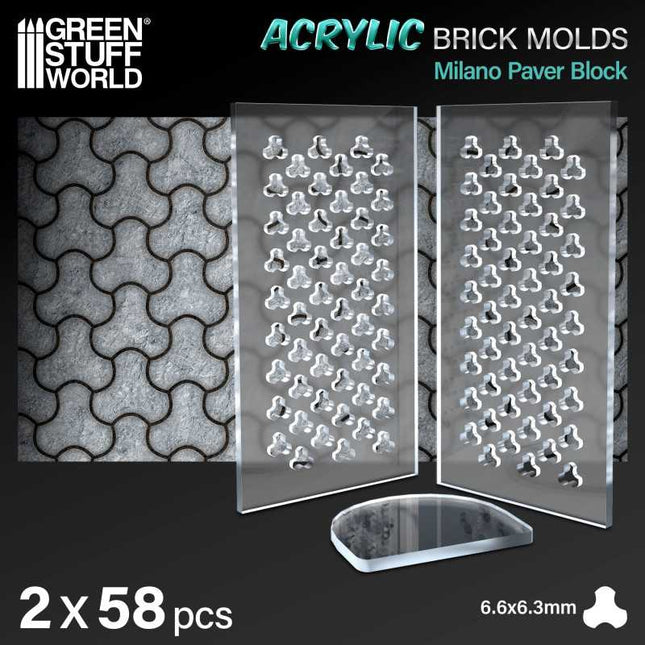
Acrylic Brick molds - Round Dumble paver
Elevate your dioramas to an unparalleled level of realism with our acrylic molds for modeling regular bricks. These accessories will allow you to create an infinite number of them with precision and consistency, adding authenticity and depth to your creations. They are specifically designed to create miniature regular bricks for use in scale modeling projects. Each model features a variety of patterns and textures that replicate real ones and that modelers will use to shape the air-drying clay. Our acrylic modeling molds are perfectly complemented by air-drying pastes such as modeling clay, foam clay, and similar products. These options guarantee a faithful and detailed reproduction for your diorama. Instructions for use: Using acrylic brick molds is a straightforward process, but it requires some care to ensure you get the best results. Here's a step-by-step guide on how to use these molds: Prepare the mold: Ensure that your acrylic brick mold is clean and dry. Make sure it's free of any debris or dust. Cover one side of the mold to hold the pieces. You can do this process with baking paper, wet oven paper, mylar plastic, or even airbrush masking tape. Place the mold on a flat surface: Find a flat and stable surface where you can work comfortably. Place the mold with the paper side down to prevent sticking. Add air-drying clay: Take a ball of air-drying clay and place it on the mold. Use your fingers to gently press and work the clay into the cavities of the mold. Make sure you fill each brick cavity completely. You may need to adjust the amount of clay to achieve your desired brick size and thickness. Level the surface: Use the included plastic spatula or the edge of another mold to drag/scrape across the surface of the mold, skimming off any excess clay. This will ensure that the surface is even and smooth. Let it dry: Allow the clay to dry completely. The air-drying paste has a small degree of shrinkage as it dries, which will help the pieces release from the mold. Remove the paper: Once the clay is completely dry, carefully peel off the paper tape from the back of the mold. This will help release the hobby bricks. Remove the pieces: Use a blunt stick (like the reverse end of a brush) to gently push out the individual bricks from the mold. Be careful not to apply too much pressure, as you don't want to damage the delicate acrylic mold. Smooth the edges: To give your bricks a more realistic look and get rid of any sharp edges, gently rub small amounts of them together between the palms of your hands. This will soften the edges and make the bricks look more like real bricks. Use the bricks: You can now use the air-dried clay bricks for your crafting or construction project. We recommend gluing the pieces with PVA glue or an acrylic sealer such as decoupe product (like ModPodge) to secure the pieces. Remember to handle the acrylic mold with care, as it's not as flexible as rubber or silicon molds and can break if bent. With our methacrylate molds, your dioramas will come to life with authentic and captivating details - unleash your creativity and build sets that tell stories of their own! Take your projects to the next level of excellence with this essential accessory for lovers of high-quality dioramas. Quantity: 2x pack Scale: 1:35 (1:48-1:32) The thickness of the pieces: 3 mm Brick size: 2.85 x 5.7 mm Mould size: 6 x 11 cm
€10,00€7,00
-
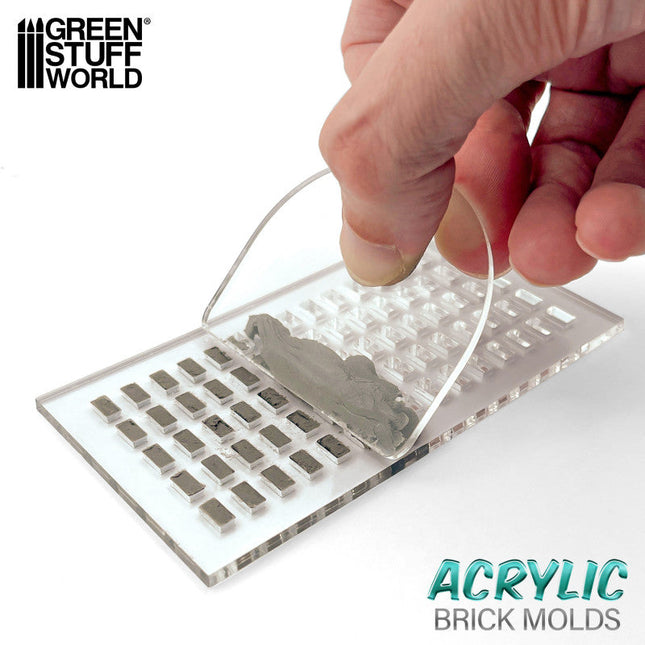
Acrylic Brick molds - H Shaped
Elevate your dioramas to an unparalleled level of realism with our acrylic molds for modeling regular bricks. These accessories will allow you to create an infinite number of them with precision and consistency, adding authenticity and depth to your creations. They are specifically designed to create miniature regular bricks for use in scale modeling projects. Each model features a variety of patterns and textures that replicate real ones and that modelers will use to shape the air-drying clay. Our acrylic modeling molds are perfectly complemented by air-drying pastes such as modeling clay, foam clay, and similar products. These options guarantee a faithful and detailed reproduction for your diorama. Instructions for use: Using acrylic brick molds is a straightforward process, but it requires some care to ensure you get the best results. Here's a step-by-step guide on how to use these molds: Prepare the mold: Ensure that your acrylic brick mold is clean and dry. Make sure it's free of any debris or dust. Cover one side of the mold to hold the pieces. You can do this process with baking paper, wet oven paper, mylar plastic, or even airbrush masking tape. Place the mold on a flat surface: Find a flat and stable surface where you can work comfortably. Place the mold with the paper side down to prevent sticking. Add air-drying clay: Take a ball of air-drying clay and place it on the mold. Use your fingers to gently press and work the clay into the cavities of the mold. Make sure you fill each brick cavity completely. You may need to adjust the amount of clay to achieve your desired brick size and thickness. Level the surface: Use the included plastic spatula or the edge of another mold to drag/scrape across the surface of the mold, skimming off any excess clay. This will ensure that the surface is even and smooth. Let it dry: Allow the clay to dry completely. The air-drying paste has a small degree of shrinkage as it dries, which will help the pieces release from the mold. Remove the paper: Once the clay is completely dry, carefully peel off the paper tape from the back of the mold. This will help release the hobby bricks. Remove the pieces: Use a blunt stick (like the reverse end of a brush) to gently push out the individual bricks from the mold. Be careful not to apply too much pressure, as you don't want to damage the delicate acrylic mold. Smooth the edges: To give your bricks a more realistic look and get rid of any sharp edges, gently rub small amounts of them together between the palms of your hands. This will soften the edges and make the bricks look more like real bricks. Use the bricks: You can now use the air-dried clay bricks for your crafting or construction project. We recommend gluing the pieces with PVA glue or an acrylic sealer such as decoupe product (like ModPodge) to secure the pieces. Remember to handle the acrylic mold with care, as it's not as flexible as rubber or silicon molds and can break if bent. With our methacrylate molds, your dioramas will come to life with authentic and captivating details - unleash your creativity and build sets that tell stories of their own! Take your projects to the next level of excellence with this essential accessory for lovers of high-quality dioramas. Quantity: 2x pack Scale: 1:35 (1:48-1:32) The thickness of the pieces: 3 mm Brick size: 2.85 x 5.7 mm Mould size: 6 x 11 cm
€10,00€7,00
-
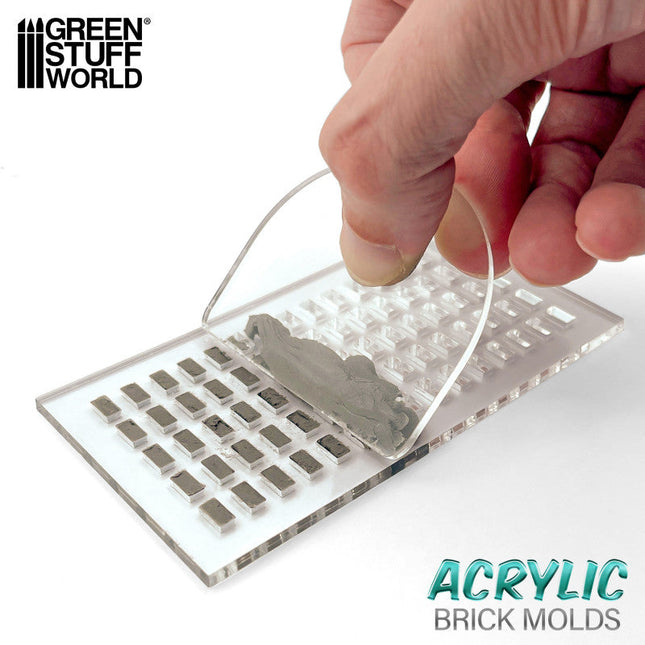
Acrylic Brick molds - Trihex Pavement
Elevate your dioramas to an unparalleled level of realism with our acrylic molds for modeling regular bricks. These accessories will allow you to create an infinite number of them with precision and consistency, adding authenticity and depth to your creations. They are specifically designed to create miniature regular bricks for use in scale modeling projects. Each model features a variety of patterns and textures that replicate real ones and that modelers will use to shape the air-drying clay. Our acrylic modeling molds are perfectly complemented by air-drying pastes such as modeling clay, foam clay, and similar products. These options guarantee a faithful and detailed reproduction for your diorama. Instructions for use: Using acrylic brick molds is a straightforward process, but it requires some care to ensure you get the best results. Here's a step-by-step guide on how to use these molds: Prepare the mold: Ensure that your acrylic brick mold is clean and dry. Make sure it's free of any debris or dust. Cover one side of the mold to hold the pieces. You can do this process with baking paper, wet oven paper, mylar plastic, or even airbrush masking tape. Place the mold on a flat surface: Find a flat and stable surface where you can work comfortably. Place the mold with the paper side down to prevent sticking. Add air-drying clay: Take a ball of air-drying clay and place it on the mold. Use your fingers to gently press and work the clay into the cavities of the mold. Make sure you fill each brick cavity completely. You may need to adjust the amount of clay to achieve your desired brick size and thickness. Level the surface: Use the included plastic spatula or the edge of another mold to drag/scrape across the surface of the mold, skimming off any excess clay. This will ensure that the surface is even and smooth. Let it dry: Allow the clay to dry completely. The air-drying paste has a small degree of shrinkage as it dries, which will help the pieces release from the mold. Remove the paper: Once the clay is completely dry, carefully peel off the paper tape from the back of the mold. This will help release the hobby bricks. Remove the pieces: Use a blunt stick (like the reverse end of a brush) to gently push out the individual bricks from the mold. Be careful not to apply too much pressure, as you don't want to damage the delicate acrylic mold. Smooth the edges: To give your bricks a more realistic look and get rid of any sharp edges, gently rub small amounts of them together between the palms of your hands. This will soften the edges and make the bricks look more like real bricks. Use the bricks: You can now use the air-dried clay bricks for your crafting or construction project. We recommend gluing the pieces with PVA glue or an acrylic sealer such as decoupe product (like ModPodge) to secure the pieces. Remember to handle the acrylic mold with care, as it's not as flexible as rubber or silicon molds and can break if bent. With our methacrylate molds, your dioramas will come to life with authentic and captivating details - unleash your creativity and build sets that tell stories of their own! Take your projects to the next level of excellence with this essential accessory for lovers of high-quality dioramas. Quantity: 2x pack Scale: 1:35 (1:48-1:32) The thickness of the pieces: 3 mm Brick size: 2.85 x 5.7 mm Mould size: 6 x 11 cm
€10,00€7,00
-

Silicone Molds - Supply Boxes (1:48)
Wooden Crate Mold 1:48-1:35The silicone mold for wooden crates from Green Stuff World is designed to create 14 highly detailed pieces in 1:48–1:35 scales, ideal for models, dioramas, scenery, and miniature games. Its realistic proportions and textures allow you to reproduce shipping and storage crates made from wooden planks, including wood grain, joints, reinforcements, and other details typical of this type of packaging. These crates are perfect for setting the scene in warehouses, workshops, factories, ports, train stations, military bases, camps, trenches, markets, farms, mines, and loading areas. They can also be used to represent supplies, ammunition, tools, food, military equipment, abandoned goods, or cargo ready for transport. Thanks to their versatile and timeless design, the crates fit naturally into historical, modern, post-apocalyptic, steampunk, grimdark, fantasy, and science fiction settings. They can be placed individually, stacked to create storage areas, used as cover, or combined with barrels, pallets, sandbags, containers, and other diorama accessories. Their 1:48–1:35 scales are particularly well-suited for miniatures measuring approximately 28 to 35 mm, allowing these crates to blend visually into numerous miniatures games. They are compatible in scale and theme with Trench Crusade, Warhammer 40,000, Warhammer Kill Team, Necromunda, Star Wars: Legion, Infinity, Fallout: Wasteland Warfare, Bolt Action, Konflikt ’47, Spectre Operations, Zona Alfa, Five Parsecs From Home, Core Space, This Is Not a Test, Maelstrom’s Edge, Deadzone, Judge Dredd Miniatures Game, and other historical, modern, industrial, post-apocalyptic, and futuristic wargames of similar scales. In war-themed and grimdark games such as Trench Crusade, these wooden crates can be used to decorate trenches, ammunition depots, supply posts, fortifications, military camps, and war-torn areas. Their traditional shapes fit particularly well into scenarios inspired by industrial conflicts, alternate-history wars, and dark settings where supplies and equipment are transported in reinforced crates. In science fiction universes such as Warhammer 40,000, Kill Team, or Necromunda, they can represent Imperial cargo, ammunition crates, military supplies, contraband goods, manufactorum resources, or materials stored in industrial settlements. In Star Wars: Legion, they work especially well in Rebel bases, Imperial outposts, hangars, markets, makeshift camps, and remote stations. In historical games like Bolt Action or Konflikt ’47, these pieces are ideal for representing ammunition crates, provisions, equipment, and military cargo. In post-apocalyptic scenarios like Fallout: Wasteland Warfare, Zona Alfa, or This Is Not a Test, they can be used as abandoned containers, supply caches, looted crates, or the remains of old warehouses. The pieces can be painted in various wood tones and customized with serial numbers, military symbols, shipping marks, labels, stains, moisture, mud, dust, scratches, or weathering effects. This allows you to easily adapt the crates to any era or setting. Made of high-quality flexible silicone, this mold is easy to use and allows for the reproduction of sharp details, such as wood grain, planks, joints, and structural reinforcements. It is heat-resistant up to approximately 240 °C and is designed to withstand numerous uses without losing definition. Each mold has an approximate working surface area of 6 × 12 cm and yields 14 different pieces in each full cast, facilitating the quick and economical creation of large quantities of boxes for scenery, bases, and dioramas. The molds work perfectly with all types of resins, although we especially recommend the use of acrylic resin. It is important to allow the material to cure completely before removing the pieces from the mold. Other materials such as Milliput, Milliput mixed with plasticine, Magic Sculpt, or other epoxy putties can also be used, although they are somewhat more difficult to work with. For optimal results, we recommend using flexible steel scrapers to remove excess putty or clay without damaging the mold surface. Contents: 1x Supply Boxes mold
€13,50
-
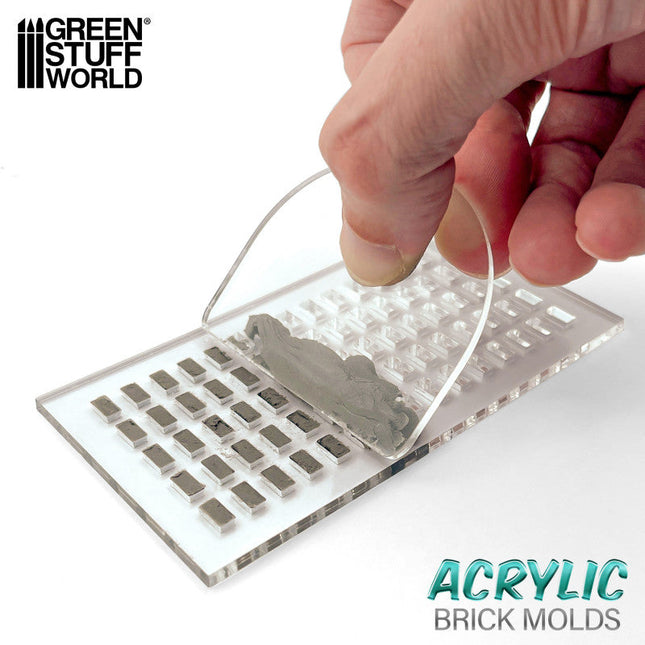
Acrylic Brick molds - Zig Zag Pavement (or Backbone)
Elevate your dioramas to an unparalleled level of realism with our acrylic molds for modeling regular bricks. These accessories will allow you to create an infinite number of them with precision and consistency, adding authenticity and depth to your creations. They are specifically designed to create miniature regular bricks for use in scale modeling projects. Each model features a variety of patterns and textures that replicate real ones and that modelers will use to shape the air-drying clay. Our acrylic modeling molds are perfectly complemented by air-drying pastes such as modeling clay, foam clay, and similar products. These options guarantee a faithful and detailed reproduction for your diorama. Instructions for use: Using acrylic brick molds is a straightforward process, but it requires some care to ensure you get the best results. Here's a step-by-step guide on how to use these molds: Prepare the mold: Ensure that your acrylic brick mold is clean and dry. Make sure it's free of any debris or dust. Cover one side of the mold to hold the pieces. You can do this process with baking paper, wet oven paper, mylar plastic, or even airbrush masking tape. Place the mold on a flat surface: Find a flat and stable surface where you can work comfortably. Place the mold with the paper side down to prevent sticking. Add air-drying clay: Take a ball of air-drying clay and place it on the mold. Use your fingers to gently press and work the clay into the cavities of the mold. Make sure you fill each brick cavity completely. You may need to adjust the amount of clay to achieve your desired brick size and thickness. Level the surface: Use the included plastic spatula or the edge of another mold to drag/scrape across the surface of the mold, skimming off any excess clay. This will ensure that the surface is even and smooth. Let it dry: Allow the clay to dry completely. The air-drying paste has a small degree of shrinkage as it dries, which will help the pieces release from the mold. Remove the paper: Once the clay is completely dry, carefully peel off the paper tape from the back of the mold. This will help release the hobby bricks. Remove the pieces: Use a blunt stick (like the reverse end of a brush) to gently push out the individual bricks from the mold. Be careful not to apply too much pressure, as you don't want to damage the delicate acrylic mold. Smooth the edges: To give your bricks a more realistic look and get rid of any sharp edges, gently rub small amounts of them together between the palms of your hands. This will soften the edges and make the bricks look more like real bricks. Use the bricks: You can now use the air-dried clay bricks for your crafting or construction project. We recommend gluing the pieces with PVA glue or an acrylic sealer such as decoupe product (like ModPodge) to secure the pieces. Remember to handle the acrylic mold with care, as it's not as flexible as rubber or silicon molds and can break if bent. With our methacrylate molds, your dioramas will come to life with authentic and captivating details - unleash your creativity and build sets that tell stories of their own! Take your projects to the next level of excellence with this essential accessory for lovers of high-quality dioramas. Quantity: 2x pack Scale: 1:35 (1:48-1:32) The thickness of the pieces: 3 mm Brick size: 2.85 x 5.7 mm Mould size: 6 x 11 cm
€10,00€7,00


