


Tools all products


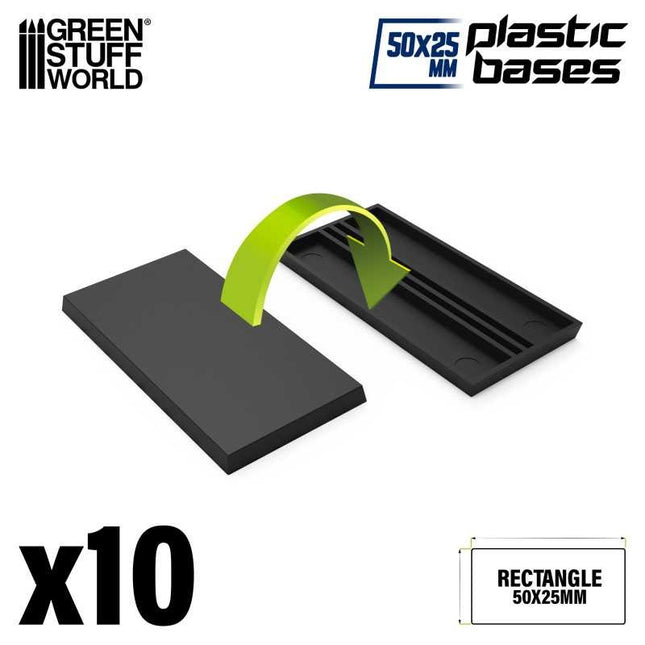
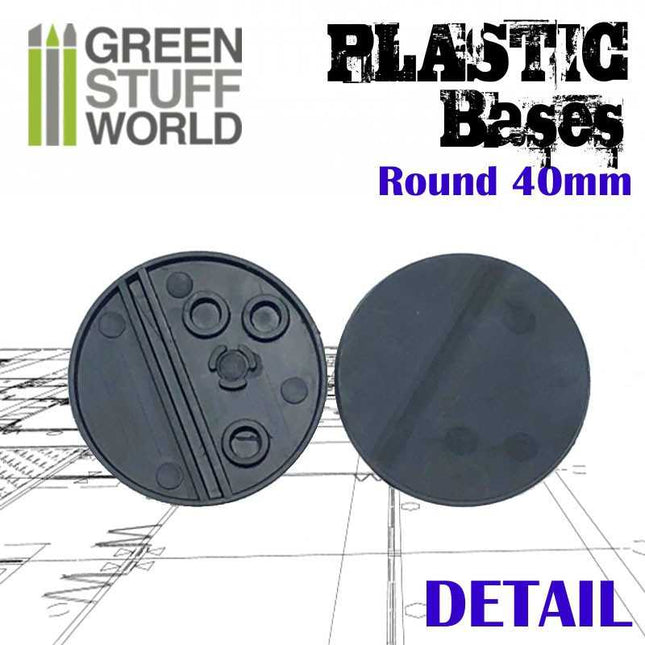
Black Plastic Bases - rectangular 50x75mm
PLASTIC BASES - RECTANGLE 50x75mm Top-quality plastic bases for mounting wargame figures. The back of these chariot bases have 4 holes to insert 5x2mm neodymium magnets. They can also be magnetized with magnetic sheets. Shape: RECTANGLE Thickness: 3mm Bases: 8 per pack
€3,85
-

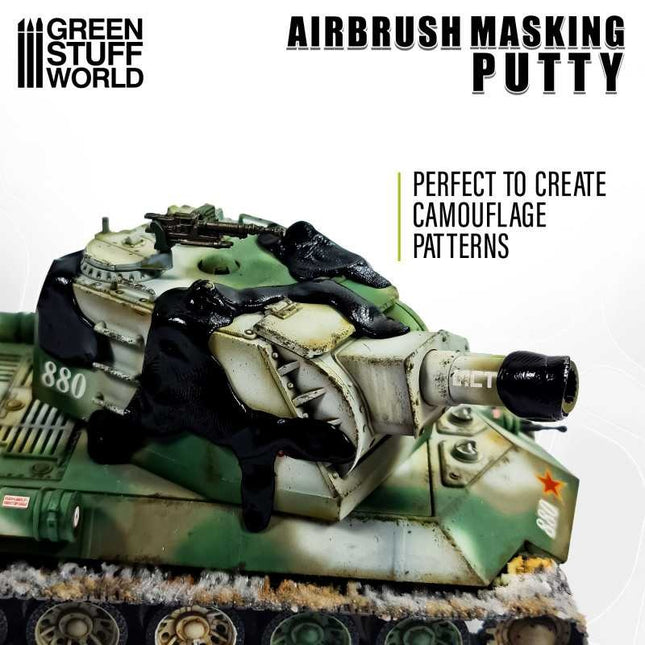
Airbrush Masking Putty
What is Airbrush Masking Putty? Is a pliable material used in modeling and painting to mask off areas that you want to protect from paint or other applications. It works by shaping and applying it over the desired surface, creating a temporary barrier. Once painted, the product is removed, leaving behind clean, crisp edges. Airbrush Masking Putty easily conforms to all surfaces and other details on any model. It has been specially designed to leave no residue on surfaces, is very easy to remove, is free from grease, and cannot dry out. Perfect material to protect areas from paint and to easily create camouflage patterns. Its special formulation is designed for multiple uses and easy cleanup. It does not stain, it is free from grease, and cannot dry out.Content: 60g to be reused many many times.
€9,95
-

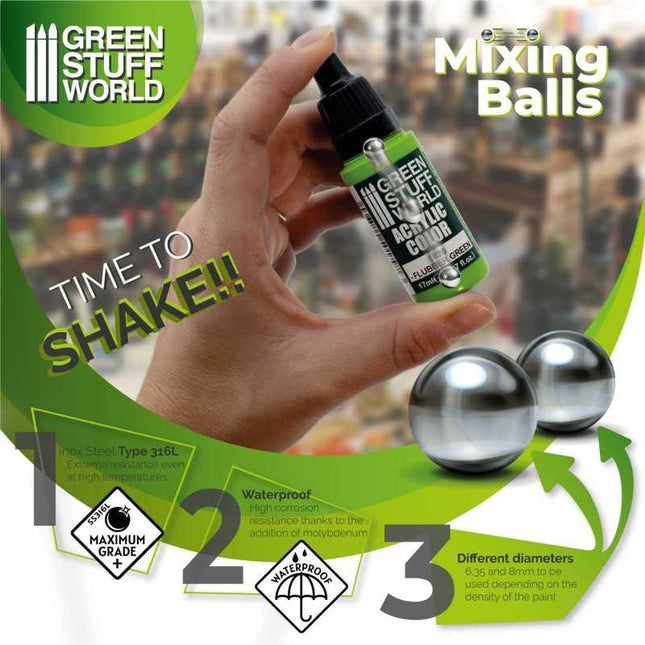
Steel Mixing balls 6.35mm (QSS316L)
Mixing Balls 6.35mm Set of 40 Stainless steel bearing balls in 8mm to mix paints. These mixing balls are coming with a special coat to make them completely paint proof which will avoid the rusting process after long periods of contact with paints that may ruin the paint colors. They are not magnetic but they will be attracted by magnets. They are suitable either for personal or industrial uses in order to guarantee a proper mixture of all paint contents and therefore avoid having all pigments deposited in the bottom of the pot, especially after long-term storage. This set includes 40 stainless steel ball-bearing of 6.35 mm, perfect for mixing and stirring paints pots such as Green Stuff World, and Citadel, among others. The total weight of 1 ball is 1gr. Quality SS316L
€4,50
-

Steel Mixing balls 8mm (QSS316L)
Mixing Balls 8mm Set of 35 Stainless steel bearing balls in 8mm to mix paints. These mixing balls are coming with a special coat to make them completely paint proof which will avoid the rusting process after long periods of contact with paints that may ruin the paint colors. They are not magnetic but they will be attracted by magnets. They are suitable either for personal or industrial uses in order to guarantee a proper mixture of all paint contents and therefore avoid having all pigments deposited in the bottom of the pot, especially after long-term storage. This set includes 35 stainless steel ball-bearing of 8 mm, perfect for mixing and stirring paints pots such as Green Stuff World, and Citadel, among others. The total weight of 1 ball is 2gr. Quality SS316L
€4,75
-

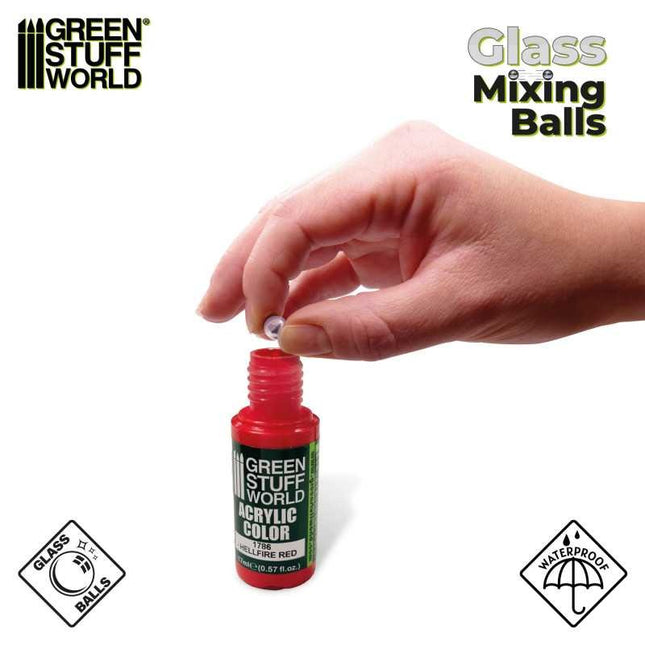
Glass Mixing balls 8mm (40st)
Glass mixing balls in an 8mm size, are essential tools for artists and creative enthusiasts alike. These meticulously crafted spheres serve a vital role in the world of painting, art, and crafting, offering a versatile and reliable solution for enhancing the handling and longevity of various paints and mediums. At their core, they are designed to facilitate an efficient and consistent mix of the colors included in the colors within their respective containers. Placed inside paint pots or bottles, they act as small, unobtrusive agents of cohesion, actively combating the natural tendency of heavier pigments to settle at the bottom over time. This property is especially noticeable following extended periods of storage, where conventional model paints often require extensive manual mixing to restore their original consistency. One of the primary advantages of these lies in their ability to help keep colors vibrant and readily usable. Through their simple yet effective stirring action, they work tirelessly to maintain a homogeneous composition within the paint. This consistency is crucial for artists, as it ensures that the colors remain true to their intended vibrancy and quality. They are well-suited for paints with a lower density, such as those that are more liquid or fluid in nature such as acrylic inks, but also for those solvent-based, or with elements capable of accelerating the oxidation of a metal ball. This versatility makes them adaptable to a wide range of artistic mediums, ensuring that artists can work with the materials that best suit their creative vision. Crafted from high-quality glass, they offer assurance in the preservation of the acrylic paints's integrity. The material is not only resistant but also chemically inert, meaning that it will not interfere with the composition of the pigments or introduce any impurities. Artists can confidently rely on them to safeguard their creative materials, preventing unwanted alterations and ensuring the highest level of purity and color fidelity. Contents: 40x glass ballsWeight: 0.66 gr.Diameter: 8 mm
€4,75
-

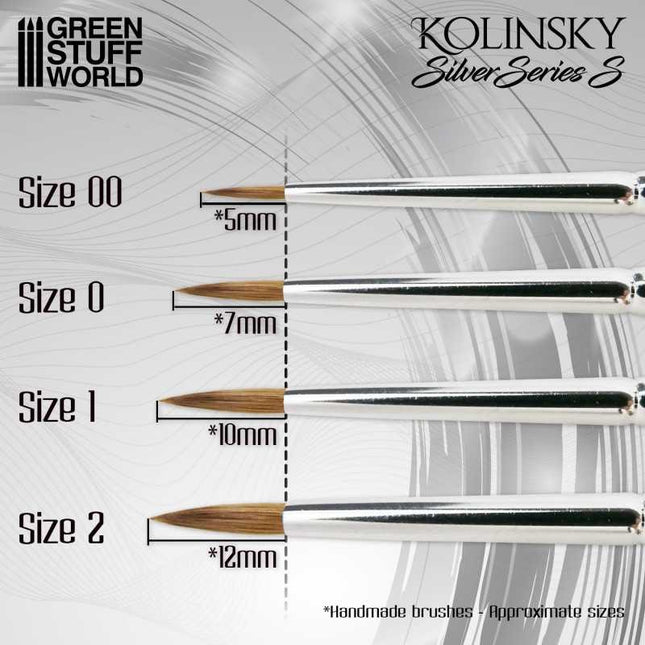
Kolinsky Silver series Brushes Small
SILVER SERIES (S) Kolinsky Brushes Kolinsky Brushes are widely recognized for their high quality and durability, the SERIE-S range with shorter and wider tips is suited for miniature painting by both beginners hobbyists, and experts, can handle intricate details, and provides greater control over the paint. They are particularly recommended for traditional painting, especially for fine and blending techniques using washes, glazes, inks, and other types of paints. Their versatility and ability to hold a fine point make them ideal for achieving sharp lines and detailed work in miniature painting. This serie contains: Silver Series S - Size 00Silver Series S - Size 0Silver Series S - Size 1Silver Series S - Size 2 Set Silver Series containing 4 brushes in size 00, 0, 1 and 2 GOLD SILVER SILVER (S-SERIE) GREEN FLAT GREEN DRY BRUSH ELASTICITY ●●●●● ●●●● ●●●● ●●● ●●● ●●●●● COLOR RETENTION ●●●●● ●●●● ●●●● ●●● ●●● ●● SOFTNESS ●●●●● ●●●●● ●●●● ●●● ●●● ●●●●● WEAR RESISTANCE ●●●●● ●●●●● ●●● ●●●● ●●●● ●●●●● TIP THINNESS ●●●●● ●●●●● ●●●● ●●● ●●● ●●
€5,00 - €25,00
-

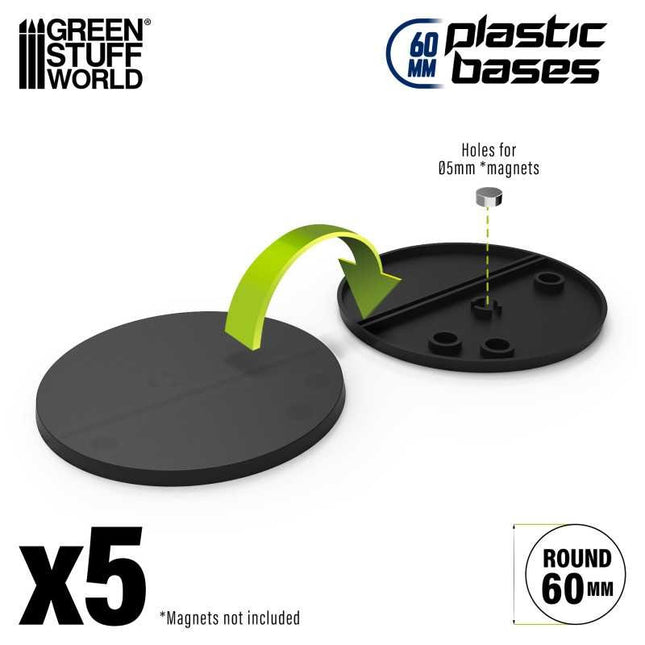
Zwarte ronde bases 60mm
Plastic Bases - Round 60 mmSet of plastic bases. Ideal for modelling, wargaming, role playing, miniatures...Shape: RoundThickness: 3mmColor: BlackBases: 5 per pack
€3,55
-

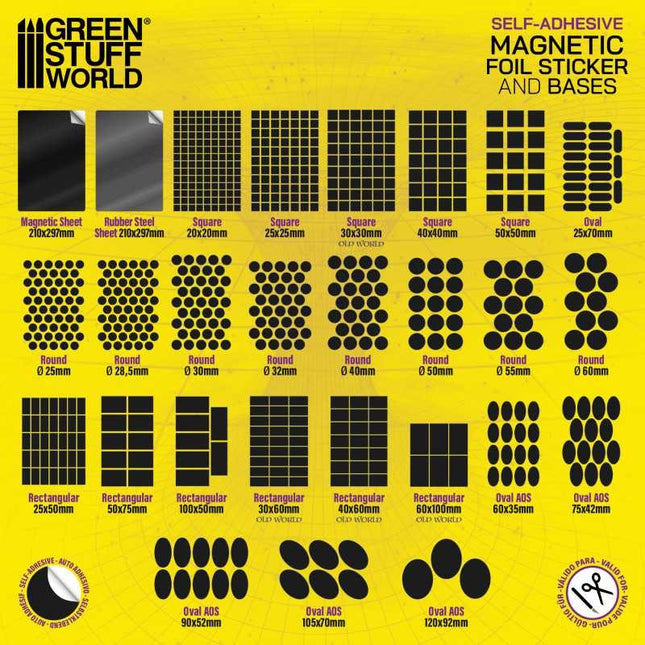
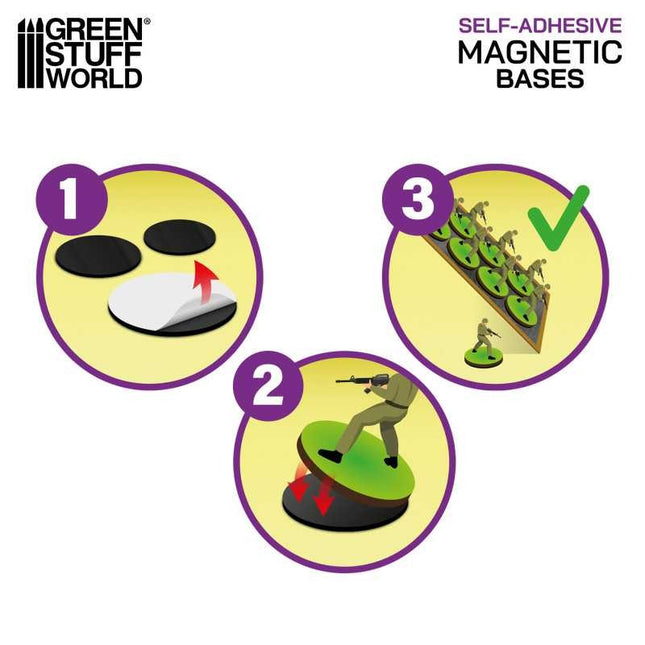
Rectangular Magnetic Sheet (zelfklevend) - 60x100mm
Magnetic Sheet - SELF ADHESIVE Self-adhesive flexible magnetic sheets provide a quick and simple way of magnetizing your wargames units without the necessity of drilling bases and gluing magnets. Square, rectangular, round, and oval most common shapes are available in a variety of sizes, but also as complete sheets to be cut to convenience with a pair of scissors or a craft knife. Use them alone, together with our rubber steel sheets, or together with our Neodymium Magnets depending on the attraction strength needed. Using magnetically-based figures allows you to field large units on the tabletop on their movement trays as one item. This removes the time spent moving figures one-by-one across the table. Even if the trays are knocked or tipped, you have a good chance of your figures staying attached and undamaged. Applying is very easy. Simply take the protective paper off the underside of the magnetic foil and stick it to the bottom of the bases. The thickness of the stickers is 0,9mm.
€3,75
-

Rectangular Magnetic Sheet (zelfklevend) - 40x60mm
Magnetic Sheet - SELF ADHESIVE Self-adhesive flexible magnetic sheets provide a quick and simple way of magnetizing your wargames units without the necessity of drilling bases and gluing magnets. Square, rectangular, round, and oval most common shapes are available in a variety of sizes, but also as complete sheets to be cut to convenience with a pair of scissors or a craft knife. Use them alone, together with our rubber steel sheets, or together with our Neodymium Magnets depending on the attraction strength needed. Using magnetically-based figures allows you to field large units on the tabletop on their movement trays as one item. This removes the time spent moving figures one-by-one across the table. Even if the trays are knocked or tipped, you have a good chance of your figures staying attached and undamaged. Applying is very easy. Simply take the protective paper off the underside of the magnetic foil and stick it to the bottom of the bases. The thickness of the stickers is 0,9mm.
€3,75
-

Rectangular Magnetic Sheet (zelfklevend) - 100x50mm
Magnetic Sheet - SELF ADHESIVE Self-adhesive flexible magnetic sheets provide a quick and simple way of magnetizing your wargames units without the necessity of drilling bases and gluing magnets. Square, rectangular, round, and oval most common shapes are available in a variety of sizes, but also as complete sheets to be cut to convenience with a pair of scissors or a craft knife. Use them alone, together with our rubber steel sheets, or together with our Neodymium Magnets depending on the attraction strength needed. Using magnetically-based figures allows you to field large units on the tabletop on their movement trays as one item. This removes the time spent moving figures one-by-one across the table. Even if the trays are knocked or tipped, you have a good chance of your figures staying attached and undamaged. Applying is very easy. Simply take the protective paper off the underside of the magnetic foil and stick it to the bottom of the bases. The thickness of the stickers is 0,9mm.
€3,75
-

Rectangular Magnetic Sheet (zelfklevend) - 50x75mm
Magnetic Sheet - SELF ADHESIVE Self-adhesive flexible magnetic sheets provide a quick and simple way of magnetizing your wargames units without the necessity of drilling bases and gluing magnets. Square, rectangular, round, and oval most common shapes are available in a variety of sizes, but also as complete sheets to be cut to convenience with a pair of scissors or a craft knife. Use them alone, together with our rubber steel sheets, or together with our Neodymium Magnets depending on the attraction strength needed. Using magnetically-based figures allows you to field large units on the tabletop on their movement trays as one item. This removes the time spent moving figures one-by-one across the table. Even if the trays are knocked or tipped, you have a good chance of your figures staying attached and undamaged. Applying is very easy. Simply take the protective paper off the underside of the magnetic foil and stick it to the bottom of the bases. The thickness of the stickers is 0,9mm.
€3,75
-

Rectangular Magnetic Sheet (zelfklevend) - 25x50mm
Magnetic Sheet - SELF ADHESIVE Self-adhesive flexible magnetic sheets provide a quick and simple way of magnetizing your wargames units without the necessity of drilling bases and gluing magnets. Square, rectangular, round, and oval most common shapes are available in a variety of sizes, but also as complete sheets to be cut to convenience with a pair of scissors or a craft knife. Use them alone, together with our rubber steel sheets, or together with our Neodymium Magnets depending on the attraction strength needed. Using magnetically-based figures allows you to field large units on the tabletop on their movement trays as one item. This removes the time spent moving figures one-by-one across the table. Even if the trays are knocked or tipped, you have a good chance of your figures staying attached and undamaged. Applying is very easy. Simply take the protective paper off the underside of the magnetic foil and stick it to the bottom of the bases. The thickness of the stickers is 0,9mm.
€3,75
-

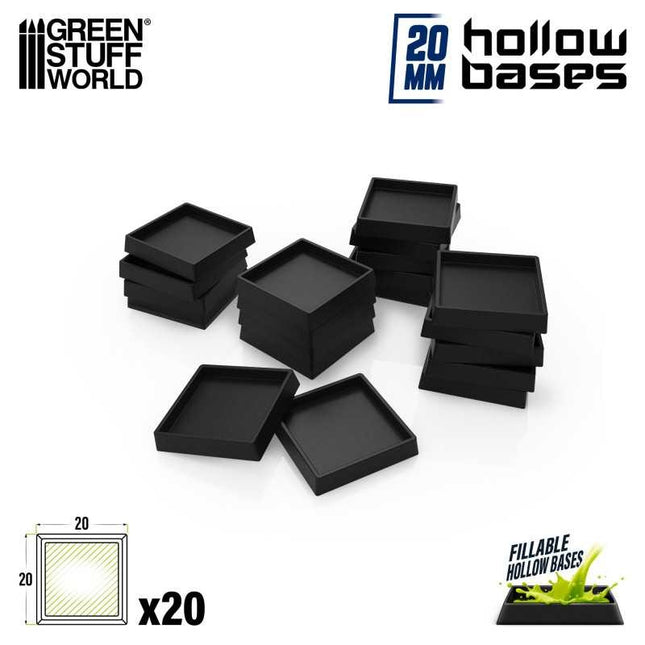
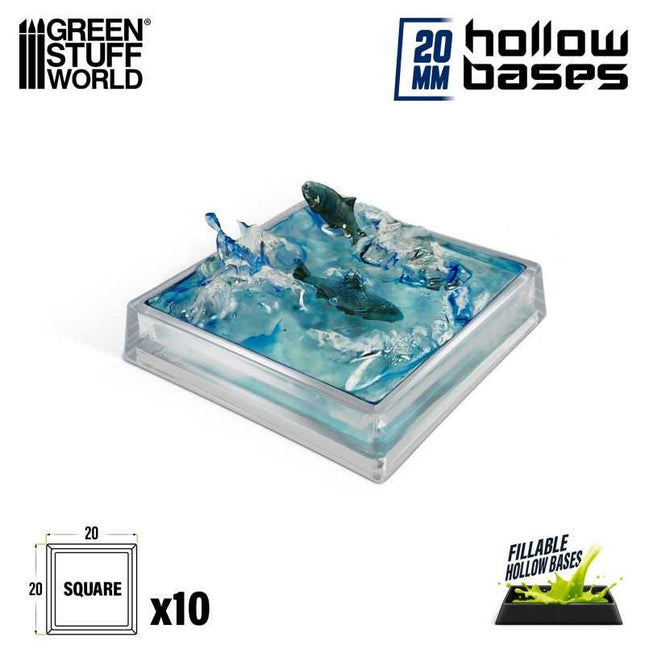
Black Plastic Bases - Square 20mm Hollow
Hollow Plastic Bases - BLACK Plastic bases bevelled and hollowed out on the inside to create water or swamp effects, or even to sink minis and recreate the effect of being in the water or swamp. Compatible with any wargame or board game. Each pack contains 20x 20mm square black plastic bases.
€3,45
-

Plastic clear Bases - Square 40mm Hollow
Hollow Plastic Bases -TRANSPARENT Top-quality plastic bases for mounting wargame figures. These bases allow you to place your model in multiple directions to create infinite possibilities and movements. Shape: Square Thickness: 3mm Color: Transparent Bases: 10 per pack
€3,85
-

Plastic clear Bases - Square 20mm Hollow
Hollow Plastic Bases -TRANSPARENT Top-quality plastic bases for mounting wargame figures. These bases allow you to place your model in multiple directions to create infinite possibilities and movements. Shape: Square Thickness: 3mm Color: Transparent Bases: 20 per pack
€3,85
-

Plastic clear Bases - Square 25mm Hollow
Hollow Plastic Bases -TRANSPARENT Top-quality plastic bases for mounting wargame figures. These bases allow you to place your model in multiple directions to create infinite possibilities and movements. Shape: Square Thickness: 3mm Color: Transparent Bases: 20 per pack
€3,85
-

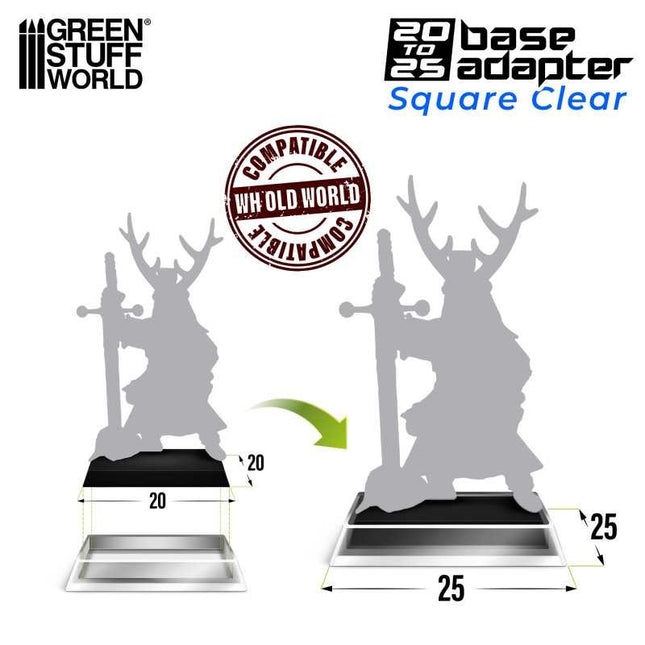
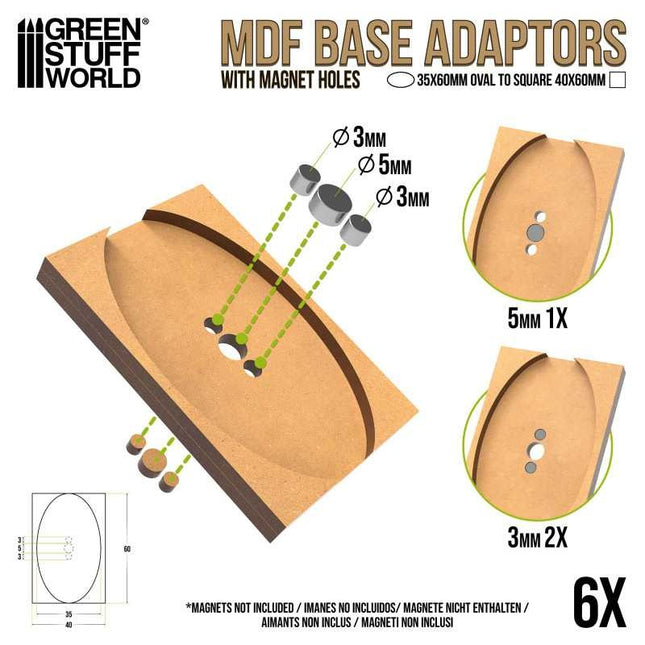
MDF Base adapter - Oval 35x60mm to Square 40x60mm
MDF Base adapter - Oval 35x60mm to Square 40x60mm Green Stuff World's shape shifting base adapters offer a unique and creative solution for using your miniatures in multiple games without having to overrun your entire army. An example would be adapting your AOS bases with Warhammer Old World bases. Cut in 3mm MDF wood with high precision laser with pre-cut holes to be able to magnetize with 5x2 or 5x3mm neodymium magnets. They require assembly of the top pieces for which we recommend PVA glue or cyanoacrylate glue. They are designed to be compatible with various wargames and board games, so they are suitable for a wide range of gaming systems. Whether you play fantasy, science fiction, history or other genres, they can add a touch of realism to your miniatures. In addition, they can serve as 50mm round to square base adapters. This feature is particularly useful as AOS adapters to Warhammer Old World bases, where the need to use old miniatures becomes a reality. The adapters have a normal MDF coloured part and a whitish part. The off-white part is created for better adhesion when gluing. Contains 6x adapters + 6x bases
€3,95€2,00
-

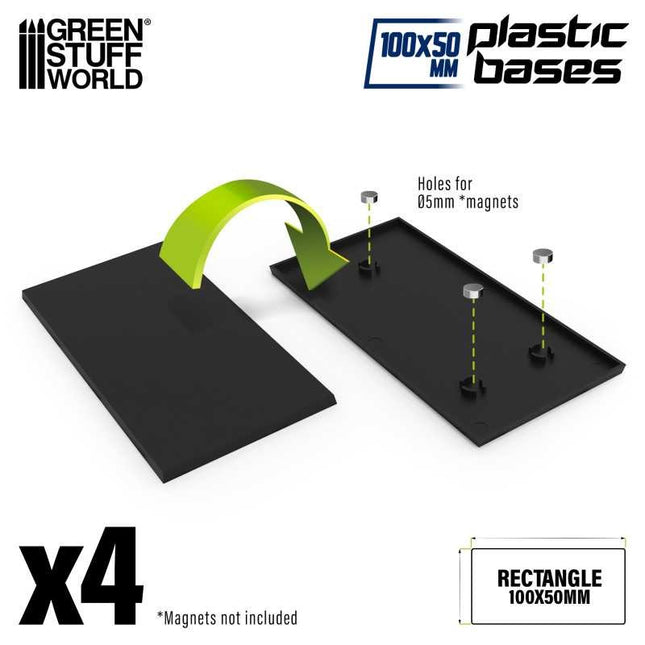
Black Plastic Bases - rectangular 100x50mm
PLASTIC BASES - RECTANGLE 100x50mm Top-quality plastic bases for mounting wargame figures. The back of these chariot bases have 4 holes to insert 5x2mm neodymium magnets. They can also be magnetized with magnetic sheets. Shape: RECTANGLE Thickness: 3mm Bases: 4 per pack
€3,65
-

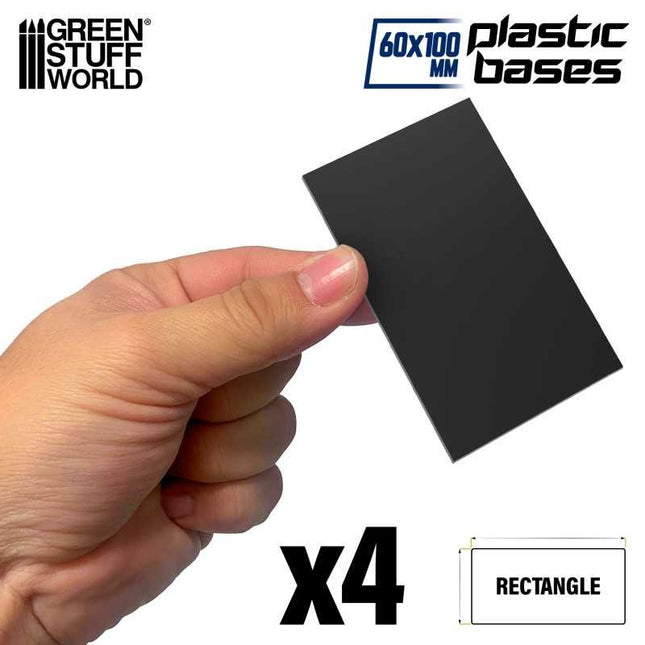
Black Plastic Bases - rectangular 60x100mm
PLASTIC BASES - RECTANGLE 60x100mm Top-quality plastic bases for mounting wargame figures. The back of these chariot bases have 4 holes to insert 5x2mm neodymium magnets. They can also be magnetized with magnetic sheets. Shape: RECTANGLE Thickness: 3mm Bases: 4 per pack
€3,85
-

Black Plastic Bases - rectangular 25x50mm
Plastic Rectangular Bases 25x50mm Set of rectangular plastic bases, ideal for use with traditional Warhammer cavalry units, as well as in other wargames or miniatures role-playing games. The back of these cavalry bases have 2 covered slots so you can open them and insert figures that have supports on the feet that need this type of coupling. They can be opened with hobby scissors, a hobby knife, a measuring ruler, or any other resistant metallic element. Shape: Rectangular (cavalry type) Thickness: 3mm Bases: 10 per pack
€3,45
-

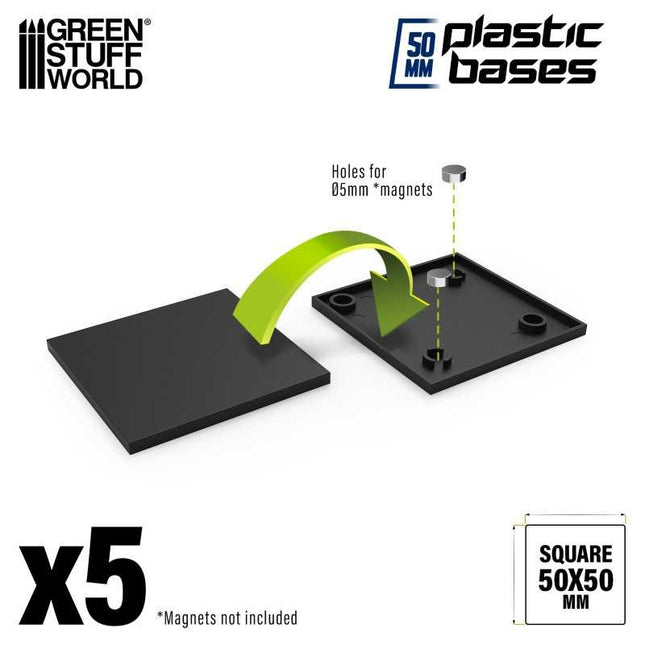
Black Plastic Bases - Square 50mm
Plastic Bases - BLACK 50mm Top quality plastic bases for mounting wargames figures. Shape: Square Thickness: 3mm Bases: 5 per pack
€3,55
-

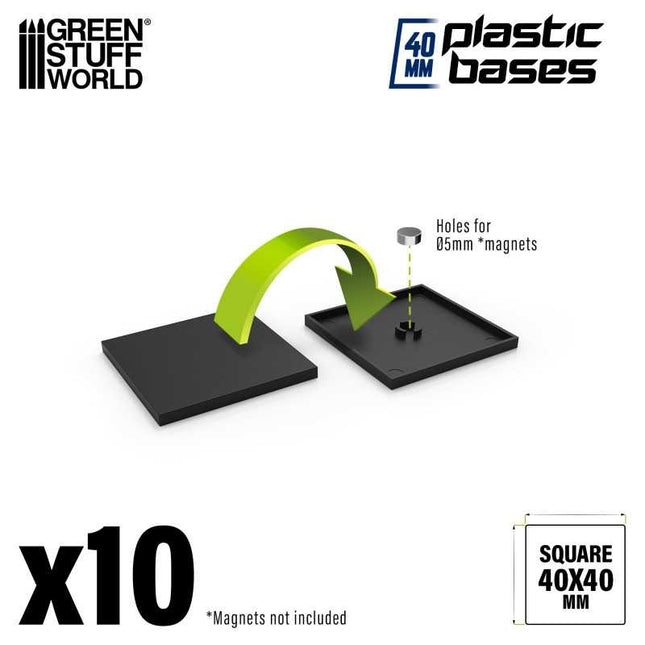
Black Plastic Bases - Square 40mm
Plastic Bases - BLACK 40mm Top quality plastic bases for mounting wargames figures. Shape: Square Thickness: 3mm Bases: 10 per pack
€3,50
-

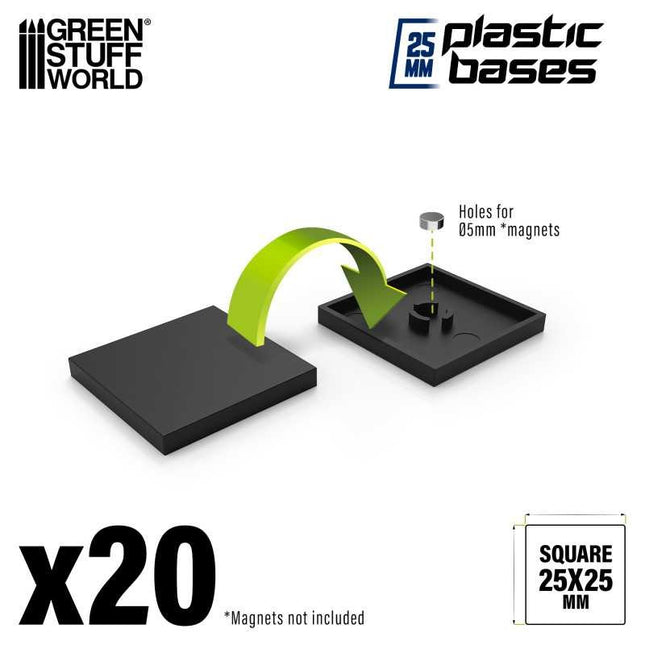
Black Plastic Bases - Square 25mm
Plastic Bases - BLACK 25mm Top quality plastic bases for mounting wargames figures. Shape: Square Thickness: 3mm Bases: 20 per pack
€3,45
-

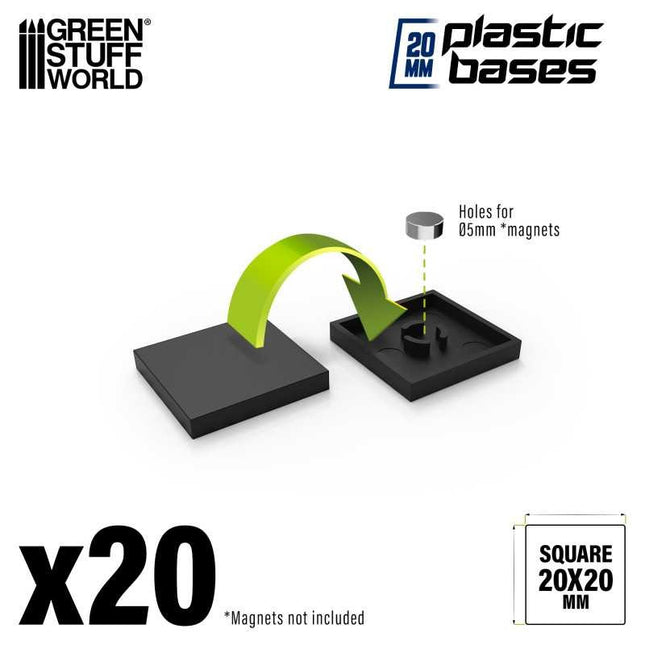
Black Plastic Bases - Square 20mm
Plastic Bases - BLACK 20mm Top quality plastic bases for mounting wargames figures. Shape: Square Thickness: 3mm Bases: 20 per pack
€3,45
-

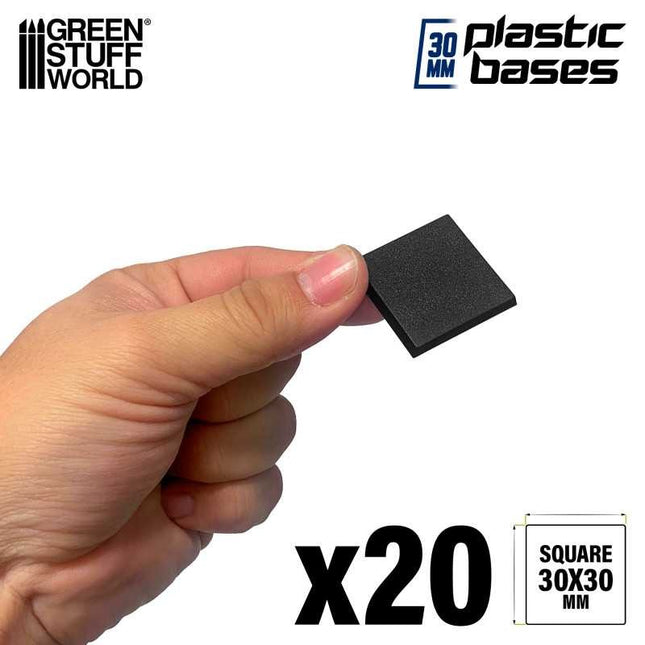
Black Plastic Bases - Square 30 mm
Plastic Bases - BLACK 30mm Top quality plastic bases for mounting wargames figures. Shape: Square Thickness: 3mm Bases: 20 per pack
€3,85
-

Square Magnetic Sheet (zelfklevend) - 50x50mm
Magnetic Sheet - SELF ADHESIVE Self-adhesive flexible magnetic sheets provide a quick and simple way of magnetizing your wargames units without the necessity of drilling bases and gluing magnets. Square, rectangular, round, and oval most common shapes are available in a variety of sizes, but also as complete sheets to be cut to convenience with a pair of scissors or a craft knife. Use them alone, together with our rubber steel sheets, or together with our Neodymium Magnets depending on the attraction strength needed. Using magnetically-based figures allows you to field large units on the tabletop on their movement trays as one item. This removes the time spent moving figures one-by-one across the table. Even if the trays are knocked or tipped, you have a good chance of your figures staying attached and undamaged. Applying is very easy. Simply take the protective paper off the underside of the magnetic foil and stick it to the bottom of the bases. The thickness of the stickers is 0,9mm.
€3,75
-

Square Magnetic Sheet (zelfklevend) - 30x30mm
Magnetic Sheet - SELF ADHESIVE Self-adhesive flexible magnetic sheets provide a quick and simple way of magnetizing your wargames units without the necessity of drilling bases and gluing magnets. Square, rectangular, round, and oval most common shapes are available in a variety of sizes, but also as complete sheets to be cut to convenience with a pair of scissors or a craft knife. Use them alone, together with our rubber steel sheets, or together with our Neodymium Magnets depending on the attraction strength needed. Using magnetically-based figures allows you to field large units on the tabletop on their movement trays as one item. This removes the time spent moving figures one-by-one across the table. Even if the trays are knocked or tipped, you have a good chance of your figures staying attached and undamaged. Applying is very easy. Simply take the protective paper off the underside of the magnetic foil and stick it to the bottom of the bases. The thickness of the stickers is 0,9mm.
€3,75
-

Square Magnetic Sheet (zelfklevend) - 40x40mm
Magnetic Sheet - SELF ADHESIVE Self-adhesive flexible magnetic sheets provide a quick and simple way of magnetizing your wargames units without the necessity of drilling bases and gluing magnets. Square, rectangular, round, and oval most common shapes are available in a variety of sizes, but also as complete sheets to be cut to convenience with a pair of scissors or a craft knife. Use them alone, together with our rubber steel sheets, or together with our Neodymium Magnets depending on the attraction strength needed. Using magnetically-based figures allows you to field large units on the tabletop on their movement trays as one item. This removes the time spent moving figures one-by-one across the table. Even if the trays are knocked or tipped, you have a good chance of your figures staying attached and undamaged. Applying is very easy. Simply take the protective paper off the underside of the magnetic foil and stick it to the bottom of the bases. The thickness of the stickers is 0,9mm.
€3,75
-

Square Magnetic Sheet (zelfklevend) - 25x25mm
Magnetic Sheet - SELF ADHESIVE Self-adhesive flexible magnetic sheets provide a quick and simple way of magnetizing your wargames units without the necessity of drilling bases and gluing magnets. Square, rectangular, round, and oval most common shapes are available in a variety of sizes, but also as complete sheets to be cut to convenience with a pair of scissors or a craft knife. Use them alone, together with our rubber steel sheets, or together with our Neodymium Magnets depending on the attraction strength needed. Using magnetically-based figures allows you to field large units on the tabletop on their movement trays as one item. This removes the time spent moving figures one-by-one across the table. Even if the trays are knocked or tipped, you have a good chance of your figures staying attached and undamaged. Applying is very easy. Simply take the protective paper off the underside of the magnetic foil and stick it to the bottom of the bases. The thickness of the stickers is 0,9mm.
€3,75
-

Square Magnetic Sheet (zelfklevend) - 20x20mm
Magnetic Sheet - SELF ADHESIVE Self-adhesive flexible magnetic sheets provide a quick and simple way of magnetizing your wargames units without the necessity of drilling bases and gluing magnets. Square, rectangular, round, and oval most common shapes are available in a variety of sizes, but also as complete sheets to be cut to convenience with a pair of scissors or a craft knife. Use them alone, together with our rubber steel sheets, or together with our Neodymium Magnets depending on the attraction strength needed. Using magnetically-based figures allows you to field large units on the tabletop on their movement trays as one item. This removes the time spent moving figures one-by-one across the table. Even if the trays are knocked or tipped, you have a good chance of your figures staying attached and undamaged. Applying is very easy. Simply take the protective paper off the underside of the magnetic foil and stick it to the bottom of the bases. The thickness of the stickers is 0,9mm.
€3,75
-

Silicone Painting mat with edges
Silicone Painting Mat with Edges Optimize your miniature painting experience with our silicone painting mat with Edges, designed for total safety and comfort. It includes strategically designed containment edges, and this painting mat prevents unwanted paint spills, keeping your work area clean and tidy. This article not only offers you protection from spills but also maximizes your efficiency with its multiple functional features. With a capacity for up to 12 paint pots of different sizes, from 12ml to 60ml, you'll always have your colors within reach. In addition, it features two paint palettes with 11 slots each, giving you ample space to mix and test colors. For added versatility, this article includes several multi-purpose recesses of different sizes, as well as two dedicated areas for storing up to 16 hobby paintbrushes, keeping them organized and ready for use. Plus, in the top area, you can easily attach our Brush Rinser to conveniently clean your brushes. Made from high-quality silicone, this is embossed and it is non-slip, easy to clean, and soft to the touch, giving you a pleasant and hassle-free working experience. In addition, its work/painting space fits perfectly with standard size 450x300mm cutting mats, allowing you to integrate other modeling tools according to your needs. This item is easily washable, which even allows you to paint on it and practice mixing and color testing. You can clean it with a little alcohol. With painting mats, take your modeling art to the next level with confidence and peace of mind. Get the most out of every painting session with this must-have tool for any modeling enthusiast - get yours today and experience the difference! This product has an optional assembly by adding a 450x300mm hobby cutting mat also available in our official store. The compatible articles that we sell are also foldable and can be inserted in the center when tougher jobs that may damage the silicone are required. WARNING:Do not cut with sharp tools or cutters on this as this could irreversibly cut it.This product is not a cutting mat, but it is compatible to be used with them at the same time.
€22,50
-

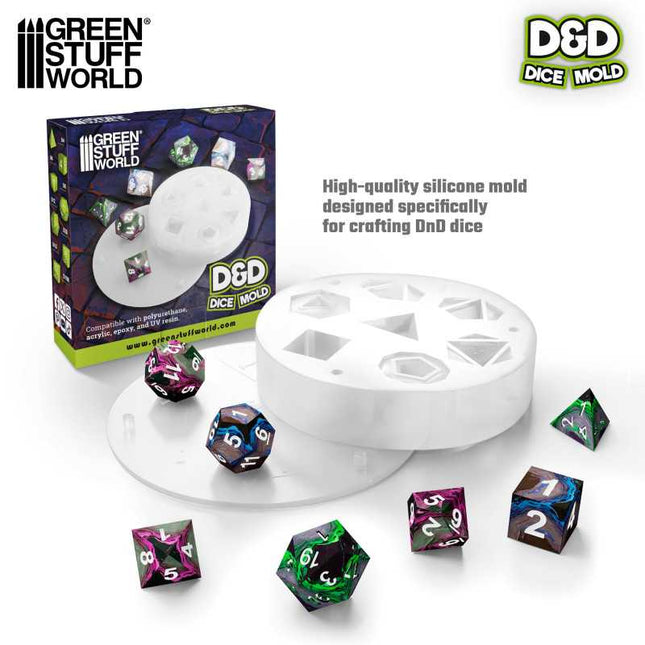
Custom dnd dice mold
DnD dice mold 102x102 This DnD dice mold set introduces a high-quality silicone mold designed specifically for crafting D&D dice. Crafted with precision, this Dnd dice mold is compatible with a variety of resin types, including polyurethane, acrylic, epoxy, and UV resin, as well as wax, soap, polymer clays, and more. It serves as an indispensable tool for tabletop gaming enthusiasts and DIY hobbyists seeking to create their custom dice sets. You can create a complete collection of RPG dice tailored to your preferences and colors. Heat resistant to 200ºC. Content: 1 mold to create pieces with the following shapes: 4-Sided6-Sided8-Sided10-Sided12-Sided20-Sided100-Sided WARNINGS: Small bubbles may appear in the mold depending on the material. Apply heat to remove them. Alternatively, you may also use a toothpick or other pointed tool to assist in bubble extraction. When filling the mold, allow the resins to overflow to ensure well-formed dice. The excess can then be sanded and polished. It is advisable to place the mold lid slowly and laterally. Never all at once. Clean the mold after each use to avoid color contamination between castings. #greenstuffworld #silicone #dice #mold #dnd
€5,50
-

Zwarte ronde bases 40mm met lip
Plastic Bases - Round Lip 40 mm Top quality plastic bases for mounting wargame miniatures. Shape: Round Thickness: 3mm Color: Black Bases: 10 per pack Let op met een klein opstaande rand zodat de base gevuld kan worden met een texture, hobbyzand of static grass etc
€3,50
-

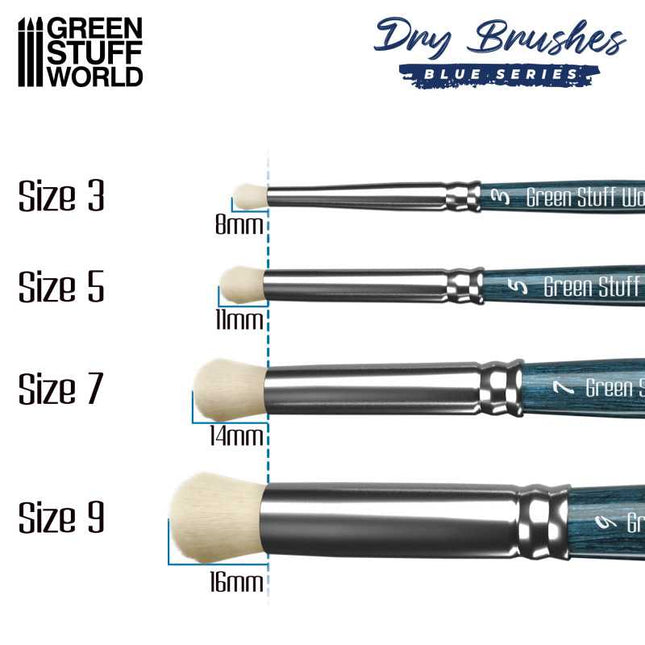
Premium Dry Brush set
Dry brush painting paint set GSW's premium range of BLUE SERIES brushes is meticulously crafted by hand using only the finest quality materials, and they are used to create a textured effect by spreading a minimal amount of paint thinly across the surface, highlighting raised areas and producing shadows. They are versatile tools that can be used to add depth and dimension to your artwork. Dry brushing brushes are a type of brush used in modeling in order to make the drybrush technique where only a minimal paint is used and the excess moisture is removed. This technique is popular in various art forms, including miniature painting, ceramics, and canvas painting. The bristles of dry brushing technique brushes are typically bigger and round, making them capable of withstanding hard dry brushwork that would normally break a normal one in a few uses. This technique produces a distinctive, textured effect, creating highlights and shadows on the raised areas of a surface. These brushes are ideal for creating weathered or aged effects, adding subtle highlights to miniature models, and creating texture in art pieces. With a light touch and minimal acrylic paint, dry brushing technique brushes can add depth and dimension to your artwork.
€25,00
-

Color Shaper Red size 2 Extra Firm
Colour Shapers Brushes SIZE 2 - EXTRA FIRM They are excellent tools to sculpt and add incredible effects when modeling and sculpting with different putties, clays, and fimo. They are somewhere between a brush, a palette knife, a modeling tool and your fingers. Easy-to-clean and long-lasting. Non-absorbent. This is the extra firm version of the black silicone brushes. They would be twice as hard as normal firm brushes. This set is including 5 different brushes with 5 different tips with 8 mm length by 5 mm width - SIZE #2 Hardness: EXTRA FIRM (very hard)
€12,00
-

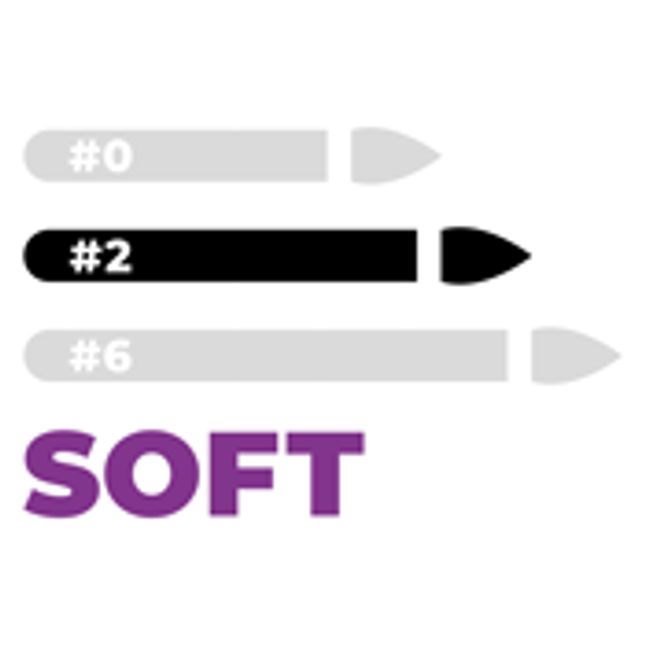
Color Shaper White size 2 Soft
Silicone Brushes – Colour Shapers WHITE are excellent tools to sculpt and add incredible effects when modeling and sculpting with different putties, clays and fimo. They are somewhere between a brush, a palette knife, a modelling tool and your fingers. Easy-to-clean and long lasting. Non absorbent - Silicone tips in colour white (SOFT hardness) This set is coming with 5 different brushes with 5 different tips with 8 mm length by 5 mm width - SIZE #2 Green Stuff World recommend BLACK FIRM brushes for less experienced users.
€12,00